Showing posts with label Vintage Labels. Show all posts

Friday, September 12, 2014

Just Add Ink 231

Hello there,
well despite Father's Day here in down under being last Sunday I have two more Father's Day cards for you this week - it's a two for one day today - lol! As it just happens the new Just Add Ink challenge this week is a Just Add a Colour Combo challenge and the colours were just what I needed for both cards. Here's the combo provided by Mae this week.


This first one was for my DH, you can probably guess it does something special (I always make either his Father's day card or birthday card - both in the same month (groan) interactive). It's a slider (or surprise pop up card). You can find a tutorial on the Splitcoast Stampers site here.

Starting to open up.
A little bit more.
Open all the way from the side.
And finally the inside.

And here's the one I made for my FIL. No interactive elements in this one but my FIL assured me he loved it.


I was wracking my brains trying to think of some way to finish off the bottom of the front panel when using the fringe scissor occurred to me - very pleased it did as I think it works great!

So there you go - two guy cards from the same colour combo - Fathers Day mission accomplished - on schedule - phewww!

Hope you join us for this great colour challenge. Do check out the rest of the DT for lots of fabulous colour inspiration.

Thanks for visiting,
Kim

Recipe: All SU! unless noted otherwise
Card 1:
Stamps: Positively Chevron, Teeny Tiny Sentiments, Alphabet (Rotary), Metro Type Alphabet, Back to Basics Alphabet, Peachy Keen (R), Vintage Labels (PaperTrey Ink)
Cardstock: Bermuda Bay, Basic Black, Crushed Curry, Whisper White
Ink: Bermuda Bay, Crushed Curry, Tuxedo Black (Memento)
Accessories: Starburst framelits, Hearts Collection framelit, Finishing Touch Edgelit, Regals Background DSP stack, Itty Bitty Accents punch pack, Owl Builder punch, Regals Candy dots, Bermuda Bay 1/8" taffeta ribbon, Dimensionals, Double sided tape (X press)

Card 2:

Stamps: Metro Type Alphabet, World's Greatest (R), Hello Sunshine (PaperTrey Ink)
Cardstock: Bermuda Bay, Basic Black, Crushed Curry, Whisper White, Vellum
Ink: Bermuda Bay, Black Stazon, Crushed Curry
Accessories: Starburst framelit, Fringe scissors, Mat Stack one layerz, Crushed Curry Baker's twine, Vellum tape (Scotch), Dimensionals, Double sided tape (X Press)

Tuesday, July 30, 2013

Merry Monday July - Blue banners

Hello there,
well finally I've managed to squeeze a Christmas card out of July to add to Merry Mondays July challenge. I actually made this one nearly two weeks ago but between school holidays, being away because of school holidays, and then dealing with sick kids - again! that was as far as I got. It's a simple one but hope it has a touch of elegance too. The design was influenced by this Merry Monday sketch.

I pulled out a retired SU blue for this one - Blue Brocade and then ransacked my DSP collection for some patterns to match. A bit of satin ribbon and subtle embossing on the front panel once I'd stamped the sentiment finished it off.

If a miracle happens I might just pull one more Christmas card for July off - but don't hold your breath!

Thanks for visiting,
Kim

Recipe: All SU! unless otherwise noted
Stamps: More Merry Messages, Vintage Labels (Papertrey Ink)
Cardstock: Blue Brocade, Very Vanilla
Ink: Blue Brocade(R)
Accessories: Linen/Canvas impression plate (PTI), Fishtail Flag and Fishtail Layers Stax (My Favorite things), Bella Bleu DSP (R), Very Vanilla satin ribbon (R), Jewels - pearls, Double sided tape (X Press), SNAIL adhesive

Friday, May 17, 2013

JAI 166 Just add a colour combo

Hello there,
well welcome back for a special two week - lots of the JAI team are away at the South Pacific SU! convention challenge - you can't tell we are excited about that can you  - lol. Ok so what is the Just Add Ink challenge? - well its a lovely colour combo.

And here is what I came up with.(Apologies about the dull lighting - with winter coming on here in Aus the window for decent lighting is pretty narrow :( )

The top down foliage, if I can put it that way, was inspired by I card I saw a few weeks ago on Pinterest. I was intrigued and I must admit I'm glad I had a play with the idea - cause it turned out nice! To lighten up the colours I added a lot of the detail by white embossing, and of course you get that lovely shine and texture as a bonus. To fill in the gaps between the larger flowers I added little punched ones dressed up with pearls.

This is a lovely colour combo - it has such a fresh feel. Do check out the rest of the DT for some fabulous inspiration. Hope you can join us!

Thanks for visiting,
Kim

Recipe: All SU! unless otherwise noted
Stamps: Fabulous Florets, (Think Big Favorites #12, Vintage Labels - PaperTrey Ink)
Cardstock: Midnight Muse, Lucky Limeade, Crumb Cake, Whisper White
Ink: Lucky Limeade, Midnight Muse, Versamark
Accessories: Tea for Two DSP, Adorning Accents Edgelits, Adorning Accents Folder, Boho Blossom punch, White embossing powder, Heat gun, Midnight Muse stitched satin ribbon, Lucky Limeade bakers twine, Jewels - pearls, Glue dots, Dimensionals, Double sided tape (X Press)

Friday, May 3, 2013

JAI 164 Just add a sketch

Hello there,
well after a bit of a break (in Hawaii no less) its back to catching up with my design team challenges. I enjoyed the change of pace but it was nice to come home and get inky again :) I've also been delving into SU! My Digital Studio - what a learning curve! But I really love the possibilities it offers. May'be I'll even get to put together a photo book on the holiday!

Anyway onto this weeks Just Add Ink challenge. This week we want you to add a sketch. 
This how mine worked out.

May'be the warm weather in Hawaii inspired the springy feel of todays offering! In a bit of a doh momment I only realised as I was overlaying the trimmed out elements that of course they wouldn't overlay perfectly as I'd cut the bottom coloured panel up and spaced it out as a grid. To minimise this I had to cut the two larger sprays into much smaller pieces. I also wanted to leave some of the grid visible so you can see designs origin from the sketch. I used the ink pad lids and my aquapainter for all the colouring. 

I wanted something special for my Mum's birthday and I think this fits the bill. Even if outside the window we have a carpet of colourful autumn leaves on the ground!

Thanks for visiting,
Kim

Recipe: All SU! unless otherwise noted
Stamps: Elements of Style, Everything Eleanor, Layered Labels, Vintage Labels (R)
Cardstock: Riding Hood Red, Baja Breeze, Whisper White
Ink: Riding Hood Red, Baja Breeze, So Saffron, Basic Black
Accessories: Large oval and scalloped oval punches, Subtles Designer Series paper stack, Aqua painter, Jewels - rhinestones, Dazzling Diamonds, Two way glue pen, Dimensionals, Double sided tape (X Press)

Friday, April 19, 2013

JAI 162 Just add a technique you have never tried before

Hello there,
well we have a fun challenge for you at Just Add Ink this week. It's Just add a technique you have never tried before. Now I've been paper crafting for a good 7 years and there are always lots of things I still have on my try one day list. So this is a good time to check your list and then go play!!
 

As you can see I just couldn't resist taking the "chalkboard" technique for a spin. I had stamps sets all over the table mixing and matching and playing with the arrangement till I was happy. It was lots of fun though and very effective. The mix of white embossing, white ink and white (and coloured pencil) adds so much detail and depth. I might have got a bit carried away with some of my doodling though! As my starting point I checked out a great tutorial by Betsy Veldman, you can find it here.

So why don't you join in the challenge this week and have some fun trying out something new! Don't forget to check out the rest of the DT for some awesome inspiration too :) Thanks for visiting,
Kim

Recipe: All SU! unless otherwise noted
Stamps: Vintage Labels, Mini Blooms, Fillable Frames #11, Half and Half, Tiny Tags, Big Birthday Wishes, Just the Ticket
Cardstock: Melon Mambo, Pretty in Pink, Whisper White, Basic Black
Ink: Melon Mambo, Pretty in Pink, Basic Black, Versamark, Whisper White
Accessories: (Half and Half dies, Fabulous Frames die, Raseberry Fizz patterned paper - all Papertrey Ink) Itty Bitty shape punches, White embossing powder, Rhinestones SU! and Kaiser, white and pink pencils, sewing machine, Dimensionals, Double sided tape (X Press)


Friday, April 5, 2013

JAI 160 Just add inspiration

Hello there,
I hope everyone enjoyed the break at Easter. I love having the luxury of some time at home just to putter around and get some of those - I'll do one day - jobs done. And some chocolate to go along with it doesn't hurt either ;) This week at Just Add Ink we have a Just Add Inspiration challenge for you. Here's the pic.

Just recently, all of sudden in fact, Autumn just kicked in. I must admit I love Autumn weather - that cool tingle in the morning and the warm, but not too warm sun during the day - just lovely! Anyway that's what this photo made me think of. But what I really wanted to add in was lots of that texture and then some tinges of colour. I went with pink (cause this was going to a friend who likes a hint of pink) and I reckon if your squint there is a hint of pink in the inspiration photo.


I wanted to bring in texture through embossing but also using some lovely natural ribbon. I even stamped a lace pattern on one! I also inked up the embossing folders to get some extra contrast. I must admit I couldn't resist using a doily too - have you noticed them popping up? Definitely a favourite with me at the moment. It was fun to build this one to play with the elements and I did love mixing and matching all the bits.

Hope you get the chance to play along and see where inspiration leads you - a good starting point is to check out the rest of the DT for some fabulous ideas.

Thanks for visiting,
Kim

Recipe: All SU! unless otherwise noted
Stamps: Delicate Dollies, Oh Hello, Viola's Lace, Vintage Labels (R)
Cardstock: Crumb Cake, Sahara Sand, Very Vanilla, Soft Suede
Ink: Crumb Cake, Soft Suede, Pretty in Pink, Regal Rose, Vintage Cream (PaperTrey Ink)
Accessories: Hearts a Flutter framelit, Two step Bird punch, Corner rounder (R), Embossing folder (Lacy Brocade, Delicate Designs), Natural 7/8" cotton ribbon, Natural 7/16" Trim ribbon, Blushing Bride pleated satin ribbon (R), 5/8" Flower trim, Vintage trinkets, sewing machine, SNAIL adhesive, Double sided tape (X Press)


Friday, March 8, 2013

JAI 156 Just add a colour combo

Hello there,
thankfully this weekend was a bit more relaxed than the last few - mostly. I did try my first zumba class - and survived - lol!  With no events planned I seized the chance to use some new stamping goodies, which is what I also did for this weeks Just Add Ink challenge. And this week we have a colour challenge for you.
How to mix these colours did take a bit of pondering.But I knew I needed a thank you card for a friend so that was the goal.

I was itching to play with my honeycomb folder so that came out, I rubbed some white ink over the embossing to bring the pattern out and then dripped and sprayed a shiny spray mist over it. The thanks went centre stage in a recessed oval accented with a flourish and some flowers. Some ribbon and buttons finish it all off. So sweet, CAS - my way that is and with lots of texture - love that!

Thanks for visiting,
Kim

Recipe: All SU! unless otherwise noted
Stamps: Oh, Hello, Vintage Labels
Cardstock: Bashful Blue, Raseberry Ripple, Whisper White
Ink: Early Expresso, Bashful Blue, Raseberry Ripple, Whisper White
Accessories: Honeycomb embossing folder, Ovals Collection framelits, Naturals Designer Buttons, Early Expresso bakers twine, 1 1/4" Bashful Blue stitched grosgrain ribbon (R), Calico Shine spray ink (Mister Huey), Jewels - pearls, Dimensionals, Double sided tape

Friday, October 19, 2012

JAI 140 Just add chevrons

Hello there,
well life is returning to its familar patterns here with the return to school and I'm hoping that means I will be able to return to my familiar patterns of stamping :) I did seize the chance before the chaos of the holidays to prepare something for this weeks Just Add Ink challenge which is - Just add chevrons. Sounds like fun doesn't it! Here is what I came up with in a late night change of mind brainstorm.

This was not what I originally had in mind, in fact my plan was to have used the thin border chevron die cuts. But as I cut them and then lined up my rainbow of colours (did you pick the rainbow sequence ?) I noticed the pattern of the negatives, and then my eye fell on my floral framelits - and so this card came about. With the idea there I just had to make it and so once I had my Mr 4 asleep I pulled out all my bit and pieces and got to work. I was a happy camper when it was done :) Tired but happy. Actually just looking at the colours makes me smile.

Hope you can have as much fun as me when you add chevrons this week! Don't forget to check out the awesome ideas that the rest of the JAI DT have come up with.

Thanks for visiting,
Kim

Recipe: SU! unless otherwise noted
Stamps: Daydream Medallions, Vintage Labels (R)
Cardstock: Daffodil Delight, Whisper White, Basic Black
Ink: Real Red, Daffodil Delight, Basic Black
Accessories: Floral Frames Framelits, 1 3/8" circle punch, Classic circle nestabilities (Spellbinder), Chevron border die (Papertrey Ink), Brights, Subtles, Regals pattern stacks, Brights buttons, Linen thread, Old Olive grosgrain ribbon (R), SNAIL adhesive, 2 way glue, Dimensionals, Tombow multi

Friday, October 14, 2011

JAI 89- just add inspiration


Well hello there,

I've been enjoying a few days holiday in Sydney squeezing in some shopping for me :) and beach visits to the kids delight. But even better was the chance to meet up a with a really lovely stamping friend Di Barnes. Hi Di :) As it happens the card I made for todays challenge is the one I gave to Di for her birthday. So what is the Just Add Ink challenge this week? Well cast your eyes down at the photo below as the this weeks challenge is an inspiration photo.


What a gorgeous scene! There are so many things to inspire in this photo! I decided I wanted to reflect the colours and how the tree seems to spread both up and down. So here is the end result.

As you can see I had a lot of fun using some still new crafting goodies. Usually I shie away from lots of white but it just seemed to work for this project. So I started by impressing a pattern on my front white panel. Then I stamped the large leafy flourish twice after working out where I wanted my central frame to go. Then embossed my black frame, trimmed it out, and then stamped my butterfly and sentiment. The butterflies were all inked up using markers and I used a blender pen to just blur the colours together a little. Another butterfly was mounted on top, embellished with a rhinestone and a few more rhinestones scattered about. That top white panel was mounted on dimensionals above the base card.

I was quite pleased how this one turned out - definitely more CAS than usual for me.

Thanks for visiting and do try and check out the other DT members as it will really inspire you!
Kim
Recipe: All SU! unless otherwise noted
Stamps: Creative Elements, Vintage Labels (R)
Cardstock: Whisper White, Basic Black
Ink: Stazon Black, Daffodil Delight, Pumpkin Pie, Tangerine Tango, Real Red, Basic Black
Accessories: Designer Frames embossing folder, Corner rounder punch, Linen/Canvas impression plate (PaperTrey Inc), Jewels - rhinestones, Dimensionals, Double sided tape

Friday, July 29, 2011

JAI 78 - Just add a colour combo

Hello there,
despite being in the depths of winter, with a -5oC night expected I felt like we had a touch of spring around today - firstly the sun was shining (mostly) and even more springy was that I noticed the first daffodil bud in the garden - its probably still a couple of weeks off blooming but its a nice sign of times to come! (also coming with Spring is our new SU! catalogue - also something to look forward to eh!!). My card today has a touch of autumn/winter to it inspired by the lovely colour combo challenge we have for you at Just Add Ink this week. Here it is.


I thought these colours would be perfect for a card for my Dad, and with Father's Day coming up down here in AUS in September I decided to try and get organised early. I also had a brand new set that I was very keen on inking up (French Foliage) so here is the result.
The inside

I started by stamping a panel of Very Vanilla all over with leaves inked first in Certainly Celery then rock and rolled in Not Quite Navy, I also added the text image in Sahara Sand, and spoltches in stamped off Chocolate Chip. That was mounted on a Chocolate Chip base.  Next I stamped a large branchy tree in Chocolate Chip on Vanilla and trimmed it out. I mounted that to the side of another Vanilla panel that I stamped with an assortment of sentiments to make up the message to my Dad. That Vanilla panel was mounted on top of a Choc Chip mat that had been embossed with the Square Lattice embossing folder. To finish off the front of the card I wrapped linen thread across the front, and added two little Not Quite Navy birds. The inside was stamped and matted to match the front.

Thanks for visiting, this is a really lovely colour combo so if you get the chance why don't you give it a go this week.

Kim

Recipe: All SU! unless otherwise noted
Stamps: French Foliage, Vintage Labels(R), Teeny Tiny Sentiments (SU!), Through the Trees, Tiny Tags, Botanical Silhouettes (Papertrey Inc)
Cardstock: Very Vanilla, Chocolate Chip
Ink: Certainly Celery, Not Quite Navy, Sahara Sand, Chocolate Chip
Accessories: Square Lattice embossing folder, Large Labels (Spellbinder), Linen Thread, Silver brad, Dimensionals, Double sided tape (X press)

Tuesday, February 8, 2011

Inkspiration 56 - A rose for you


Hi all,

this week I feel busy, like seriously up to my eyeballs busy! My Miss 6 is starting "big" school and I have had to sew all the name tags into her clothes (I'm not a natural born seamstress folks), I have made invitations to the kids birthday party (just simple but it takes time), Mr almost 3 has got a cold and needs lots of Mumma cuddles (OK no complaints from me about that - I love my cuddles). I still have to wrap all his presents (he will be Mr 3 on Saturday!) Oh and I'm preparing for my first workshop in a year!! Looking forward to it though :) AND now I have Mr almost 3's cold - sniff sniff drip :( Hmm doesn't sound like that much but trust me I'm finding it hard to find time to breathe!! (but that could just be my drippy nose - lol).

OK now onto the stamping (which I did manage to squeeze in and I'm so glad I did) as ooh I have got to tell you Makeesha set a gorgeous colour challenge this week!! A really nice combo to play with, here it is.


I have been meaning to try making a rose using the Fancy Flower punch for a while, and one of my fabulous Just Add Ink DT colleagues (Tania Gould) has posted a fab tutorial about it so I decided Cherry Cobler was just the right colour and went from there.


I've been feeling very vintagey lately so bear with me if I post alot along that theme. For this card I decided to make a scalloped circle easel card, so I cut one Baja Breeze circle for the top and a joined scallop circle card base also in Baja. Cut a Cherry Cobler mat and then a Whisper White one. I cut some Parisian Breeze DSP for the bottom half of the front, and stamped En Francais on the top half (Baja Breeze stamped off once.) Then I added a thin strip of Newsprint DSP rumpled along the join between the two. I also sponged Cherry Cobler around most of the layers.
I used Tania's tutorial to make a rose out of Cherry Cobler, I crumpled all the bits before rolling them into shape. I also sponged Cherry and a light coating of Black on the edges of the petals, once it was all put together I also gave the rose and the black swirls a light misting with Silver Glimmer Mist (a Secret Santa pressie from Tania - how appropriate is that ;)) Then added a pearl. I continued the vintagey, swirly feel through to the inside. Not sure who it's going to yet but I have two possible lovely ladies in mind - I might have to toss a coin!

I have to admit I really like how this one turned out - hope you like it too :)

Thanks for visiting,
Kim

Recipe: All SU!(unless otherwise noted)
Stamps: En Francais, Teeny Tiny Sentiments, Vintage Labels (R)
Cardstock: Baja Breeze, Cherry Cobler, Whisper White Basic Black
Ink: Baja Breeze, Cherry Cobler, Basic Black
Accessories:Scallop circle BigZ die, Fancy Flower punch, Large Oval punch, Circle Nestabilities (Spellbinders), Swirls and Scribbles sizzlet, Lots of Tags sizzlet, Newsprint DSP, Parisian Breeze DSP (R), Jewel - pearls, Crystal effects, Silver Glimmer Mist, Dimensionals, Double sided tape, SNAIL adhesive, sponge

Thursday, January 13, 2011

Just Add Ink 51 - Just Add Monochrome


Hi there,

how did you go with the Just Add Ink colour challenge last week ?? I saw some awesome entries as I was browsing through the entries. Ok we have a new challenge for you this week and its also about colour - Just Add Monochrome. I do tend to migrate to greens and blues so I knew it was going to be one of them but which one. In the end I couldn't get green out of my head so this is what I did with it.


I started by inking up my large leafy stamp in Certainly Celery, then rock and rolling it in Old Olive. Then I carefully trimmed it out. I wanted a feature panel for the leafy branch to spread across, and then DSP behind that. So I set to work sorting out the layout and layers. In the end I settled on a crosshatched pattern from the Celebration DSP. I couldn't resist adding some Celery and Old Olive buttons to embellish the branch, and to the striped Old Olive grosgrain. The inside was just simply stamped with another rock and rolled branch like the front to finish it off.


Ahh I love greens and I do really like this card - yippee :)

Thanks for visiting,

Kim

Recipe: All SU! unless otherwise noted
Stamps: Vintage Label (R), Turning a New Leaf (PaperTrey Inc)
Cardstock: Certainly Celery, Old Olive, Whisper White
Ink: Certainly Celery, Old Olive
Accessories: Bright and Subtles buttons, Striped Old Olive grosgrain ribbon, Celebration DSP, White embroidery thread, Dimensionals, SNAIL adhesive, Double sided tape (X Press)

Tuesday, November 30, 2010

Inkspirations 50 - A Little More Christmas


Hi all,

this week Makeesha set a colour challenge I just couldn't resist - even though I was up to my eyeballs busy - we are well and truly in that mad crazy run up to Christmas! So want to see the tantilising colour selection? - here it is!


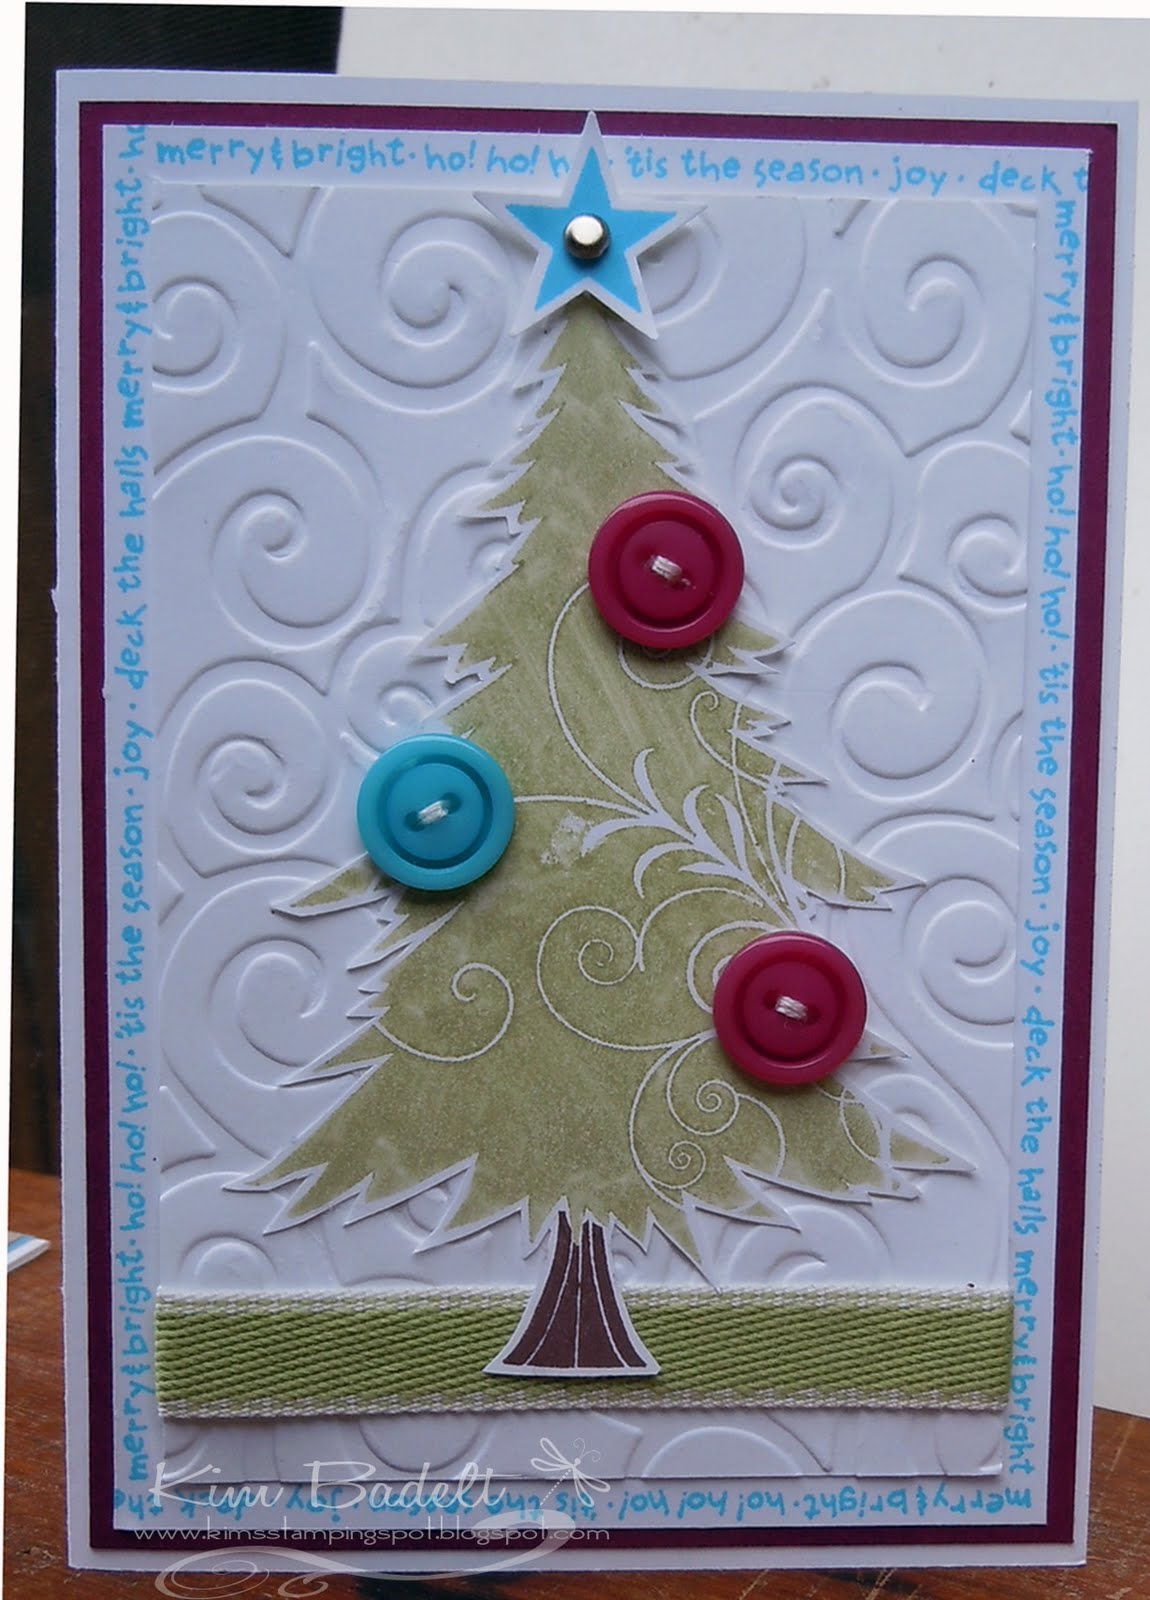
I was still in a Tree Trimming mood but wanted use the biggest Christmas tree in the set (PTI has a die for this tree but sadly mine is currently lost in mid Pacific limbo - ah well may'be it will arrive next week). My idea for the card kind of evolved as I went along but this is how it ended up.


Starting with a white base, I layered that with a Razzleberry mat, then added a white mat. I used a long Christmas sentiment stamp to add a Tempting Turquoise border all around the edges of this layer. Then I added another white mat - this one embossed with a swirl pattern to tie in with the tree image. For the tree itself I inked up the stamp with Pear Pizzazz and stamped on Whisper White, then masked the bottom so I could add a Choc Chip base. Then I trimmed the whole tree out and SNAILed it down over the embossed layer. I also added a strip of Pear Pizzazz ribbon to ground the tree. To finish the tree off I added a Turquoise star, and button and two Razzleberry buttons. The inside was finished off very simply with a decorated sentiment.

Thanks for visiting,
Kim

Recipe: All SU! unless otherwise noted
Stamps: Crazy for Christmas (R), Tree Trimming Trio (PaperTrey Inc), Vintage Labels (PTI)
Ink: Pear Pizzazz, Tempting Turquoise, Rich Razzleberry, Chocolate Chip
Accessories: Swirl cuttlebug embossing folder, Tempting Turquoise and Rich Razzleberry buttons, small Star punch (R), Silver brad, Pear Pizzazz 1/2" poly ribbon, white embroidery thread, SNAIL, Double sided tape