Thursday, January 31, 2013

Merry Monday #47 Tic Tac Oh!


Hello there,
I'm extremely time challenged for the next few weeks but I'm still determined to stick with my Christmas card a week goal. So I got stuck right in when I saw this weeks Merry Monday challenge. Mind you this week the challenge was a TicTac Toe square, a type challenge I've never done before! 


Where do you actually start or settle?? But settle I did on the first horizontal row - Blue, Dry Embossing and Snow.


I wanted to create a cluster of trees with the snow coming down and to get that effect I tried to partial emboss for the first time - and it mostly worked. I played with old and new for this. One of my oldest SU! sets, Lovely as a Tree and new embossing folder (for the lace border detail) and plate (for the snowflakes). Lots of white craft ink rubbed gently over the embossing brings out the snowflake and lace patterns. Spots of light come from the ribbon and sentiment strip and kind of balance out the darkness of the tree cluster (did you spot the little birdy I added in there ;). I couldn't help adding just a bit of sparkle too on the snowflakes and lace to finish it all off too.

Lots of inky fun in this one and I was pretty happy with how it came together :)

Thanks for visiting,
Kim 

Recipe: All SU! unless otherwise noted
Stamps: Lovely as a Tree, Tag it # 9 (PaperTrey Ink)
Cardstock: Not Quite Navy, Marina Mist, Whisper White
Ink: Night of Navy, Not Quite Navy, Marina Mist, White Craft
Accessories: Delicate Designs embossing folder, Bitty Banners framelits, Word Window punch, Peace be still Impression plate (Papertrey Ink), Whisper White organza ribbon, Dazzling Diamonds, 2 way glue pen, sponge, Doubled sided tape (X Press), Dimensionals

Friday, January 25, 2013

JAI 150 - Just add a sketch

Hello there,
hope you enjoyed the Big Shot blog hop last week, there was lots of fabulous inspiration to explore wasn't there! I've got a few things on my list to try! This week at Just Add Ink we have a great sketch for you.
And this is what I made for a friend of mine who need a little cheer up after some surgery.
I kept the inside clean and simple.
I used my copics to colour up the Pure Innocence image then trimmed it out and popped her up on dimensionals. I wanted her to be the star so I kept the rest of the card fairly simple just stamping a background pattern and adding a little ribbon.

Thanks for visiting,
Kim

Recipe: All SU! unless otherwise noted
Stamps: Better get better (My Favorite Things), Background Basics Tin Types (PaperTrey Ink)
Cardstock: Whisper White, Chocolate Chip, Pretty in Pink
Ink: Regal Rose, Pretty in Pink, Chocolate Chip, Tuxedo Black (Memento)
Accessories: Copic markers, Scallop border punch, Scalloped rectangle nestabilities (Spellbinder), White satin ribbon (R), sponge, Double sided tape (X Press), Dimensionals


Tuesday, January 22, 2013

Merry Monday 46

Hello there,
well I'm back with that guest designer gig ;) I mentioned the other day. I was delighted to be the top pick for Merry Monday #44 and as a result I get to bring you my take on Merry Monday #46. The Merry Monday challenge this week is to make a Christmas card using birds.
The first thing that sprung to my mind was birds = music so I knew I had to introduce some music in there and as I still had some music note DSP in my stash I pulled that out and then softened it by overlaying it with vellum cardstock.


Of course I had to have something for my birds to perch on - and what better for Christmas than a wreath. I embossed mine with Wild Wasabi embossing powder, then hung it up adding a layered bow. I added some border detail and then finished the whole thing off with a sentiment and some little pearls. I'm three Christmas cards up on my stash for this year now :) Don't forget to drop past Merry Monday and check out all the fabulous inspiration from the design team. Have fun with the challenge!

Thanks for visiting,
Kim

Recipe: All SU! unless otherwise noted
Stamps: Aviary, Welcome Christmas, Love Lives Here: Holiday (PaperTrey Ink)
Cardstock: Very Vanilla, Wild Wasabi, Rose Red, Vellum
Ink: Wild Wasabi, Rose Red, Crumb Cake, Versamark, Basic Black
Accessories: DSP (R), Scalloped dotted ribbon border punch, Rose Red seam binding, wild Wasabi stitched grosgrain, Victoria crochet trim, Wild Wasabi embossing powder, Vintage brad, Jewels - pearls, Double sided tape (X Press), Dimensionals


Sunday, January 20, 2013

Merry Monday 45 Golden Bells

Hello there,
well I managed to squeeze in the time for my second Merry Monday challenge. This week it was a sketch.
 I went a little vintage with this great sketch.
A close up to show you the embossing (gold and clear to get a reflecting shine effect - I hope - if not I like it regardless :) and shimmer on the background.
The inside - more golden bells.
So that's three cards for my 2013 Christmas stash. Yep that's right three. That's because I was top pick for last weeks Merry Monday  (delighted smile - has done my vanity no end of good!! ;) and if you drop past here on Tuesday you'll see what I came up with as guest designer for Merry Monday #46. Hope to see you then!

Thanks for visiting,
Kim

Recipe: All SU! unless otherwise noted
Stamps: Bell and Boughs (PaperTrey Ink)
Cardstock: Crumb Cake, Very Vanilla, Cherry Cobler
Ink: Crumb Cake, Cherry Cobler, Wild Wasabi, Garden Green, Versamark, Vanilla (PTI)
Accessories: Bells and Boughs die (PTI), Small scalloped circle and standard circle nestabilities (Spellbinder), Stripes embossing folder, Be of Good Cheer DSP, Gold and clear embossing powder, Pewter hodgepodge (R), Cherry and crumb Cake seam binding, Linen thread, Cherry cobler twine, sponge, Double sided tape, Dimensionals

Friday, January 18, 2013

JAI 149 Just add the Big Shot Blog Hop


Woohoo well we are back up and running at Just Add Ink for 2013 :) 
We decided to start the year off with a bang and begin with a Big Shot blog hop and of course the challenge this week for you is to Just add the Big Shot (or any die cutting machine) to your project. 

You may have arrived from the very talented Patrice Easton's blog or you can begin the blog hop here and follow the link at the end of my post to move on to Trish Radac's inspiring Big Shot project. You can even head to the Just Add Ink page and begin there. 

The JAI team has lots of fabulous and fun ideas to share with you using the Big Shot so grab a cuppa and sit down and enjoy :) Here's what I came up with.
Well that was how it ended up but it all started with the Petal Cone die and musing what I could do with it - somehow a spaceship just seemed to be a natural progression. This was how the petal cone die cuts started out.
And here is a close up of how it ended up, complete with lots of spaceshipy details ;)
I couldn't resist adding a touch of whimsy (I really didn't try very hard) so I just had to have a cow jumping over the moon.
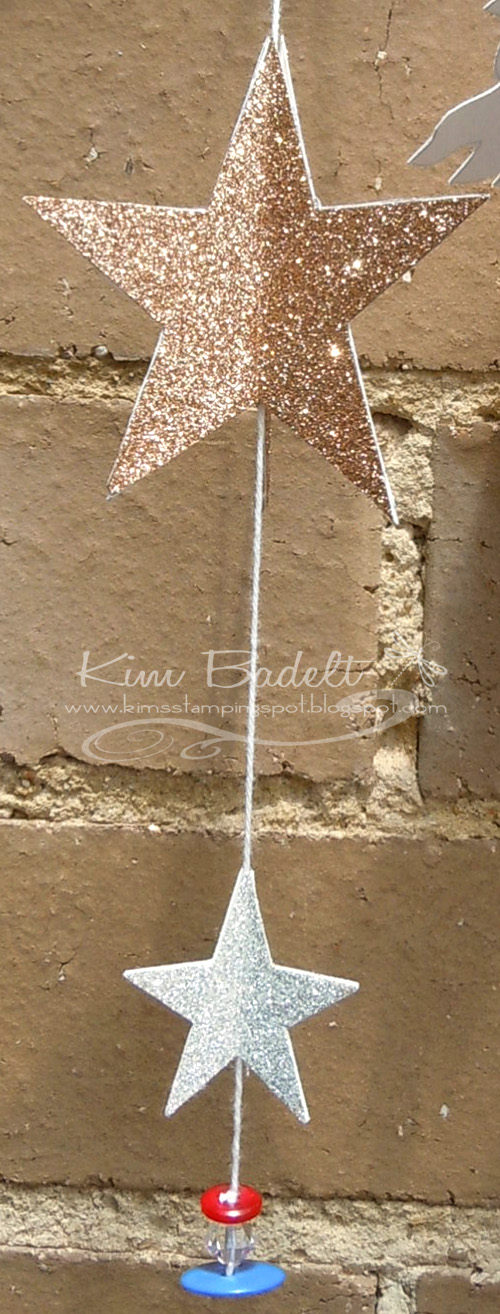
Close ups of the two side mobiles with buttons and a bead at the end that help to add a little weight and carry the colours  through too!

All I had to do to hang it up was find a small branch in the garden, paint it deep space blue, stamp some silver stars on it, spray some sealer on it then I was good to tie the mobile on and hang it up in my Mr almost 5's room.

Hope you enjoyed this little outer space trip ;) Thanks for visiting! Now don't forget to click on the Big Shot picture below or click here to take you on to Trish's blog. Go and enjoy the rest of the hop!

Kim

Recipe: All SU! unless otherwise noted
Stamps: None
Cardstock: Shimmer White (Papertrey Ink), Night of Navy, Real Red, Basic Black, Silver  and champagne glimmer paper
Ink: Silver Encore
Accessories: Petal Cone die,Typeset alphabet BigZ, Large star punch (R), Round Tab punch (R), Finishing Touch Edgelits, Merry mini punch pack, Circle punches (1 3/8", 1"), On the farm die (PaperTrey Ink), Circle nestabilities, Cuttlebug embossing folder, acetate, White twine, Pearl touch deco (Pebeo), Sticky Strip, Dimensionals, Buttons (PTI) and beads (craft shop)


Wednesday, January 16, 2013

2012 unblogged: Masculine cards Day 2

Hey there,
well I managed to find the time to add in another unblogged post. Enjoy :)

This card comes courtesy of a special friend of mine, Christine Blain, who stamped the Tool Shed background for me - thanks lovely!! I'm so glad I asked her too as my Dad was absolutely delighted by it. He's been a home handyman/builder all his life so the images were perfectly suited to him.

Please drop past on Friday for the first Just Add Ink post of the year we are starting it off big with a Big Shot blog hop!!

Thanks for visiting,
Kim

Recipe: my best guess
Stamps: Tool Shed, Afterthoughts (R)
Cardstock: Cajun Craze, Baja Breeze, Very Vanilla
Ink: Cajun Craze, Not Quite Navy
Accessories: Natural Designer Button, Early Expresso twine, pinking shears, sponge, Double sided tape (X Press), Dimensionals, Tombow multi

Sunday, January 13, 2013

Merry Monday 44- A New year goal

Hello there, 
well as a change from my 2012 unblogged series I decided I had better stick to a new year goal I set myself which was to play along with the Merry Monday challenges this year. I found myself for the second year running, rather ironically, after running Christmas card classes for the five months before Christmas not having mine done! So this is my attempt to rectify that - and also play with all of my Christmas stamp collection (which is ahh - rather extensive ;) The Merry Monday challenge this week was a colour challenge.


My mind wasn't playing along with new ideas so I decided to remake a card I made for a lovely friend (as part of a secret santa exchange) this past Christmas which remains unblogged, so far anyway. Here's the new version.

A shaker card is always going to bring a smile to anyone's face - so fun! Well its late, I only just realised I needed to get this up tonight 20 mins ago. So no more chatter from me!

Thanks for visiting,
Kim

Recipe: All SU! unless otherwise noted
Stamps: Winter Snow Globe (Papertrey Ink)
Cardstock: Island Indigo, Pool Party, Whisper White 
Ink: Real Red, Pool Party, Island Indigo, Whisper White, Memento Tuxedo Black, Versamark
Accessories: Labels collection framelits, Ski slope DSP (R), SU! shaker frames, 1 3/4" and 1 3/8" circle punches, Corner rounder (R), Double ended banner die (PTI), white embossing powder, Island Indigo ruffled ribbon, Silver glass glitter, acetate, Copic markers, Jewels - rhinestones, Double sided tape (X Press), SNAIL adhesive, dimensionals

2012 unblogged: Masculine cards Day 1

Hello there,
well I did say I had some thing "super" special to start off my unblogged 2012 masculine cards. Have a look. 


I made this one for my DH for fathers day. He liked it and I had fun making it too :) I created the superman emblem by printing one out (after doing an image search) and then using it as a template to create mine. The torn frame is a fun technique that I picked up from Sharnee Torrents she has a great tutorial for it here.

Thanks for visiting,
Kim

Recipe: My best guess
Stamps: Teeny tiny sentiments
Cardstock: Real Red, Basic Black, Daffodil Delight, Whisper White
Ink: Basic Black
Accessories: Linen and Canvas Impression plate (Papertrey Ink), Word Window punch, Mat and piercing tool, Real Red brads, Red glimmer paper, Double sided tape (X Press), Dimensionals

Thursday, January 10, 2013

2012 unblogged: Sympathy cards 2

 Hello again,
well here is my second sympathy card for last year. Lots of fussy cutting but I thought the end effect would be worth it.


Next installment will be a few masculine cards starting with something "super" special for my DH.
 
Thanks for visiting,
Kim
 
Recipe: My best guess
Stamps: Pleasant Poppies, Loving Thoughts
Cardstock: Basic Grey, Pink Pirouette, Very Vanilla
Accessories: First Edition DSP, Bella Rose DSP (R), Apothecary Accent framelits, cardstock vellum, silver brads, Doubled sided tape (X Press), Dimensionals, Sponges

Tuesday, January 8, 2013

2012 unblogged: Sympathy card 1

Hello there,
well I'm still continuing my 2012 unblogged series. Today's installment is the first of two sympathy cards. Hope its cooler where you are!
 
Thanks for visiting,
Kim

Recipe: My best guess
Stamps: Loving Thoughts
Cardstock: Naturals Ivory
Ink: Old Olive, Basic Grey
Accessories: Argyle embossing folder (SU!), Turning a New Leaf patterned paper, Turning a New Leaf die, Notched Flower dies, Double Ended banner die, Chocolate vintage button (Papertrey Ink), Corner rounder punch (R) SU!, Linen Thread, Doubled sided tape (X Press), Dimensionals

Sunday, January 6, 2013

2012 unblogged: Wedding cards Day 3

Hello again,
I am back with the last wedding card, my favourite in fact. I was very pleased with how this one turned out. With no further ado here it is.


Thanks for visiting. Next installment if all goes to plan will be two sympathy cards.
Kim

Recipe: My best guess
Stamps: One in a million, Everything Eleanor
Cardstock: Basic Grey, Pink Pirouette, Whisper White
Ink: Basic Grey, Pink Pirouette
Accessories: Filigree border die (PTI), Twitterpated DSP, Pleated Pink Pirouette satin ribbon (R), Jewels - pearls

Friday, January 4, 2013

Christmas gift card holder

Hello there,
Delys and I compared notes right before Christmas and realised like many other paper crafters we were giving gift cards as Christmas presents, in my case to my teenage nieces and nephews (iTunes) and also to my Dad (books). So we decided to do a joint Just Add Ink post with a couple of ideas for gift card holders. Now the gift card holder I'm going to show is Christmas themed as this was the one I made for my Dad; but all you need to do is change up the paper and add a tag or some other embellishment to the front (instead of Santa) to make it perfect for any other occaision. I first saw the idea for this gift card holder fold on Erica Cerwin's blog here. She has a link in her post that will take you to an instruction pdf. I have also included a mini tutorial below so you can see how to put one together.

First cut yourself a 8 1/2" by 4 1/4" piece of cardstock and lay diagonally on score board with opposite points both on 6" score mark. Then hold in place and score down entire length.
 Fold cardstock on the score line and lay on score board as below. Score at the mid point.
 Now fold on score line and gift card holder is complete. That was easy - wasn't it ;) Next it's time to embellish.
Make yourself a template by tracing around the outside of the folded holder. Then use this to cut your pattern paper to size for embellishing.
 Finished gift card holder open
Close up of inside showing gift card. Decorate the front as you wish. I did find that I needed to add some method of tying the holder closed, so I sticky striped in some narrow grosgrain ribbon inside the folds, which in my case worked perfectly as Santa's belt. I created my Santa using a punch art I spied on pinterest. I can't trace the link back unfortunately but I'll include a list of all the punches below.
Hope you found this fun and useful! Thanks for visiting,
Kim

Recipe: All SU! unless otherwise noted
Stamps: none
Cardstock: Real Red, Whisper White, Pink Pirouette, Basic Black
Ink: Crumb Cake, Pink Pirouette
Accessories: Candlelight Christmas DSP, Lacy Brocade embossing folder, punches (Ornament, Extra Large Oval, 1/4", 1/2" and 1 3/4" circle, 1" square, 2 step bird punch, slot (R)), White gel pen, Jewels- rhinestone, narrow black grosgrain ribbon (R), Dimensionals, SNAIL adhesive, Sticky strip.

Wednesday, January 2, 2013

2012 unblogged: Wedding cards Day 2

Hi there,
here is my second 2012 wedding card. The hot pink/ black of the wedding colours made me feel like glamming it up so I played around with adding some glitter and then added a scored diagonal background for a touch of elegance.

The colours are a bit off, as I didn't photograph it in the best light, but you get the idea. And here is the inside.

Thanks for visiting,
Kim

Recipe: My best guess
Stamps: Mr and Mrs, Baroque motifs (SU!)
Cardstock: Pretty in Pink, Melon Mambo, Basic Black
Ink: Pretty in Pink, Melon Mambo, Versamark
Accessories: Boho Blossom punch, jewels- rhinestones, Iitty Bitty Shapes punch pack, Timeless Type alphabet sizzlet, Simply scoring board, Black satin ribbon (R), Pink Pirouette pleated satin ribbon (R), Pink fine glitter (R), Mat pack and piercing tool, Black embossing powder, Mat Stack 5 and mat stack 5 layerz dies (PTI)