Showing posts with label Petals Pizzazz. Show all posts

Monday, February 28, 2011

Inkspiration 59 - Printed Petal Flower


Hi there,

now I just have to ask has anyone else had a morning start like this? It goes:
DH to me: Its Mum's birthday tomorrow (his Mum) you've made a card for her, haven't you?

Now I will say he was partly (mind you only partly) joking, and after about 18 years I should be aware of the fact that he is crap at preparing for birthdays and so should have his Mum's birthday written on the calender (I do now!). But it gave me a valid excuse to "slave" away stamping Sunday afternoon - ah its a hard life sometimes ;)

Of course ever looking of ways to multi task I used the Inkspiration sketch challenge this week for the card. You can see Keesh's sketch below.


This card is a real mix of old and new. Old DSP and a new stamp - I got Printed Petals at the 2010 convention and this is its first inking up. So here is the result.


I started with a completely different idea but saw this pink flower pattern and it reminded me of the large flower in Printed Petals so that's how this evolved. So I settled on a Regal Rose/ Early Expresso combo. So a square Regal Rose base, then an Expresso scalloped square mat (I was delighted when I realised that this was just the right size!!) then the DSP. I went for clean lines on the long vertical panel and also used the flower to break up the lines more. The flower was inked up in Regal Rose and Versamark then embossed with glittery clear embossing powder. For contrast I used Early Expresso for the stem and leaves. For the three horizontal bands I used satin Expresso ribbon for two and the sentiment for the last. The inside was finished off with another flower.
This one, despite having brown on it, got the big thumbs up by Miss 6 - but she decided it was OK for it to be posted if it was going to her Nana :)

Thanks for visiting,
Kim

Recipe: All SU! unless otherwise noted
Stamps: Printed Petals, Party This Way, Petals Pizzazz
Ink: Regal Rose, Early Expresso, Versamark
Accessories: Sweet Always DSP (R), Scalloped Square BigZ die, Word Window punch, Itty Bitty Shapes punch pack, Early Expresso satin ribbon, Iridescent Ice embossing powder, Dimensionals, Double sided tape (X Press), Neutral button, Rhinestone (Kaiser), Brad - Flower


Friday, October 8, 2010

JAI 38 - Just add pink and bling!


Hi there :),

the JAI team have a fun challenge for you this week. You have to add bling and pink!


For some reason the combo of pink and bling made me think of making an acetate card - not sure why but I kind of liked the idea of rhinestone swirls over the clear surface. So I had to do it. Here's what I came up with.


So first off I started with some window sheet, cut it to approx 12 cm sq or 4"6 sq then I rounded the bottom corners mostly cause the sharp corners were just plain sharp! When you work with an acetate card the main thing to remember is that you can see everything on the back side unless you cover it up. So for both the front and inside I had to create panels for both the front and back sides. Pink made me think flowers so I went for a bit of wow imact using Petals Pizzazz. So I stamped the largest flower in Pretty in Pink, trimmed it out, then layered it with a punched Melon Mambo circle and then the sentiment. I added two more flowers on either side of my big one and layered those with small punched Daffodil Delight flowers as I thought the touch of yellow would add a bit of lift to all the pink shades. Now of course it was time for the bling! First some rhinestone brads for the flowers and basic rhinestones for the sentiment. My design for the rhinestone swirl came from a portion of the Baroque Motifs swirl. I just traced the swirl direct from the catty onto some paper then laid the paper inside the acetate card and of course I could see it - cause its clear ;) Then I laid the rhinestones out following the pattern of the swirl. The inside was as usual finished off simply with some flower background stamping in stamped off Regal Rose and Daffodil Delight. Then a follow up sentiment mounted up on a die cut tag. One final note I deliberately made the inside panel a bit bigger than the front so you could see little peaks of it above and below (creating a double scallop edging).

This one got a big thumbs up from my Miss 5

Thanks for visiting and why don't pull out some pink and bling it up and post your
creation on Just Add Ink this week :)

Kim

Recipe: All SU! unless otherwise noted
Stamps: Petals Pizzazz, Perfect Punches, Occasional Quotes
Cardstock: Whisper White, Regal Rose, Melon Mambo
Ink: Pretty in Pink, Regal Rose, Melon Mambo, Daffodil Delight
Accessories: Window sheet, Wide oval punch, 1 3/4"circle punch, Boho Blossom punch, Scallop border punch, Basic Rhinestones, Clear Rhinestone brads, Lots of Tags sizzlits, Double sided tape, Dimensionals


Friday, October 1, 2010

JAI 37 just add a colour combo


Hi there,

this week Just Add Ink has a lovely colour combo to work with. It's my week off from the DT but I always try to play along if I can. Here's the colour combo.

I was struggling with a nasty cold when I was trying to think up ideas for this challenge and it really was a struggle. The combo said flowers to me but could any ideas penetrate the fog in my head - nope :( So I turned to a great standby to CASE someone else's work. I saw a card on p102 of the new USA SU! catalogue and I knew instantly that it would be perfect. So here is what I came up with.


The layout and layering of the flowers is pretty much identical to the catty card. The one touch that I added was to emboss the card base with the Perfect Polka Dot folder. So starting from the begining ;) I embossed the base layer with Perfect Polka Dots. Then add a panel of Rose Red scalloped down the LHS. Another layer of Whisper White was added on top of that. On this layer I stamped the flower stems in Always Artichoke (having worked out the placement of the flower heads). The leaves were stamped in Old Olive trimmed out and fixed into place (two are up on dimensionals). I used Petals Pizzazz for the flowers in a mix of Pumpkin Pie and Rose Red, also using some DSP for each colour. I layered the flowers up, added the finishing touches - felt fusion flower and rhinestones. Then glittered up the Rose Red layers. All I needed to do then was add the sentiment embellished with some white taffeta and another rhinestone brad. The inside was finished off very simply to match.

I really like how bright and cheery this turned out!

Thanks for visiting - and if you have time this week why don't you play along with the challenge and link your creation back to Just Add Ink.

Kim

Recipe: All SU! unless otherwise noted
Stamps: Petals Pizzazz, Party This Way
Cardstock: Whisper White, Rose Red
Ink: Rose Red, Pumpkin Pie, Old Olive, Always Artichoke
Accessories: Perfect Polka Dots embossing folder, Scallop border punch, 1 3/4" circle punch, Felt Fusion (R), Rhinestone brads(Clear and Fire), White Taffeta ribbon, Always Artichoke narrow grosgrain ribbon, Old Olive brad, Two way Glue, Dazzling Diamonds, SNAIL adhesive, Double sided tape, Dimensionals

Thursday, January 28, 2010

Three times the inspiration


Hi there everyone,

Not quite sure what got into me this week, but in the little snippets of free time I managed to grab from work and looking after my two darling little munchkins I made three cards for Makeesha Byl’s first challenge for 2010. I must have really missed doing them – waving hi Keesh. This was a colour challenge – so here is Makeesha colour selection.


Card One

Sorry about the crooked card but it was the best pic

This was my original idea for the challenge. But it has evolved from my original concept. OK I started with a Very Vanilla base, stamped that with En Francais in Cameo Coral (originally I had planned to keep it plain but I struggle with keeping to the clean and simple). The image panel has four flower stems stamped in Chocolate Chip. The flowers are a mix between stamps and buttons, some of the buttons have pink rhinestones adhered and some are threaded with coloured thread and a couple of buttons I left plain. The finishing touch for the stamped buttons was some dazzling diamonds which gives them a real glittering glow. The top of the image panel I scalloped with the scallop edge punch and at the bottom I added a base of Cameo Coral, used the Apron Lace punch (originally I had planned for the lace pattern to be at the bottom but it just looked better this way so thats how it ended up). Then I wanted to try making a pleated ribbon embellishment to go over this. I started by putting on some double sided tape then carefully pleating my ribbon over. That attached the ribbon but it still needed to be stitched flat. This was my first time trying to sew on cards, and I like it! It won’t happen too often as I have to haul my machine out of a cupboard plug it in etc etc but it’s certainly worth it sometimes. The inside was just finished off simply.

Card Two


This one came to me in a flash of inspiration while I was putting my Mr almost Two to bed. I realized that the colours could work really well for a tree going through all the seasons. It was actually a very quick card to make. I just stamped my tree trunk four times then inked up the tree top, progressively in So Saffron and then Cameo Coral. I decided to add the sentiment to the “winter” panel. Then a quick punch, punch, punch, punch and I had my images. I made a Choc Chip base – its just a small note card really, about 3 by 3"2'. I scored a line up the top and two below where the tree panels would go. Then I added a Saffron brad to the o in “you” and mounted all the panels on dimensionals. To give the whole card a lift I added dazzling diamonds to all the little leaves on the trees – nice. The inside is just simply stamped with another tree.

Card Three

Another crooked card - sigh


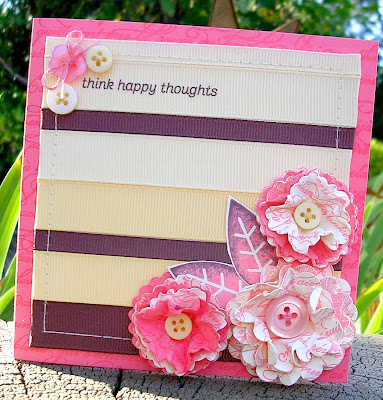
This one was quite experimental for me, but I certainly had fun trying new stuff and I think it turned out quite well. I started by getting out a selection of grosgrain ribbons in Chocolate Chip, Very Vanilla and So Saffron. I laid them out and decided on a transition from lighter to darker moving from top to bottom. I got a panel of cardstock the right size covered it with double sided tape then stuck all my ribbon down. Next more experimenting with the sewing machine – I stitched a border all the way around the panel. Tucked all the ribbon ends under and that was done. I decided to go a bit flamboyant for embellishments (not naturally me). I made three “poofy” paper flowers, I seen them on Dawn McVey’s blog recently and she made a little video and how she makes them. I used a mix between Vanilla stamped with Cameo Coral (mostly stamped with En Francais) and some Cameo Coral stamped with Cameo Coral. The biggest flower was made using my scallop circle punch, the two smaller one by using the smallest scalloped circle nestability die. There are five layers to each flower. I finished each off with threaded buttons. In the top left corner I added the sentiment – a rub on – it worked no problems although I was a bit nervous about transferring it to ribbon. To highlight that and balance the big flowers I added three buttons, two just threaded and one finished with a bow. I used DMC embroidery thread for all the buttons (I have quite a stash as my embroidery is a rather neglected hobby of mine at the moment). I didn’t check what the DMC numbers were – sorry. I was just trying to find the best match I could. Hmm I should mention the base, the ribbon panel was adhered to a base of Cameo Coral stamped with En Francais. Ok final touches , a couple of leaves to add to the flowers, stick everything down, glue dots for the buttons and I am upgrading the flower adhering method to sticky strip the double sided tape can’t handle the weight of the flowers in this heat – did I mention our air conditioning broke Saturday afternoon. Its already 30oC in the house at 1 PM today – urggghhhhhh.

Thanks for visiting and sticking through the post - see you soon I hope

Kim

PS: Cameo Coral is growing on me - who would of thought!

Recipes: All SU unless otherwise noted
Card One
Stamps: En Francais, Eastern Blooms, Everyday Button Bits (PaperTrey Inc)
Cardstock: Very Vanilla, Cameo Coral
Ink: Cameo Coral, Chocolate Chip, So Saffron
Accessories: Button Latte buttons, buttons from assorted craft pack from Spotlight, Kaiser Pink Rhinestones, So Saffron grosgrain ribbon, Scallop Edge punch, Fiskars Apron Lace punch, Two way glue, Dazzling Diamonds, DMC embroidery thread, Double sided tape, dimensionals, Tombow glue (stick buttons down), a sewing machine.

Card Two
Stamps: Trendy Trees
Cardstock: Chocolate Chip, Very Vanilla, Cameo Coral
Ink: So Saffron, Cameo Coral, Chocolate Chip
Accessories: 1 ¼ inch square punch, So Saffron brad, Dimensionals, Two way glue, Dazzling diamonds

Card Three
Stamps: En Francais, Floral (R), Petals Pizzazz
Cardstock: Cameo Coral, Very Vanilla
Ink: Cameo Coral, Chocolate Chip
Accessories: Grosgrain ribbon – Chocolate Chip, Very Vanilla, So Saffron, Scallop Circle punch, Scalloped circle nestability, Scalloped Edge punch, Chit Chat rub on, Assorted buttons from craft selection (Spotlight), DMC embroidery thread, Glue dots, silver brads, Double sided tape, dimensionals, a sewing machine, no dazzling diamonds ;)

Sunday, October 11, 2009

Pink, plum and burgundy


Hi there,

The guideline for the second Creatalicious challenge was to use pink or plum with burgundy and green oh and some ribbon or lace. I did include the green but I also changed it to pink and plum and here is the result.
And here's a side view to show you the layering and a glimpse of the inside.


To balance out using several colours I started by using a white base. I stamped out several flowers in a mix of Pink Pirouette, Pale and Perfect Plum and Bravo Burgundy, mostly onto Whisper White but I did stamp two Perfect Plum ink onto Pale Plum cardstock flowers. Then I punched or trimmed them out and layered them up in a sort of descending cascade from right to left. I decided on using Kiwi Kiss as the green as it seemed to lift and brighten the whole colour combo – so I stamped three leaves and fitted those into the flower cascade. The ribbon component is a bow of Kiwi Kiss satin added onto the largest layered flower. To finish off the flowers I added some retired buttons (Pretty in Pink and Burgundy) and some pale pink brads. To balance out the flower cascade I’ve added the sentiment in the top LHS corner, framing it with a little paper piercing.

I finished off the inside with a little simple stamping and masking of flowers.

Hope you like it – I must admit I thought it was an unusual colour combo but I am quite happy with how it turned out. It’s certainly making me think about using my Plums and Burgundy inks a bit more frequently.

Thanks for visiting.

Kim

Recipe: All SU unless otherwise noted
Stamps: Petal Pizzazz, Short and Sweet
Cardstock: Whisper White, Pale Plum
Ink: Pink Pirouette, Pale Plum, Perfect Plum, Bravo Burgundy, Kiwi Kiss
Accessories: Scallop circle punch, Kiwi Kiss satin ribbon, Soft Subtle and Riche Regal buttons (R), Bo Bunny pale pink brads, Mat pack and piercing tool, Dimensionals, SNAIL adhesive.


Thursday, June 4, 2009

My First DT card - Its a Girl


Hi there everyone,

yep the title says it all. I was delighted (translation excited jumping up and down accompanied by squeals of joy) to recieve an email from the lovely Makeesha to ask me to be the first guest design team member for her weekly challenges. I will be on the DT for the month of June so I will look forward to saying hello each week and hopefully hearing from you all as well!

Now I have discovered that I find colour challenges the hardest to work with - imagine how daunting it was to start off my tenure with a colour challenge. This is the colour combo that Makeesha picked this week.


I did do a fair bit of fiddling and in the end made two cards. But the one I have decided to select as my DT card is right below.


A family friend is expecting a baby in the next few weeks - so my start point was a baby card, given the involvement of Pink Passion - one for a girl. Overall its actually a fairly simple card. My main colour decision to was when possible to space the Celery between the Pink Passion and Pumpkin. I found it gave better contrast for both of them. So starting with a Pink Passion layer, I added a Celery one on top then a Whisper White that was stamped with Polka Dots to match the dotty Pumpkin DSP at the bottom. The main element is the Pink Passion elephant, dressed up with a Celery brad for its eye, glittery Pumpkin ear and a Pumpkin felt Fusion flower. To dress up the Celery ribbon below I also added a row of Pumpkin felt fusion flowers with alternating pink and Celery brads. In the process I discovered that Tombow and Crystal effects just did not want to stick the flowers down but some glue dots and sticky strip later I got that problem solved. Lots of scallops, some piercing and "Its a girl' for the flower stalk and it was all done. The inside was also just finished off simply.

Ok having seen my official card here is the second one I made for the colour challenge.


My starting point for this one was to use the most recent (at the time) Mojo Monday sketch and also to use the same layering as I did for the first. The points to note here are that I used the stripy Background sampler stamp to make the Pink Passion strips on the bottom, then using markers added in Pumpkin and Celery stripes. I got the colour effect on the largest flower, by colouring the centre with a Pumkpin marker and the edge with a Pink Passion one, then used a blender pen to pull the Pumkpin out into the Pink, I did go over after with an aquapainter and a little ink from the ink pads lids to deepen the colour. The top flower was simply rock and rolled and Dazzling Diamonds was added to the Celery flower. The opened up pink brads was accidental really, I opened one up flat just so I could see if the Pink brads were right for the card - size wise and looked and went - hmmm Ok I might keep it this way.

I want to finish today by saying a big thank you to very good friend (and now upline) Sam who kindly lent me Polka Dot, Background Sampler and Petals Pizzazz.

You can check out the brilliant creations from the other DT members here.


Kirsty

"Its a Girl"
Recipe:
All SU unless otherwise noted
Stamps: Wild About You, So Many Sayings, Polka Dot
CardStock: Pink Passion, Certainly Celery, Pumpkin Pie and Whisper White
Ink: Pink Passion, Certainly Celery, Pumpkin Pie
Accessories: Scallop Edge punch, Wide and narrow Certainly Celery grosgrain ribbon, Pumpkin Pie felt Fusion flowers, 2-way Glue pen, Dazzling Diamonds, Certainly Cerlery brads, Pink Bo Bunny brads, Mat pack and piercing tool, Glue Dots, Sticky Strip, Double sided tape, SNAIL adhesive, Dimensionals

"Thank You"
Recipe:
All SU unless otherwise noted
Stamps: Petals Pizzazz, Background Sampler, Simple Wishes (retired hostess set)
CardStock: Pink Passion, Certainly Celery, and Whisper White
Ink: Pink Passion, Certainly Celery, Pumpkin Pie
Accessories: Certainly Celery DSP, Cuttlebug Distressed Stripes folder, Ice Rhinestone brad, large pink Bo Bunny brads, wide Certainly Celery grosgrain ribbon, 2-way Glue pen, Dazzling Diamonds, Dimensionals, Double sided tape, SNAIL adhesive, blender pen