Showing posts with label Chit Chat rub ons. Show all posts

Friday, July 16, 2010

JAI26 - just add embossing


Hi there,
well welcome to my first offical post as a member of the Just Add Ink design team! Luckily for me this week the challenge is to add one of my favourite techniques - just add embossing.
Here is what I came up with. Heat embossing is darn hard to capture with photography so I hope you'll be able to see what I'm talking about below.


I used two different techniques that involved heat embossing to make this card. Firstly on the background DSP mat I first inked up my stamp in Versamark and then the coloured classic ink (Rich Razzleberry in this instance). I stamped that direct onto the DSP and then sprinkled over clear embossing powder and then used the heat gun.

The second technique is called emboss resist and I used this to create the top image panel. In this case I stamped my daisies using Versamark only onto the DSP, then sprinkled over clear embossing powder and then used my heat gun embossed the image. Now that the daisies were embossed I inked up my brayer with Rich Razzleberry and rolled over a thick coat of ink, then carefully wiped the Razzleberry off the daises, which because they are embossed resist the ink.

I matted the top image panel on a mat of scalloped Whisper White, made using my Scalloped border punch, this is mounted up on dimensionals above the base layers. Threaded below the top panel is some White Taffeta, with a bow on the bottom left of the top panel. The base DSP layer is mounted on a mat of Whisper White and a base layer of Rich Razzleberry. The inside is finished off simply to match by stamping off Upsy Daisy in Rich Razzleberry.


So this week why don't you give it a go and - just add embossing and then link your creation back to the Just Add Ink challenge post!

Thanks so much for visiting,

Kim

Recipe: All SU!
Stamps: Upsy Daisy
Cardstock: Rich Razzleberry, Orchid Opulence, Whisper White
Ink: Versamark, Rich Razzleberry
Accessories: Cottage Wall DSP, Scallop border punch, White Taffeta ribbon, Chit Chat rub ons, Brayer, Clear embossing powder, Heat Gun, Dimensionals, SNAIL adhesive, double sided tape


Monday, June 21, 2010

Haiku for you


Hi everyone,

my did Makeesha have a in your face colour combo for her Inkspiration challenge this week! My first thought was argh how do work with that. But the DT put together some fantastic examples and the combo was rapidly growing on me. Factor in some zen time for thinking while I put Mr 2 to bed and I had an idea to work with! Here is the colour combo.


And here is the outcome.


I started with some folded over Pumpkin Pie cardstock which I then cut with my Scallop Circle die. To get an instant card just make sure you don't completely cover the die - that way you get your fold. Next on some Whisper White I stamped the flowering branch from Eastern Blooms. I inked up the stamp using markers for this, colouring the branches Chocolate and then the flowers in mixed Eggplant and Pumpkin. I could then place my circle nestie over the image and cut. I did try one extra trick - to trim out the end of the branch with my scissors and carefully lay this over the die so when it cut the circle the end of the branch would remain extending out from the circle - it worked :). Oh and when I cut the white image layer I also laid my DSP over so that was cut at the same time. Finally I cut a mat of Eggplant, then one of Whisper White. To embellish the front I stamped three flowers and trimmed them out, adding contrasting brads to highlight the centre. Another little trick that I tried was to colour a white brad (with Copic marker V09) to get an Eggplant coloured one - I put on two layers of ink letting it dry in between. Nice! I mounted the flowers on dimensionals above the branch, added a Chocolate rub on for the sentiment and then layered on some narrow Eggplant grosgrain (using sticky strip) to cover the image/DSP transition. The final touch, after some deliberation, was to sponge Pumpkin Pie and then Elegant Eggplant around the edges of the Pumpkin scallop circle base, and just some Pumpkin on the white edge of the image panel. The inside was finished off very simply to match.


I quite liked the end result - its always nice to end feeling that way :) I think I can see more circle cards in the future.

Thanks for visiting,
Kim

Recipe: All SU!(unless otherwise noted)
Stamps: Eastern Blooms
Cardstock: Pumpkin Pie, Elegant Eggplant, Whisper White
Ink: Pumpkin Pie, Elegant Eggplant, Chocolate Chip
Accessories: Scallop Circle Die, Haiku DSP, Chit Chat rub-ons, narrow Elegant Eggplant grosgrain ribbon, Circle nestabilities (Spellbinder), Earth Element brads, white brad colours with V09 Copic marker, sponge, Sticky Strip,Dimensionals, SNAIL adhesive, Double sided tape.

Tuesday, February 23, 2010

Birthday Butterfly


Hi there,

When I saw the picture that Makeesha Byl had selected for her weekly challenge this week – I was initially stumped – no really I was. Here is her inspiration picture. (I'll edit Keesh's link in once its up).

The colour part was easy – I was figuring on Regal Rose, Rose Red and Tempting Turquoise and to use a butterfly or lots of butterflies. I would have liked to make a butterfly shaped card, or a stained glass butterfly but gave up both ideas as too hard for the limited time I have to hand (Monday night once the kids are in bed and what ever nap time Mr 2 has – unfortunately he is not a long sleeper). So this is what I came up with in the end.

A close up of the layered butterfly


I had a couple of inspiration sources, this sketch from Karen Giron Sweet Sunday Sketch Challenge, as well as how she balanced her light and dark layers in her card for this sketch. Also I watched a video tutorial by Sarah Klass for covering and embellishing a head band. She made a ribbon rosette/flower and when I watched it was a case of – oh is that how you do that!! So I just had to incorporate that in too. I still need girl’s birthday cards so this challenge was a perfect fit for that.

Ok as briefly as possible I started with a Regal Rose base (4”6’ sq), cut a Rose Red layer to go on that. Found some dotty Turquoise DSP, and cut that into four squares, that were layered onto the Rose Red. Then a smaller panel of Regal Rose, with some Rose Red DSP (from 2008/2009?), then cut a large scalloped circle in Regal Rose and a white mat for it. Made a ribbon rosette from Rose Red double stitched grosgrain ribbon, layered that with a scallop circle of turquoise DSP, then (almost there…) layered that with a butterfly (Regal Rose base with Rose Red flowers), then added an acetate butterfly (stamped with white stazon, with the same flowers, wings bent up – and adhered with a medium sized clear rhinestone (whewww). Final touches – some turquoise satin ribbon and a white happy birthday rub-on.

I was pretty happy with how it turned out in the end. Although posting it might be a bit tricky – ah well you can’t have everything ;)

The inside was finished off to match the front, and the butterfly inside has three little rhinestones as its body to glam it up a bit.

Thanks for visiting,

Kim

Recipe: All SU unless otherwise noted
Stamps: Flight of the Butterfly
Cardstock: Regal Rose, Rose Red, Whisper White
Ink: Regal Rose, Rose Red, White Stazon
Accessories: Petals and Paisley DSP (R), Rose Red DSP (R), Standard and Scalloped circle nestabilities (Spellbinder), Butterfly punch, Scallop circle punch,Acetate, 1” Rose Red double stitched grosgrain ribbon, Clear Rhinestone brad, Chit Chat rubon, rhinestones (Kaiser), turquoise ribbon (local craft store), Glue dots, dimensionals, Double sided tape, SNAIL adhesive.

Thursday, January 28, 2010

Three times the inspiration


Hi there everyone,

Not quite sure what got into me this week, but in the little snippets of free time I managed to grab from work and looking after my two darling little munchkins I made three cards for Makeesha Byl’s first challenge for 2010. I must have really missed doing them – waving hi Keesh. This was a colour challenge – so here is Makeesha colour selection.


Card One

Sorry about the crooked card but it was the best pic

This was my original idea for the challenge. But it has evolved from my original concept. OK I started with a Very Vanilla base, stamped that with En Francais in Cameo Coral (originally I had planned to keep it plain but I struggle with keeping to the clean and simple). The image panel has four flower stems stamped in Chocolate Chip. The flowers are a mix between stamps and buttons, some of the buttons have pink rhinestones adhered and some are threaded with coloured thread and a couple of buttons I left plain. The finishing touch for the stamped buttons was some dazzling diamonds which gives them a real glittering glow. The top of the image panel I scalloped with the scallop edge punch and at the bottom I added a base of Cameo Coral, used the Apron Lace punch (originally I had planned for the lace pattern to be at the bottom but it just looked better this way so thats how it ended up). Then I wanted to try making a pleated ribbon embellishment to go over this. I started by putting on some double sided tape then carefully pleating my ribbon over. That attached the ribbon but it still needed to be stitched flat. This was my first time trying to sew on cards, and I like it! It won’t happen too often as I have to haul my machine out of a cupboard plug it in etc etc but it’s certainly worth it sometimes. The inside was just finished off simply.

Card Two


This one came to me in a flash of inspiration while I was putting my Mr almost Two to bed. I realized that the colours could work really well for a tree going through all the seasons. It was actually a very quick card to make. I just stamped my tree trunk four times then inked up the tree top, progressively in So Saffron and then Cameo Coral. I decided to add the sentiment to the “winter” panel. Then a quick punch, punch, punch, punch and I had my images. I made a Choc Chip base – its just a small note card really, about 3 by 3"2'. I scored a line up the top and two below where the tree panels would go. Then I added a Saffron brad to the o in “you” and mounted all the panels on dimensionals. To give the whole card a lift I added dazzling diamonds to all the little leaves on the trees – nice. The inside is just simply stamped with another tree.
Card Three

Another crooked card - sigh


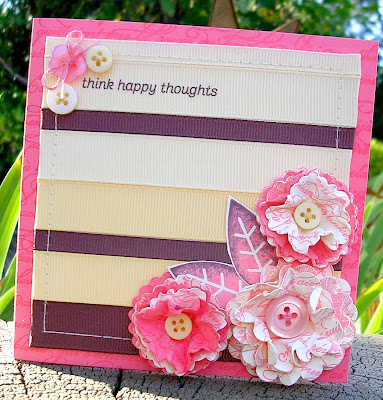
This one was quite experimental for me, but I certainly had fun trying new stuff and I think it turned out quite well. I started by getting out a selection of grosgrain ribbons in Chocolate Chip, Very Vanilla and So Saffron. I laid them out and decided on a transition from lighter to darker moving from top to bottom. I got a panel of cardstock the right size covered it with double sided tape then stuck all my ribbon down. Next more experimenting with the sewing machine – I stitched a border all the way around the panel. Tucked all the ribbon ends under and that was done. I decided to go a bit flamboyant for embellishments (not naturally me). I made three “poofy” paper flowers, I seen them on Dawn McVey’s blog recently and she made a little video and how she makes them. I used a mix between Vanilla stamped with Cameo Coral (mostly stamped with En Francais) and some Cameo Coral stamped with Cameo Coral. The biggest flower was made using my scallop circle punch, the two smaller one by using the smallest scalloped circle nestability die. There are five layers to each flower. I finished each off with threaded buttons. In the top left corner I added the sentiment – a rub on – it worked no problems although I was a bit nervous about transferring it to ribbon. To highlight that and balance the big flowers I added three buttons, two just threaded and one finished with a bow. I used DMC embroidery thread for all the buttons (I have quite a stash as my embroidery is a rather neglected hobby of mine at the moment). I didn’t check what the DMC numbers were – sorry. I was just trying to find the best match I could. Hmm I should mention the base, the ribbon panel was adhered to a base of Cameo Coral stamped with En Francais. Ok final touches , a couple of leaves to add to the flowers, stick everything down, glue dots for the buttons and I am upgrading the flower adhering method to sticky strip the double sided tape can’t handle the weight of the flowers in this heat – did I mention our air conditioning broke Saturday afternoon. Its already 30oC in the house at 1 PM today – urggghhhhhh.

Thanks for visiting and sticking through the post - see you soon I hope

Kim

PS: Cameo Coral is growing on me - who would of thought!

Recipes: All SU unless otherwise noted
Card One
Stamps: En Francais, Eastern Blooms, Everyday Button Bits (PaperTrey Inc)
Cardstock: Very Vanilla, Cameo Coral
Ink: Cameo Coral, Chocolate Chip, So Saffron
Accessories: Button Latte buttons, buttons from assorted craft pack from Spotlight, Kaiser Pink Rhinestones, So Saffron grosgrain ribbon, Scallop Edge punch, Fiskars Apron Lace punch, Two way glue, Dazzling Diamonds, DMC embroidery thread, Double sided tape, dimensionals, Tombow glue (stick buttons down), a sewing machine.

Card Two
Stamps: Trendy Trees
Cardstock: Chocolate Chip, Very Vanilla, Cameo Coral
Ink: So Saffron, Cameo Coral, Chocolate Chip
Accessories: 1 ¼ inch square punch, So Saffron brad, Dimensionals, Two way glue, Dazzling diamonds

Card Three
Stamps: En Francais, Floral (R), Petals Pizzazz
Cardstock: Cameo Coral, Very Vanilla
Ink: Cameo Coral, Chocolate Chip
Accessories: Grosgrain ribbon – Chocolate Chip, Very Vanilla, So Saffron, Scallop Circle punch, Scalloped circle nestability, Scalloped Edge punch, Chit Chat rub on, Assorted buttons from craft selection (Spotlight), DMC embroidery thread, Glue dots, silver brads, Double sided tape, dimensionals, a sewing machine, no dazzling diamonds ;)