Showing posts with label Labels Collection framelits. Show all posts

Friday, October 10, 2014

JAI 235 Just add a colour combo

Hello there,
the flowers I used this week remind me of my garden at the moment. We have had a succession of trees blossom through a delightful array of pinks. Sadly the spring blossoms are gone but a lovely hue of bright green has settled over the garden and soon enough I will have roses too.  The challenge we have for you this week at Just Add Ink (with a little artistic license) is perfect for flowers - this week we want you to Just Add a Colour Combo.


I needed a birthday card for a pink loving friend so I pulled out my markers and got to work. Sweetbriar Rose has a real classic botanical art feel so I was aiming to capture that feel. 


I considered colouring the image direct on the pink cardstock but decided it would be too difficult to get the tones I needed for the colour challenge. So instead I stamped and then coloured the image on white cardstock then fussy cut it out. To finish the card off I added lots of little details to create a (blinged up) vintage botanical feel.

Do check out the rest of the DT for some gorgeous colour inspired creations. Hope you can join us.

Thanks for visiting,
Kim

Recipe: All SU! unless otherwise noted
Stamps: Sweetbriar Rose, Express Yourself
Cardstock: Strawberry Slush, Blackberry Bliss, Pink Pirouette, Very Vanilla, White (X Press Blending)
Ink: Strawberry Slush, Blackberry Bliss, Soft Sky, Pink Pirouette, Crumb Cake
Accessories: Labels collection framelits, Spiral border punch, First Edition DSP (R), Copic markers, Piercing tool and mat, Gold sequin trim, Venetian crochet trim, Gold Baker's twine, Tombow multi, Dimensionals, Double sided tape (X Press)

Friday, July 11, 2014

JAI 222 Just add a colour combo


Hello there,
we are in the midst of school holidays over here. It was a real delight to have just a few mornings where it wasn't the usual go go go! One memorable morning, darling daughter, son and the cat piled on to the kitchen couch with me in the morning sun and watched tv, wrote a story, flipped through the new SU! catalogue and just enjoyed the company - can you guess who was doing what ;0

Right onto this weeks Just Add Ink challenge - this week we have a lovely colour combo for you from Mae. 


I went a little vintage for this one (and pretty heavy on the Blushing Bride)


I wanted a patterned background but didn't want it to be too dominant, so I clear embossed a floral pattern. The main focal panel was coloured using an aquapainter. By stamping it twice I had some flowers I could colour and then trim out and add on dimensionals. Lots of textures, and inky distressing and some tiny pearls finish off the vintage impression.

The DT have come up with some wonderfully different takes on the colour combo so do go check out the rest of the team. Hope you can join us!

Thanks for visiting,
Kim

Recipe: All SU! unless noted
Stamps: So Very Grateful (R), Apothecary Art
Cardstock: Very Vanilla, Blushing Bride, Soft Suede, Bermuda Bay
Ink: Soft Suede, Blushing Bride, Bermuda Bay, Versamark, Whisper White
Accessories: Labels Collection framelits, Stylish Stripes embossing folder, Pansy punch, 7/8" Scallop circle punch, Boho Blossom punch, Hexagon punch, Victoria crochet trim (R), Vintage faceted designer button, Calypso Coral baker's twine (R), Jewels - pearls, Clear embossing powder, Aquapainter, Sponges, Double sided tape (X Press), Dimensional

Friday, November 22, 2013

JAI 192 Just add a colour combo

Hello there,
are you ready for another Just Add Ink challenge? I sure hope so because we have a great colour combo for you. My Christmas crafting efforts are building up steam at the moment but I didn't go down that path this week instead I decided to make a thank you card. It's always useful to have a few of those after Christmas or for the end of year school wrap up too! Here's the colour picks.


And here is what I came up with.


I've flipped back to a cleaner modern style this week. I had originally intended to not even mat the mosaic stamped panel on the front but my love for mats (and CAS phobia) kicked in at the last minute and I added a very thin border of Tangerine Tango. I did love being able to mix stamped and embossed patterns adds that extra touch of something special!

Do check out the rest of the JAI DT for some fabulous colour inspiration!
Thanks for visiting,
Kim

Recipe: All SU! unless otherwise noted
Stamps: Mosaic Madness, Oh Hello
Cardstock: Whisper White, Tangerine Tango
Ink: Tangerine Tango, Island Indigo
Accessories: Labels collection framelits, Modern Mosaic embossing folder, Dotted scallop ribbon border punch, Island Indigo bakers twine, sequins, Tombow multi, Dimensionals, Double sided tape (X Press)

Friday, March 29, 2013

JAI 159 Just Add a Bunny

Hello and a very Happy Easter to you all,
as you could probably guess we have an Easter themed challenge for you this week at Just Add Ink. This week we would like you to Just Add a Bunny. I've been wanting to ink up the very sweet Storybook Friends images for a while and I decided this was the time to ink up the bunny and make a baby card. I was originally aiming for a gender neutral card but I think in the end it definitely ended up a bit more on the girly side. See what you think.

I pulled my colour combo from the Tea for Two DSP - I thought the soft pastels would be really lovely for a baby card and went with a patchwork panel at the top and some embossing below. A lot of different elements went into this card but I think they all work together. I certainly loved how it turned out :)

I wish you all a happy and relaxing Easter. I'm planning on doing some out of season "spring" cleaning, some stamping ;) and eating some chocolate - of course - I think Lindt bunny is on the menu - yum yum! Don't forget to check out the rest of the DT's bunny offerings too for some great ideas.

Thanks for visiting,
Kim

Recipe: All SU! unless noted otherwise
Stamps: Storybook Friends, Tiny Tags, Itty Bitty Banners
Cardstock: Crumb Cake, Calypso Coral, So Saffron, Whisper White
Ink: Calypso Coral, Whisper White, Versamark, Tuxedo Black (Memento)
Accessories: Tea for two DSP, Embossing folders (Stripes, Designer Frames, Needlepoint Border), 1 1/4" square punch, Extra large oval punch, Jewelery Tag punch, Itty Bitty Shapes punch, Labels Collection Framelits, Bitty Banner Framelits, Copic markers, Victoria crochet trim, Calypso Coral ruffled ribbon and bakers twine, Vintage trinket, Jewels - pearl, White embossing powder, Gold leaf pen, sewing machine, Dimensionals, Double sided tape (X Press)

Friday, February 1, 2013

JAI 151 Just add a shaped card

Hello there,
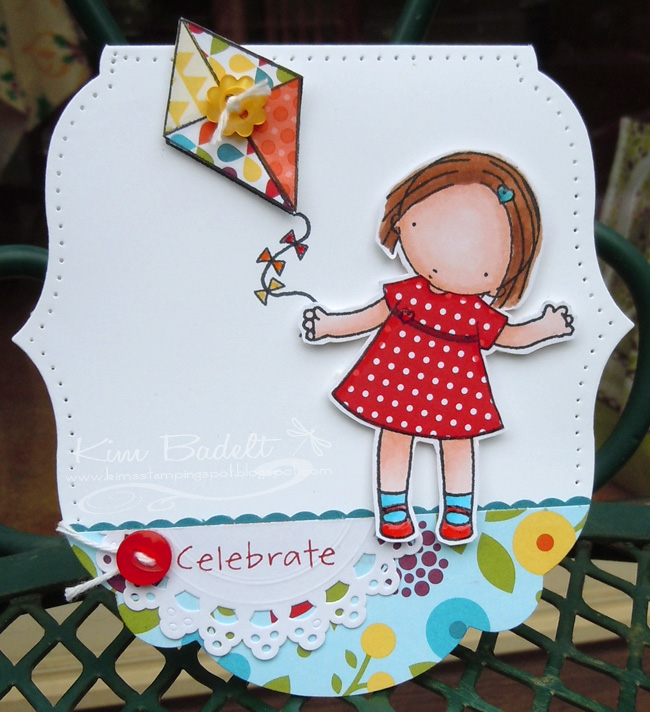
this week we have a fun challenge for you at Just Add Ink and its to Just Add a shaped card. Any shapes goes as long as its not your standard square or rectangle card. The DT has some very fun and inspiring examples so do check them out!! Here's what I came up with.

I hadn't used my Labels framelits to make a card base yet - so it was definitely time to pull them out. I decided to leave the top flat but have the kite element pop up up above it a little to break the line. I was aiming for CAS - well CAS my way ;) with pops of bright colour. I did a fair bit of paper piecing to bring that colour in using the SU! Summer Smooches DSP. For my little Pure Innocence figure, I coloured and paper pieced her then cut her out and mounted her above the bard base. A bit of doily, button and piercing detail and she was all finished.

Hope you can join in the fun this week. Thanks for visiting :)
Kim

Recipe: All SU! unless otherwise noted
Stamps: Aim High, All Smiles (My Favorite Things)
Cardstock: Whisper white, Island Indigo, White (X Press)
Ink: Tuxedo Black (Memento), Taken with Teal (R), Real Red, Pumpkin Pie, Daffodil Delight
Accessories: Copic markers, Scalloped dotted border punch, Twine, Mat pack and piercing tool, Martha Stewart doily, Brights button, Pure Poppy vintage button (PaperTrey Ink), Crystal effects, SNAIL adhesive, Dimensionals 

Sunday, January 13, 2013

Merry Monday 44- A New year goal

Hello there, 
well as a change from my 2012 unblogged series I decided I had better stick to a new year goal I set myself which was to play along with the Merry Monday challenges this year. I found myself for the second year running, rather ironically, after running Christmas card classes for the five months before Christmas not having mine done! So this is my attempt to rectify that - and also play with all of my Christmas stamp collection (which is ahh - rather extensive ;) The Merry Monday challenge this week was a colour challenge.


My mind wasn't playing along with new ideas so I decided to remake a card I made for a lovely friend (as part of a secret santa exchange) this past Christmas which remains unblogged, so far anyway. Here's the new version.

A shaker card is always going to bring a smile to anyone's face - so fun! Well its late, I only just realised I needed to get this up tonight 20 mins ago. So no more chatter from me!

Thanks for visiting,
Kim

Recipe: All SU! unless otherwise noted
Stamps: Winter Snow Globe (Papertrey Ink)
Cardstock: Island Indigo, Pool Party, Whisper White 
Ink: Real Red, Pool Party, Island Indigo, Whisper White, Memento Tuxedo Black, Versamark
Accessories: Labels collection framelits, Ski slope DSP (R), SU! shaker frames, 1 3/4" and 1 3/8" circle punches, Corner rounder (R), Double ended banner die (PTI), white embossing powder, Island Indigo ruffled ribbon, Silver glass glitter, acetate, Copic markers, Jewels - rhinestones, Double sided tape (X Press), SNAIL adhesive, dimensionals

Friday, July 20, 2012

JAI 127 Just add a colour combo


Hello there,
well this week at Just Add Ink we have a challenge with a choice for you!  We want you to add Black and White and one other colour of your choice - sounds fun eh?
I seem to be turning a lot to black, red and white (or vanilla) as a favoured colour combination - but then it is one that's hard to go past, as it has such an elegant feel. In this particular instance my red was Riding Hood Red pulled from the Twitterpated DSP. So here is what I came up with - a new card fold for me - a bit fiddly but the end result is pretty special! Here it is.

Opening up

The inside
I saw this type of card demoed at our recent convention (by Pam Morgan, SU home office) and was intrigued by the idea of using my framelits in a different way. My initial investigations informed me that I was actually going to need three pieces, two with the edges shaped by the framelit and the last that forms the base. (I discovered even a 12" long piece of cardstock is not long enough to get a full length card base and then the overlap to close.) So having worked that all out I started cutting out layers, edges and framelit layers for the focal point. Next was to sponge around all the edges to add some vintagey depth and I also used markers to ink up the large blossom branch to stamp the inside. Then time to assemble it all. The only tricky bit here is to plan where you want the two fasteners to be. Then I made sure that the brad prongs and fastening twine were all secured between the DSP and cardstock mats so that the final finish is clean.

The outcome is pretty special, and very fun to open but tricky to photograph ;)

Thanks for visiting,
Kim

Recipe: All SU! unless otherwise noted
Stamps: Apothecary Art, Elements of Style
Cardstock: Basic Black, Whisper White, Riding Hood Red
Ink: Basic Black, Riding Hood Red, just a smidge of Crumb Cake
Accessories: Labels Collection Framelits, Perfect Polka Dots embossing folder, Twitterpated DSP, Vintage brads, Victoria lace, Cherry Cobler seam binding, Cherry Cobler twine, Double sided tape, SNAIL adhesive, Dimensionals

Friday, June 15, 2012

JAI 122 Just add Delys Cram


Hello there,
welcome back for another challenge for Just Add Ink. This week we want you to... Just Add Delys Cram. Yes its time to CASE another one of the DT, Delys has a wonderful creative way with cards and her scrapbooking is just awesome! Go and have a browse through her blog and find a project that you'd like to CASE. I didn't have to go far to find something that made my fingers itch to get creating ;)   Firstly here is Delys card that I choose to CASE.


I really liked the layout on this card and what really caught my eye was how Delys used the new SU! edgelits. So off I went and this is what I came up with.
A simple inside using the remnant edgelit die cuts.
I stayed true to Delys layout but as you can see I changed the orientation and I decided to go with a pink and grey colour scheme. The putting together so to speak is pretty straightforward - but extra touches include sponging around edges,some paper piercing detail, colouring of the flowers, adding a couple of trimmed out extras on top for added dimension, and finally some little pearls to finish it all off.
Now I have one more card for you today that was also inspired by Delys card. But I have taken a much more stripped down approach and alot more license with the layout.
As you can probably guess this one is a card for a man - it's on its way to my FIL as I write this! The distressed DSP was my starting point for the woodgrain and colours. Then add in some piercing, pinking shear border, twine and a button and all done. This one was alot faster to put together than the girly version!!

So as you can see you can have alot of fun with this challenge :)
Thanks for visiting,
Kim

Recipe: All SU! unless otherwise noted
Card One
Stamps: Apothecary Art
Cardstock: Pink Pirouette, Basic Gray, Whisper White
Ink: Basic Black, Basic Grey, Pink Pirouette, Pretty in Pink, Certainly Celery
Accessories: Twitterpated DSP, Labels Collection Framelits, Edgelit Adorning Accents, Blushing Bride Pleated satin ribbon, Mat pack and piercing tool, Jewels - pearls, SU! button (R), embroidery thread, Sponge, Dimensionals, Double sided tape (X Press)

Card Two
Stamps: Woodgrain, Afterthoughts
Cardstock: Blue Bayou (R), Naturals Ivory
Ink: Blue Bayou (R), Cajun Craze, Crumb Cake
Accessories: Rugged DSP (Creative Memories), Woodgrain impression plate (Papertrey Inc),  Labels 2 (Spellbinder), pinking shears, Island Indigo twine, Regals button, Mat pack and piercing tool, Dimensionals, Double sided tape (X Press) 

Friday, June 1, 2012

2012 Convention Swaps

Hello there,
well I've been very happily occupied with attending the Australian/ New Zealand SU! Convention for the last day or two (big smile). In the lead up I was flat out trying to get swaps and a special little pressie for my fellow  JAI  design teammates ready. As a consequence I just didn't have the time do something for this weeks Just Add Ink challenge :( Luckily it was my "off" week. But do go to JAI and see what others on the DT have come up with for another great challenge. Since by now my convention swaps have been swapped I thought it would be a good occaision to actually post them! I made three different swaps. Here they are.
Made in three colour ways

Number two
Number three (this one was a re-creation I first blogged it here, for a JAI inspiration challenge)
In total I made 60 (not of each) and just finished them by the skin of my teeth. As to the little pressie's for my JAI teammates well I hope to blog that sometime soon ;)

Thanks for dropping by :)
Kim

Recipe: All SU!
Swap One
Stamps: Mixed Bouquet, Creative Elements, Apothecary Art
Cardstock: Early Expresso,Very Vanilla, (Pretty in Pink or Cherry Cobler or Marina Mist)
Ink: Early Expresso, (Pretty in Pink or Cherry Cobler or Marina Mist)
Accessories: First Edition DSP, Perfect Polka Dot embossing folder, (Blossom, Boho Blossom, Dotted Ribbon Scallop border) punch, Silver brad, Pretty in Pink satin ribbon or Marina Mist Scallop Dots ribbon or Cherry Cobler seam binding, Dimensionals, SNAIL, Double sided tape (X Press)

Swap Two
Stamps: Kindness Matters, Loving Thoughts, Apothecary Art
Cardstock: Crumb Cake, Basic Black
Ink: Basic Black, Versamark, Whisper White, Crumb Cake
Accessories:Labels Collection Framelits, Petal Cone Bigz die, Corner rounder (R), Gold embossing powder, Black satin ribbon, Gold brads, Sponge, Dimensionals, SNAIL, Double sided tape (X Press)

Swap Three
Stamps: Creative Elements, Clearly for You
Cardstock: Whisper White, Basic Black
Ink: Daffodil Delight, Pumpkin Pie, Tangerine Tango, Real Red, Basic Black
Accessories: Designer Frames embossing folder, Corner rounder (R), Jewels - rhinestones, Blender pen, Dimensionals, SNAIL