Showing posts with label Ski Slope DSP. Show all posts

Sunday, January 13, 2013

Merry Monday 44- A New year goal

Hello there, 
well as a change from my 2012 unblogged series I decided I had better stick to a new year goal I set myself which was to play along with the Merry Monday challenges this year. I found myself for the second year running, rather ironically, after running Christmas card classes for the five months before Christmas not having mine done! So this is my attempt to rectify that - and also play with all of my Christmas stamp collection (which is ahh - rather extensive ;) The Merry Monday challenge this week was a colour challenge.


My mind wasn't playing along with new ideas so I decided to remake a card I made for a lovely friend (as part of a secret santa exchange) this past Christmas which remains unblogged, so far anyway. Here's the new version.

A shaker card is always going to bring a smile to anyone's face - so fun! Well its late, I only just realised I needed to get this up tonight 20 mins ago. So no more chatter from me!

Thanks for visiting,
Kim

Recipe: All SU! unless otherwise noted
Stamps: Winter Snow Globe (Papertrey Ink)
Cardstock: Island Indigo, Pool Party, Whisper White 
Ink: Real Red, Pool Party, Island Indigo, Whisper White, Memento Tuxedo Black, Versamark
Accessories: Labels collection framelits, Ski slope DSP (R), SU! shaker frames, 1 3/4" and 1 3/8" circle punches, Corner rounder (R), Double ended banner die (PTI), white embossing powder, Island Indigo ruffled ribbon, Silver glass glitter, acetate, Copic markers, Jewels - rhinestones, Double sided tape (X Press), SNAIL adhesive, dimensionals

Friday, July 6, 2012

JAI 125 Just add winter


Hello there,
well we have a very seasonal challenge for you this week on Just Add Ink - it is Just Add Winter. The frosty mornings we have in my little corner of AUS made me feel that this cute little polar bear was just the perfect image for winter. I certainly go to work every morning with a scarf on at the momment!
I started with the concept of framing my bear in a scallop circle card and pulled the colours from probably my most favourite SU! christmas DSP - Ski Slope - if you look carefully you'll see a few little scraps on the card ;) So I coloured my bear and paperpieced his scarf, then die cut this out as the top mat. That was finished off with a few blinged snowflakes. Down the bottom I added some DSP, the sentiment banner and a snowflake embellishment. The inside echoes the front, with a red mat then white top layer, finished with a snowflake. So another special Christmas card to add to my pile! Next week though, I can promise you it won't be a Christmas card - lol!

Thanks for visiting,
Kim

Recipe: All SU! unless otherwise specified
Stamps: Snow Flurries (R), Cool Yule, Presents for You (My Favorite Things)
Cardstock: Baja Breeze, Real Red, Whisper White, X Press blending card
Ink: Baja Breeze, Real Red
Accessories: Ski Slope DSP (R), Scallop circle BigZ die, Dotted Scallop Ribbon border punch, Classic circle nestabilities (Spellbinder), Double ended banner die (PaperTrey Inc), Let it snow dienamic (My Favorite Things), Copics (YG, R22, R24, R27), Jewels - rhinestones, Dazzling diamonds, Double sided tape (X Press), SNAIL adhesive, 2 way glue pen, Dimensionals

Friday, June 8, 2012

JAI 121 Just add pearls

Hello there,
well I'm settling back into life after convention. I had a wonderful time meeting up with some special stamping friends and am already looking forward to seeing them again next year in Brisbane! I have some great new ideas to try out so hopefully some of those will make their way here over the next few weeks. But for today I can show you the new challenge from Just Add Ink. This week we want you to Just Add Pearls. Here's what I came up with.

I wanted to make a birthday card for a special stamping friend so I tailored the colours to something I knew she would like - hence the red and indigo. I also had a new blossom punch to play with ;) I started by inking the flower with markers, then layered that over two red punched blossoms, fixed it together with a brad then spritzing with glimmer mist and letting it dry. You get a great 3D effect doing this although that does make it tricky to post! But since I was hand delivering this one at convention I didn't have to worry about that. I used the flower as the feature and accented it with coordinating DSP, some lacey border detail, stitching and of course lots of pearls. The pearls are a subtle but I think really important finishing touch.

Do go check out the rest of the DT they will have some wonderful pearl adorned creations to inspire you!!

Thanks for visiting,
Kim

Recipe: All SU! unless otherwise noted
Stamps: Create a Cupcake, Mixed Bouquet
Cardstock: Real Red, Island Indigo, Whisper White
Ink: Real Red, Island Indigo
Accessories: Blossom punch, Corner rounder (SU!), Mat Stack 3, Mat Stack 3 layerz and Filigree border die (PaperTrey Inc), Twitterpated DSP, Ski Slope DSP (R), Frost white shimmer paint, Jewels - pearls, sewing machine, wide Real Red grosgrain ribbon (R), Dimensionals, SNAIL, Double sided tape (X Press)

Tuesday, December 20, 2011

Inkspirations 100 - Inspired By

Hello there,
well an extra post in a week has been a rarity for me in the last six months or more, just to busy balancing family, work etc. But when I saw Makeesha Byl's post that the Inkspiration challenges were shutting up shop and were going out with one last challenge - well I just had to join in. The Inkspiration challenges were the first challenges that I participated in and I had the great delight of being a guest designer a couple of times. The design team have never failed to produce innovative and just plain gorgeous work! The challenge was to show your Christmas projects - what ever you've been making for the Christmas season - decorations or gifts. I decided use the card and gifts I made for my Miss 6 teacher. Here they are.

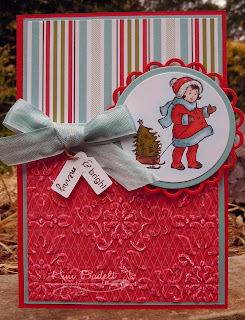
I started with the card - and went just a little vintage using the super cute little Christmas girl from Greeting Card kids, colouring her in with copics. I added some gold highlights to the Christmas tree and dazzling diamonds to her hat. I especially liked the slightly distressed feel I got by embossing the DSP panel on the bottom! I had been planning to using the same DSP on the pencil box which my Miss 6 described as "awesome". I loved it too!! This is one of the inspired by elements - I purchased the template from Ilina Crouse's blog (one of the Inkspirations DT) . I pretty much followed Ilina's instructions as is, just changed up some of the colours and retro fitted some extra tabs to hold the bottom on. So anyway back to the DSP - I was going to use the same but Miss 6 said she wanted numbers and so I dug out some other DSP, colours all still matched so it all still works. As you can see the top of the "pencil" flips open. I stuffed it full of chocolates and then perched the brooch I made on the little shelf at the top. The brooch is my other inspired by element - I was lucky enough to get a gorgeous brooch by Michelle Martin at the SU! convention this year. So I decided to make one of my own. In a nutshell I just stamped some swirls on some DSP, punched out a flower shape, then 4 more flowers of cardstock. Use Tombow to adhere all these layers together, leave to dry. Then give the top a coating of crystal effects, pressing the ribbon threaded button into this and leave it all the dry and set. The next day turn over and coat back with crystal effect pressing the broach pin into it and leave to dry.

Miss 6's teacher was delighted, and I'm slowly nibbling my way through the chocolates that couldn't fit into the box - bonus ;)

Thanks for visiting - and a big thanks to the Inkspiration team - I will miss the challenges and the wonderful inspiration you all provided!

Kim

Card
Recipe: All SU! unless otherwise noted
Stamps: Greeting Card Kids, Holiday Button Bits (PaperTrey Inc)
Cardstock: Real Red, Baja Breeze, Whisper White, X Press copic blending card
Ink: Chocolate Chip
Accessories: Vintage Wallpaper embossing folder, Medium Jewelery Tag punch, Lacey and classic circles nestability (Spellbinder), Baja Breeze seam binding, Copic markers, Gold leaf pen, Dazzling Diamonds, Ski Slope DSP (R), Linen Thread, Dimensionals, Two way glue pen, Double sided tape, SNAIL adhesive.

Pencil Box
Recipe: All SU! unless other wise noted
Stamps: Tart and Tangy (R)
Cardstock: Real Red, Basic Black, Sahara Sand, Whisper White
Ink: Real Red, Chocolate Chip, Old Olive
Accessories: Celebrations DSP (R), Sticky strip, Double sided tape, Tombow multi

Brooch
Recipe: All SU! unless otherwise noted
Stamps: Barque Motifs
Cardstock: Riding Hood Red
Ink: Black Stazon
Accessories: Love Letter DSP (R), Black button, 1/8" Real Red taffeta, Boho Blossom punch, Tombow multi, Crystal effects, sponge, brooch pin (craft store)

Sunday, February 6, 2011

Happy Birthday PTI

Hi there,

PaperTrey Inc are just starting their fourth birthday celebrations, see Nichole Heady's post here, and they have a fabulous crafty hugemongeous prize for Day 1, all you need to do is repost your favourite PTI post of the last year. I had a quick browse this morning and decided to go with these little cuties I made last December. I was really delighted when these were selected as one of Passion for PaperTrey top three picks for their Christmas challenge :). So please read on about the little treat boxes for the kids. Here's the end result. First a close up of the girls boxes.
And a close up of the boys boxes


The boxes are fusion of SU! and PTI. To start with I used the Favor it 2 box die to cut the boxes out (you need two per box) Baja Breeze for the boys and Real Red for the girls. (I decided to use some retired SU! DSP Ski Slope to decorate the boxes hence the colour scheme.) I labelled the boxes using first a Mat Stack 1 die cut (stamped with the matching Mat Stack stamp from Tiny Treats: Christmas) then different Limitless Layers 1 3/4" circles for the girls and boys. Lastly I added a stamped and coloured image from Tiny Treat: Christmas - Santa for the girls and seriously the cutest reindeer ever for the boys. I coloured the Santa and reindeer in using SU! markers. The last touch was just a few rhinestones to bling them up a bit - a very important detail according to my Miss 5 (she made sure the girls got three rhinestones on theirs!) I used a cello bag filled it with a few home made Christmas biscuits we'd made Saturday afternoon and some little chocolate Santa's. Then tied it closed with some dotty Real Red ribbon.

It was a labor of love - but fun I have got to say :) and the kids loved them which definitely makes it worth while!!

Thanks for visiting,
Kim

Recipe: SU! and PaperTrey Inc
Stamps: Tiny Treats: Christmas (PTI)
Cardstock: Real Red, Baja Breeze, Whisper White (all SU!)
Ink: Real Red, Baja Breeze, Basic Black, Close to Cocoa, YoYo Yellow, Brocade Blue
Accessories: SU! Ski Slope DSP (R), Real Red stitched dotty grosgrain ribbon, small cello bags, Sticky Strip, 1 3/4 " circle punch, Dimensionals, PTI Favor it Box 2 die, Mat Stack 1 die, Limitless Layers 1 3/4" circle dies

Tuesday, December 7, 2010

Guess what I did Saturday night

Hi there,

well rather unexpectedly a box of some delightful new crafty goodies arrived on my doorstep last Saturday and I couldn't resist playing with them once the kids were tucked up in bed that night. I had a purpose in mind too - which helps - we were going to a Christmas coffee get together with some good friends Sunday and I wanted to make some little treat boxes for the kids. Here's the end result. First a close up of the girls boxes.
And a close up of the boys boxes


The boxes are fusion of SU! and PTI. To start with I used a the Favor it 2 box die to cut the boxes out (you need two per box) Baja Breeze for the boys and Real Red for the girls. (I decided to use some retired SU! DSP Ski Slope to decorate the boxes hence the colour scheme.) I labelled the boxes using first a Mat Stack 1 die cut (stamped with the matching Mat Stack stamp from Tiny Treats: Christmas) then different Limitless Layers 1 3/4" circles for the girls and boys. Lastly I added a stamped and coloured image from Tiny Treat: Christmas - santa for the girls and seriously the cutest reindeer ever for the boys. I coloured the Santa and reindeer in using SU! markers. The last touch was just a few rhinestones to bling them up a bit - a very important detail according to my Miss 5 (she made sure the girls got three rhinestones on theirs!) I used a cello bag filled it with a few home made Christmas biscuits we'd made Saturday afternoon and some little chocolate Santa's. Then tied it closed with some dotty Real Red ribbon.

It was a labor of love - but fun I have got to say :) and the kids loved them which definitely makes it worth while!! Christmas is everywhere in blog land at the momment but since these are mostly PTI I thought I might add them to the Passion for PaperTrey Christmas challenge - cause there was passion involved in their making and a very late night!

Thanks for visiting,
Kim

Recipe: SU! and PaperTrey Inc
Stamps: Tiny Treats: Christmas (PTI)
Cardstock: Real Red, Baja Breeze, Whisper White (all SU!)
Ink: Real Red, Baja Breeze, Basic Black, Close to Cocoa, YoYo Yellow, Brocade Blue
Accessories: SU! Ski Slope DSP (R), Real Red stitched dotty grosgrain ribbon, small cello bags, Sticky Strip, 1 3/4 " circle punch, Dimensionals, PTI Favor it Box 2 die, Mat Stack 1 die, Limitless Layers 1 3/4" circle dies

Friday, September 3, 2010

JAI 33 - Just add a sketch


Hi all,

welcome back for another Just Add Ink challenge. This week its a sketch and yep once again I had to have a go on my week off ;) Here's the sketch.


I decided to turn the sketch and make the panel element a christmas bauble. Yes another Christmas card :) But its kind of nice to get a head start on the season! Here's what I can up with - and most unusually very little stamping!


I started by pulling out what's left of my Ski Slope DSP - my favourite SU! Christmas DSP - that decided me on a Real Red base layered with some Baja coloured DSP. I pierced the DSP all around the edges and rounded the bottom corners of DSP and Real Red base. Next I made the bauble simply by punching out 5 scallop circle folding them in half and then adhering each half back to back with another using Tombow. Having made my bauble I then added a strip of 5/8" Real Red grosgrain layered with some white taffeta down the DSP off centred to the left. I worked out where I wanted the bauble to go and then attached a rhinestone brad below the bauble location. I also made a taffeta bow and wrapped the prongs of another rhinestone brad around the middle, this was attached above the bauble. The bauble itself I glued down to the DSP with more Tombow. Then I could wrap the ribbon ends under the DSP and attach that to the base. Final touch was to stamp the sentiment - inking up my stamp first in versamark and then Real Red. Then clear embossing. Because the bauble folds down this is still reasonably mailable which is a bonus! (Although the rhinestones might prove tricky but do it just with a bow and you'd be right). I haven't finished off the inside but then I often don't with Christmas cards as I like to leave lots of room to write an annual hello there message to friends.

Thanks for visiting and if you have time why don't you try your hand at this great sketch and then link your creation back to Just Add Ink.

Kim

Recipe: All SU!
Stamps: Snow Swirled
Cardstock: Real Red
Ink: Real Red, Versamark
Accessories: Ski Slope DSP (R), Scallop circle punch, Clear embossing powder, 5/8" Real Red grosgrain, white taffeta, Rhinestone brads, Mat pack and piercing tool, Dimensional, Double sided tape, Tombow


Sunday, January 3, 2010

Happy New Year


Good morning everyone,


I hope you all had a nice New Years Eve, we had friends over for a BBQ which was really nice.


I thought I would start the year with a quick post with some of my development Christmas cards, the ones I made before I came up with my final design.

This first one isn't my favourite - I think it would have looked better with a larger sentiment.


I really liked the effect of the All About Christmas wheel (R) on this one, something I will keep in mind for next year.


This last one is my favourite but just wasn't so practical for mass producing - so lost out on those grounds.

I won't go into construction details, it should be fairly easy to see how they came together. All details are in the recipes below.

Thanks for visiting....and looking forward to hearing from you in 2010:)

Kim


Recipe Card One: All SU unless otherwise noted

Stamps:Tree Trimmings, Best Yet

Cardstock: Real Red, Old Olive, Whisper White

Ink: Real Red, Chocolate Chip

Accessories: Ski Slope DSP, Silver brad, Eyelet border punch, 1 1/4" Riding Hood Red Striped Grosgrain ribbon, Mat pack and piercing tool, Dimensionals, SNAIL adhesive


Recipe Card Two: All SU unless noted otherwise

Stamps:Tree Trimmings, All About Christmas (R)

Cardstock: Old Olive, Bashful Blue, Whisper White

Ink: Old Olive, Chocolate Chip

Accessories: Holiday Thyme DSP (R), Silver brad, 1" double stitched Bashful Blue grosgrain ribbon, Eyelet border punch, Dimensionals, SNAIL adhesive


Recipe Card Three: All SU unless noted otherwise

Stamps: Tree Trimmings, Short and Sweet

Cardstock: Real Red, Bashful Blue, Whisper White

Ink: Real Red, Bashful Blue

Accessories: Spellbinder Oval Classic and Scalloped Nestabilities, Ski Slope DSP, Kaiser Rhinestones, Scallope edge punch, Word Window punch, Dimensionals, SNAIL adhesive

Thursday, December 31, 2009

The Christmas card


Hello, hello, hello there,

I hope everyone had a very happy Christmas. We had a lovely time visiting my parents, the kids got to go to the beach a couple of times, Mum (me) got to go to the movies for the first time in three years! and do some shopping. I bought myself a new border punch that I have been wanting to get my hands on (Apron Lace from Fyskars). It's nice to be home though and aside from some decluttering (every surface in our house seems to attract some) and preparing for a BBQ tonight I couldn't resist posting. Actually I have a few things I'd like to post but given that Christmas is rapidly disappearing I thought I had better post my "official" Christmas card for 2009.


I played around with Tree Trimmings, for a few weeks trying to find a layout that I liked. I'd seen some great cards but wanted to come up with something that was easy to reproduce but looked good and was mostly mine in design. I can't remember what triggered it but I was seized by an idea and then was able to make up a prototype very quickly - hooray!! In fact I prepped up the pieces for 20+ cards and took them with me on holiday in November and then just assembled two cards a day till I was done.

I wanted to do a traditional colour version and a non traditional version, the blue/olive mix was mostly DSP inspired, the Ski Slope DSP available then used those together as did the (long retired) Holiday Thyme DSP I used on those cards. Enough blather - the design pretty simple, the base of the card is stamped with stars/snowflakes, over that is a Old Olive panel scalloped down one edge. Then the image panel goes over that. DSP at the bottom, the greeting and a bauble raised on dimensionals. A strip of ribbon goes over to blend the join.
Thanks for visiting through this first year of blogging - its been a great fun and I love to hear your comments.
Have a Happy New Year,
Kim
Recipe: Trad colours (All SU unless otherwise noted)
Stamps: Sleigh Full of Toys (R), Tree Trimming, Sincere Salutations
Cardstock: Real Red, Old Olive, Whisper White
Ink: Real Red, Chocolate Chip, White Craft
Accessories: Ski Slope DSP (R), Scallop Edge punch, wide Real Red and Old Olive grosgrain ribbon, Silver brad, dimensionals, Double sided tape, SNAIL adhesive
Recipe: Non-Trad colours (All SU unless otherwise noted)
Stamps: Sleigh Full of Toys (R), Tree Trimmings, Sincere Salutations
Cardstock:Bashful Blue, Old Olive, Whisper White
Ink: Bashful Blue, Old Olive
Accessories: Holiday Thyme DSP (R), Scalloped Edge punch, 1" Double stitched Bashful Blue grosgrain ribbon, narrow Old Olive grosgrain ribbon, silver brad, dimensionals, double sided tape, SNAIL adhesive

Tuesday, November 3, 2009

An Ornate Trimming


Hi there,

Well once again its time for me to load my entry for Makeesha weekly challenge – this week a sketch. Here’s the sketch.

I’m still on my Christmas card crusade so the type of card was easy to decide on, and this is what I came up with.

I’ve been doing a lot of fairly white cards lately so I decided to try something a bit richer and more ornate. With that in mind I started off with a Real Red base, on the top I added a new Cuttlebug folder I aquired recently- Victoria in Baja, which gives a nice ornatish effect that ties in with the broad stripy Ski Slope DSP (I really love this DSP - for some reason Christmas ones are often so dark and muted but this has lovely bright patterns). I also decided to crack open some new Spellbinder dies - Labels 9 which I thought would suit the feel. So I cut out a large red label 9 shape then the next size down in white (making sure it was just big enough to fit my Tree Trimming ornament on). To get the white border on the red layer I left the die on and traced around the inside edge with a white gel pen. I was quite happy with the effect. I simply stamped the largest ornament in real red on white and then trimmed it out, mounting it on dimensionals in the label 9 panel. Before doing that I did add the ribbon and white brad. The sentiment I stamped then punched out with the curly label punch, just doodled around the edges with a red marker and then slipped the end under the ribbon. Three little red pearls (timely aquired only just on Sat) finished off the card. My overall feeling about it is that I do like it (90%)but I feel like something isn't quite there but I haven't been able to figure out what that factor is. So it will just have to stay as is.
Thanks for visiting.
Kim

Recipe: All SU unless otherwise noted
Stamps: Tree Trimmings, Short and Sweet
Cardstock: Real Red, Baja Breeze, Old Olive, Whisper White
Ink: Real Red ink pad and marker
Accessories: Ski Slope DSP, Spellbinders Labels 9, Curly Label punch, Cuttlebug Victoria folder, Wide Old Olive grosgrain ribbon, Narrow Real Red grosgrain ribbon, White gel pen, Red Half Pearls (Kaiser), Small white brad (Bo Bunny), dimensionals, SNAIL adhesive