Friday, January 27, 2012

JAI 102 - Just Add Kathy Tanner


Hello there,
well this week at Just Add Ink we have a chance for you to be really inspired! The challenge this week is to case one of the team - Kathy Tanner. She is one talented lady so I have no doubt you will enjoy finding something wonderful to CASE! I loved the card I choose to case at first site. Here's Kathy's card.

And here is my spin on it


I was still working in pink mode when I made this one - so its all Melon Mambo and Pretty in Pink on a Confetti White base. I got to try a couple of new things here - which is always fun - I inked up my embossing folder with Pretty in Pink and then embossed and I used the tulip frame embossing folder for the first time!! It took a little bit of jiggling and fiddling to get the "squares" (they turned out as rectangles in the end) the right size. Then more jiggling and fiddling to get the "squares" arranged in an order I thought looked good. I sponged around all the edges and also added some PIP accents to various swirly and butterfly bits. The front was finished off with some scalloped Mambo ribbon and a sentiment medallion. Got to say I love this elegant design and it was a real delight to CASE Kathy. So I hope you get the chance to as well!

Thanks for visiting,
Kim

Recipe: All SU! unless otherwise noted
Stamps: Creative Elements, All a Flutter, Clearly for You, Watercolor Trio (R), Bliss (R)
Cardstock: Melon Mambo, Pretty in Pink, Confetti White
Ink: Melon Mambo, Pretty in Pink
Accessories: Framed Tulips embossing folder, Final Press embossing folder,Lots of Tags sizzlet, Large oval punch, Scallop Dots ribbon Melon Mambo, Silver brads, Brayer, Blender pen, Double sided tape (X Press), SNAIL adhesive, Dimensionals

Friday, January 20, 2012

JAI 101 - just add a sketch

Hello there,
welcome back for a new Just Add Ink challenge. This week we have sketch challenge for you and here it is - a nice square one.
 I just happened to be browsing the local craft store and saw some scrapbook frames that were just perfect for making some wall art for my kids rooms and they were square - perfect. Here is what I made for my Miss.
A close up of the gold shimmer
And a close up of one of my favourite bits - I tried stamping on the frame and wrapping it around
I really started from scratch with this, as the frame was a raw pine one and I've got to say it was quite fun! So first I painted it with hot pink acrylic paint (which not surprisingly we had in the house) then once that layer had dried I coated it a couple of times with white acrylic paint. Then once that dried (being summer it didn't take all that long for each layer to dry) I sanded the frame, trying to get a gentle distressed look and also aiming to get some of the pink to show through. Once that was all done I stamped the swirl onto the frame, wrapping it around the sides. Then I sprayed the frame with gold shimmer - liberally ;) After that was all dry then sprayed the frame with sealer, and as the final touch added some rhinestones. Now for the inside. I knew I wanted a big butterfly to be centre element of the sketch and I wanted a substantial one. So I die cut a chipboard one and also one in DSP, glued them together and then embossed. I then sponged the edges of the butterfly with Pretty in Pink and just a touch of Melon Mambo to accent the edges. Made some antenna out of jewelery wire and added some buttons and then more gold shimmer for the butterfly! Underneath the butterfly I have a scalloped square of text DSP (the only bit my daughter did not like but I was equally adamant that it would stay). That was layered over more patterned DSP, I sponged the edges of both layers with PIP and MM again. Ok last thing was to add a sentiment - my little Miss and I both agreed that "follow your dreams" was a good one. Now I just need to make one for my little boyo - I thinking a space theme for his I think.

Right I was up wayyyyy too late last night so I need get to bed - and I have certainly babbled on enough ;0 so many thanks for visiting!! and if you can give the sketch a try. Oh and don't forget the JAI scrapbooking challenge that runs till the last Friday of the month.

Kim

Recipe: All SU! unless otherwise noted
Stamps: Elements of Style, Fillable Frames #3
Cardstock: Pretty in Pink, Melon Mambo, Very Vanilla
Ink: Pretty in Pink, Melon Mambo
Accessories: Beautiful Butterflies Bigz die, Scallop square duo Bigz die, Elegant Bouquet embossing folder, Flirtaceous DSP, First Edition DSP, Designer Label, Modern Label punches, 1" circle punch, Jewels - rhinestones, Gold smooch spray, chipboard, Razeberry Fizz vintage buttons (PaperTrey Inc), jewelery wire, Acrylic paint, Tombow multi, daubers, Dimensionals, Double sided tape.

Monday, January 16, 2012

A bit of holiday button fun

Well hello there,
most unusually there is a change in the programming this week ;) Why? Well as I'm slowly catching up on my blog browsing (I was so busy before Christmas my Google Reader was up to 700 - yikes!) I came across an idea and a challenge, Brandi Wiggins-Cote's January Squareheaded Pinterest challenge. The challenge was to make a button bracelet - I figured this would be something fun to do with my Miss almost 7 especially since we are on school holidays at the momment. The chance to sit down and tip buttons all over the table came up yesterday and the end result was alot of fun, a delighted daughter and a button bracelet for me and two for her! Here's the pic's.

I used an elastic thread for her bracelets, not that durable but makes it easy for her to get the bracelets on and off. For mine I used some PTI dark chocolate twine and PTI buttons. The glass beads, there are two on my bracelet were ones I had in my stash acquired at a craft fair a few years ago. High time I used them - eh!! The bracelets are pretty simple but considering it took all of about 10 minutes (or less) to make each one I reckon thats OK!

Right normal blog programming will now resume ;)

Thanks for visiting,
Kim

Friday, January 13, 2012

JAI 100 Just add crowns blog hop


Well hello there and happy 2012!
After a short intermission for Christmas and New Year I’m back with a bang ;) The Just Add Ink team have decided to start the year off by celebrating our 100th challenge with a Blog Hop. The theme of the blog hop is to Just Add Crowns (think royalty related theme). You may have just come from Kathy Tanner’s blog, if not make sure you go and check out her very cute princess! You can start the blog hop here, with any of the DT members or at the JAI blog. Because this is a special occasion we are also offering prizes!! – one for commenting on all the DT blogs and one for the winner of the challenge.

When the theme was set for this blog hop one idea immediately popped into my mind, something special I had been saving up to try for my gorgeous girl and seeing as her birthday is coming up it was the perfect time. Now kings and queens (who of course wear crowns, have to keep their crowns somewhere safe don't they ;) - and of course that would be a castle!! I first saw a castle card on Liam Pulcher's blog here and followed her link back to Deneen's tutorial here. I printed Deneen's templates two to a page, so approximately half size. I wanted my finished card to be as close to a standard A5 size, so once I cut out the template pieces I just widen them to 4” for each panel that way I could cut all three panels from one 12x12 piece, and just score the folds.
The glittery 7 surprise
The front and back unfolded

Close ups


Since this is my special little girls birthday card I went with a colour combo that would appeal to her tastes – well the pink (Regal Rose) and yellow (Daffodil Delight) do - although she is bit iffy on the Expresso! So starting with a Regal Rose base, I covered the front and back inside panel with DSP (Sweet Stitches), I also prepared a layer of impressed Expresso for the back panel that the front door opens on to. I sandwiched a bit of decorative scalloped trim in between some of these layers. Finally I added one more panel of Expresso for the turret roof. This probably sounds confusing so please do look at the photos. Then I added lots and lots of bling, and garlands of little flowers, with more bling!! Some vines and more flowers finish off the front, and yes those woodgrain doors do open to a little extra glittery surprise! The final touch for the top is a flag to fly from the turret – with a crown (of course ;) and more bling. I kept the layers on the inside pretty flat, a panel to write our birthday message and a large decorative embossed Happy Birthday (yes I’m still loving my coloured embossing powders J). The card opens with a kind of zig zag motion. I can tell you my kids were both entranced and my Mr almost 4 is lobbying hard to get a castle card for his birthday too!

Now don’t forget to keep going through the blog hop and join in the challenge. Next stop is Mae Collins, just click on the blog hop button below to get to Mae’s blog. All the DT blog links are on the JAI blog if there are any hiccups too.

Thanks for visiting and enjoy this right royal occaision J
Kim


Recipe: All SU! unless other wise noted
Stamps: Perfectly Penned, Create a Cupcake,Tiny Tags
Cardstock: Regal Rose, Daffodil Delight, Early Expresso, Whisper White
Ink: Regal Rose, Daffodil Delight, Versamark
Accessories: Sweet Stitches DSP (R), Swirls scribbles sizzlet, Timeless Type alphabet sizzlet, Itty Bitty shapes punch pack, Woodgrain and Linen/Canvas Impression plates (PaperTrey Ink), Double ended banner dies (PTI), Mat Stack 1 and Mat Stack layerz dies (PTI), Corner rounder punch, Dotted Scallop ribbon border punch, Jewels – rhinestones, coloured rhinestones (Kaiser), Pretty in Pink brads, Butter embossing powder (Zing), Fine supernova glitter, Big Shot adhesive sheets, Double sided tape (X Press), SNAIL adhesive, Glue dots

Friday, December 23, 2011

JAI 99 - just add wrapping/ pretty packaging

Hello,
well it's almost Christmas - yippee! The run up has been pretty crazy, but every...thing...is...done...now! even the presents wrapped - hurray. So it's time to sit back and relax (well as much as that is possible with four kids under 6 around - no not all mine!!), catch up on some blog browsing, read a book and perhaps have the odd glass of champagne too :) The challenge this week at Just Add Ink is perfectly suited to the Christmas season - it's just add wrapping/pretty packaging.


I wanted to make my SIL some lavender filled felt strawberries ( I made some of these earlier this year - see this post for the details of the making). The only thing I've improved was to add a little button to hide where the ribbon hanger is stitched on. I figured these juicy berries required some special packaging to showcase them. So I dug out my Petal Cone die and cut two acetate die cuts. I converted the cone die cuts to a box shape by trimming the bottom inch off each then scoring and folding the next inch under to form the bottom of the box. I used sticky strip to hold it all together and then added DSP (on the outside) and cardstock (on the inside) on two sides of the box to hide where the box was adhered together. I decorated all the flaps with scalloped cardstock and DSP, but reversed the orientation on the opposite flaps (hope that makes sense - just look at the pics to see what I mean).  I shredded some white tissue paper to act as a bed for the strawberries, tucked them and  then in the flaps folded up I punched holes and threaded through some taffeta ribbon, tying it in a bow to secure it all. Lastly I added a Christmas tag with some linen thread.

Hope you are all on the home stretch with the Christmas preparations - and then enjoy a Christmas filled with peace, love and joy!!

Thanks for visiting,
Kim

Box
Recipe: All SU! unless otherwise noted
Stamps: Holiday Lights (PaperTrey Inc)
Cardstock: Old Olive, Real Red
Ink: Real Red
Accessories: Petal Cone BigZL die, Bella Rose DSP (R), Beautiful Blooms DSP (PaperTrey Inc), 1/8" Old Olive taffeta ribbon, Linen Thread, 2" scalloped circle punch, 1 3/4" circle punch, Jewels - rhinestones, Sticky Strip, Scor Tape

Strawberries
Red and green wool felt, White embroidery thread, 1/8" Old Olive taffeta ribbon, shell button

Tuesday, December 20, 2011

Inkspirations 100 - Inspired By

Hello there,
well an extra post in a week has been a rarity for me in the last six months or more, just to busy balancing family, work etc. But when I saw Makeesha Byl's post that the Inkspiration challenges were shutting up shop and were going out with one last challenge - well I just had to join in. The Inkspiration challenges were the first challenges that I participated in and I had the great delight of being a guest designer a couple of times. The design team have never failed to produce innovative and just plain gorgeous work! The challenge was to show your Christmas projects - what ever you've been making for the Christmas season - decorations or gifts. I decided use the card and gifts I made for my Miss 6 teacher. Here they are.

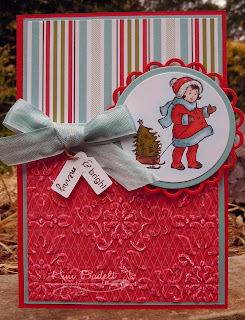
I started with the card - and went just a little vintage using the super cute little Christmas girl from Greeting Card kids, colouring her in with copics. I added some gold highlights to the Christmas tree and dazzling diamonds to her hat. I especially liked the slightly distressed feel I got by embossing the DSP panel on the bottom! I had been planning to using the same DSP on the pencil box which my Miss 6 described as "awesome". I loved it too!! This is one of the inspired by elements - I purchased the template from Ilina Crouse's blog (one of the Inkspirations DT) . I pretty much followed Ilina's instructions as is, just changed up some of the colours and retro fitted some extra tabs to hold the bottom on. So anyway back to the DSP - I was going to use the same but Miss 6 said she wanted numbers and so I dug out some other DSP, colours all still matched so it all still works. As you can see the top of the "pencil" flips open. I stuffed it full of chocolates and then perched the brooch I made on the little shelf at the top. The brooch is my other inspired by element - I was lucky enough to get a gorgeous brooch by Michelle Martin at the SU! convention this year. So I decided to make one of my own. In a nutshell I just stamped some swirls on some DSP, punched out a flower shape, then 4 more flowers of cardstock. Use Tombow to adhere all these layers together, leave to dry. Then give the top a coating of crystal effects, pressing the ribbon threaded button into this and leave it all the dry and set. The next day turn over and coat back with crystal effect pressing the broach pin into it and leave to dry.

Miss 6's teacher was delighted, and I'm slowly nibbling my way through the chocolates that couldn't fit into the box - bonus ;)

Thanks for visiting - and a big thanks to the Inkspiration team - I will miss the challenges and the wonderful inspiration you all provided!

Kim

Card
Recipe: All SU! unless otherwise noted
Stamps: Greeting Card Kids, Holiday Button Bits (PaperTrey Inc)
Cardstock: Real Red, Baja Breeze, Whisper White, X Press copic blending card
Ink: Chocolate Chip
Accessories: Vintage Wallpaper embossing folder, Medium Jewelery Tag punch, Lacey and classic circles nestability (Spellbinder), Baja Breeze seam binding, Copic markers, Gold leaf pen, Dazzling Diamonds, Ski Slope DSP (R), Linen Thread, Dimensionals, Two way glue pen, Double sided tape, SNAIL adhesive.

Pencil Box
Recipe: All SU! unless other wise noted
Stamps: Tart and Tangy (R)
Cardstock: Real Red, Basic Black, Sahara Sand, Whisper White
Ink: Real Red, Chocolate Chip, Old Olive
Accessories: Celebrations DSP (R), Sticky strip, Double sided tape, Tombow multi

Brooch
Recipe: All SU! unless otherwise noted
Stamps: Barque Motifs
Cardstock: Riding Hood Red
Ink: Black Stazon
Accessories: Love Letter DSP (R), Black button, 1/8" Real Red taffeta, Boho Blossom punch, Tombow multi, Crystal effects, sponge, brooch pin (craft store)

Friday, December 16, 2011

JAI 98 - Just add sparkle


Well hello there :)
How is everyone tracking with their Christmas preparations? I'm finally making headway with mine but still have a stack of cards to write and post out.  This week at Just Add Ink we have a very appropriate challenge for the Christmas season - its Just Add Sparkle. I had a special Christmas card in mind for this challenge...here it is.

This one came together pretty quickly once I had the colour combo, I wanted something a little vintage and soft to go with the gorgeous angel die that I planned to use. So first up a Pear Pizzazz base, then a Perfect Plum mat, then the vanilla top mat. I stamped a frame of greenery around the panel, adding Plum and Blushing Bride berries. Then I die cut and stamped my angel, and added a hanger for her. Finishing touches include the sparkle (of course ;) rhinestones "berries" and glass glitter on the wings, and a sentiment - a very appropriate one in my case as the card has already made its way to my parents :)

As usual at the momment I dead knackered so that is from me!! Have a good week and check out the rest of the amazing DT offerings  - they are stunning!

Thanks for visiting,
Kim

Recipe: All SU! unless otherwise noted
Stamps: Tree Trimmings, Love Lives Here: Holiday (PaperTrey Inc)
Cardstock: Pear Pizzazz, Perfect Plum, Very Vanilla
Ink: Pear Pizzazz, Perfect Plum, Blushing Bride, Early Expresso
Accessories: Love Lives Here" Holiday dies (PaperTrey Inc), Corner Rounder punch, Silver glass glitter, Jewels - rhinestones, Tombow multi, Dimensionals, Double sided tape