Showing posts with label Create a Cupcake. Show all posts

Friday, July 19, 2013

JAI 174 Just add a colour combo

Hello there,
well I must admit I almost forgot to write up my post this week as my usual program of weekly events is all out of sync because of school holidays. But I'm really glad I did remember as this week at Just Add Ink we have a lovely, very new, colour challenge for you. Yes this week its time to Just add a colour combo. Here's the colours.
Now if you don't have these exact colours, you can substitute with close alternatives - say for example Crumb Cake and Pool Party in SU! terms.

A close up of my first Simply Pressed clay button, painted with a light sheen of crystal effects. I was delighted with how it turned out - and it was a lot of fun to make it too!
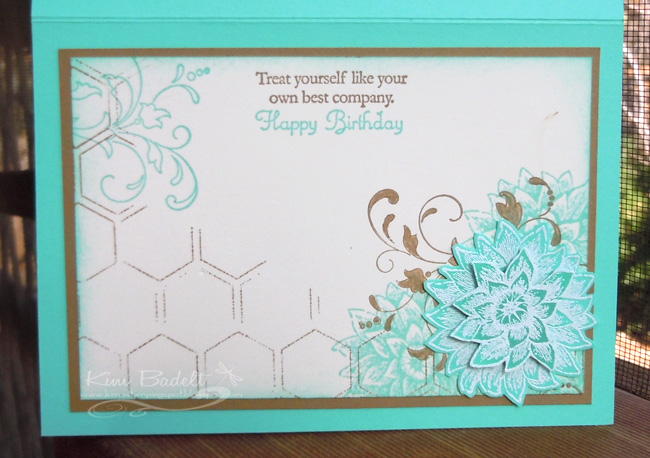
As you might guess I had fun playing with an embossing folder again. This time I used my brayer to apply Baked Brown Sugar to the raised side of the SU! Honeycomb embossing folder and then I pressed my card stock gently onto the folder. By shear chance I got a clear space on the bottom left at the front - so that predestined where my sentiment would go. I framed it with stamped and embossed flowers and some extra swirly bits - and a banner - I'm finding it hard not to add one to cards right now - lol!

I really enjoyed playing with this colour combo as its a really lovely one!  Hope you can join us and play with the colours too. Thanks for visiting,
Kim

Recipe: All SU! unless noted otherwise
Stamps: Creative Elements, Hearts a Flutter, Create a Cupcake, Hello Lovely
Cardstock: Baked Brown Sugar, Coastal Cabana, Very Vanilla
Ink: Baked brown Sugar, Costal Cabana, Versamark
Accessories: Honeycomb embossing folder, Hearts a Flutter framelit, White embossing powder, Simply Pressed Clay and mold, Linen Thread, Crystal effects, Blender pen, Tombow multi, Dimensionals, Double sided tape (X Press)

Friday, July 5, 2013

JAI 172 Just add Inspiration

Hello there, 
well with the beginning of the new Stampin Up! year here in the South Pacific we (Just Add Ink) thought it would make a great challenge to kick it off using the new catalogue front cover as an inspiration challenge. 

So this week we want you to Just Add Inspiration - it might be the colours, the banners, the flowers, the frame or even the shoes. You can take it where you want - that's the fun of an inspiration challenge!

And this was the outcome.

I couldn't resist the frame - and I just love this ornate one I pulled out to use to frame the birthday cake - well cupcake - which I glittered up - of course ;) The inspiration pic also inspired the bunting. I love the stripy banner I used, but to change it up a little I used a different framelit to cut it and it worked perfectly! Blushing Bride was the perfect pink to use for this and I must admit it is fast becoming a firm favourite of mine! 

Thanks for visiting and don't forget to check out the rest of the DT for fabulous inspiration ideas and welcome Louise and Susan for their first DT pieces too.

Kim

Recipe: All SU! unless otherwise noted
Stamps: Create a Cupcake, Papaya Collage, En Francais, Hearts a Flutter
Cardstock: Blushing Bride, Daffodil Delight, Crumb Cake, Whisper White, Rose Red
Ink: Crumb Cake, Blushing Bride, Rose Red, Versamark
Accessories: Cupcake builder punch, Hearts a Flutter framelits, Bitty Banner framelits, Boho Blossom punch, Itty Bitty shapes punch, Blushing Bride DSP (R), White embossing powder, Multipurpose adhesive sheet, Dazzling Diamonds, Jewels - rhinestones, Brights button, White Baker's twine, 1/8" circle punch, Dimensionals, Double sided tape (X Press)

Friday, June 8, 2012

JAI 121 Just add pearls

Hello there,
well I'm settling back into life after convention. I had a wonderful time meeting up with some special stamping friends and am already looking forward to seeing them again next year in Brisbane! I have some great new ideas to try out so hopefully some of those will make their way here over the next few weeks. But for today I can show you the new challenge from Just Add Ink. This week we want you to Just Add Pearls. Here's what I came up with.

I wanted to make a birthday card for a special stamping friend so I tailored the colours to something I knew she would like - hence the red and indigo. I also had a new blossom punch to play with ;) I started by inking the flower with markers, then layered that over two red punched blossoms, fixed it together with a brad then spritzing with glimmer mist and letting it dry. You get a great 3D effect doing this although that does make it tricky to post! But since I was hand delivering this one at convention I didn't have to worry about that. I used the flower as the feature and accented it with coordinating DSP, some lacey border detail, stitching and of course lots of pearls. The pearls are a subtle but I think really important finishing touch.

Do go check out the rest of the DT they will have some wonderful pearl adorned creations to inspire you!!

Thanks for visiting,
Kim

Recipe: All SU! unless otherwise noted
Stamps: Create a Cupcake, Mixed Bouquet
Cardstock: Real Red, Island Indigo, Whisper White
Ink: Real Red, Island Indigo
Accessories: Blossom punch, Corner rounder (SU!), Mat Stack 3, Mat Stack 3 layerz and Filigree border die (PaperTrey Inc), Twitterpated DSP, Ski Slope DSP (R), Frost white shimmer paint, Jewels - pearls, sewing machine, wide Real Red grosgrain ribbon (R), Dimensionals, SNAIL, Double sided tape (X Press)

Friday, January 13, 2012

JAI 100 Just add crowns blog hop


Well hello there and happy 2012!
After a short intermission for Christmas and New Year I’m back with a bang ;) The Just Add Ink team have decided to start the year off by celebrating our 100th challenge with a Blog Hop. The theme of the blog hop is to Just Add Crowns (think royalty related theme). You may have just come from Kathy Tanner’s blog, if not make sure you go and check out her very cute princess! You can start the blog hop here, with any of the DT members or at the JAI blog. Because this is a special occasion we are also offering prizes!! – one for commenting on all the DT blogs and one for the winner of the challenge.

When the theme was set for this blog hop one idea immediately popped into my mind, something special I had been saving up to try for my gorgeous girl and seeing as her birthday is coming up it was the perfect time. Now kings and queens (who of course wear crowns, have to keep their crowns somewhere safe don't they ;) - and of course that would be a castle!! I first saw a castle card on Liam Pulcher's blog here and followed her link back to Deneen's tutorial here. I printed Deneen's templates two to a page, so approximately half size. I wanted my finished card to be as close to a standard A5 size, so once I cut out the template pieces I just widen them to 4” for each panel that way I could cut all three panels from one 12x12 piece, and just score the folds.
The glittery 7 surprise
The front and back unfolded

Close ups


Since this is my special little girls birthday card I went with a colour combo that would appeal to her tastes – well the pink (Regal Rose) and yellow (Daffodil Delight) do - although she is bit iffy on the Expresso! So starting with a Regal Rose base, I covered the front and back inside panel with DSP (Sweet Stitches), I also prepared a layer of impressed Expresso for the back panel that the front door opens on to. I sandwiched a bit of decorative scalloped trim in between some of these layers. Finally I added one more panel of Expresso for the turret roof. This probably sounds confusing so please do look at the photos. Then I added lots and lots of bling, and garlands of little flowers, with more bling!! Some vines and more flowers finish off the front, and yes those woodgrain doors do open to a little extra glittery surprise! The final touch for the top is a flag to fly from the turret – with a crown (of course ;) and more bling. I kept the layers on the inside pretty flat, a panel to write our birthday message and a large decorative embossed Happy Birthday (yes I’m still loving my coloured embossing powders J). The card opens with a kind of zig zag motion. I can tell you my kids were both entranced and my Mr almost 4 is lobbying hard to get a castle card for his birthday too!

Now don’t forget to keep going through the blog hop and join in the challenge. Next stop is Mae Collins, just click on the blog hop button below to get to Mae’s blog. All the DT blog links are on the JAI blog if there are any hiccups too.

Thanks for visiting and enjoy this right royal occaision J
Kim


Recipe: All SU! unless other wise noted
Stamps: Perfectly Penned, Create a Cupcake,Tiny Tags
Cardstock: Regal Rose, Daffodil Delight, Early Expresso, Whisper White
Ink: Regal Rose, Daffodil Delight, Versamark
Accessories: Sweet Stitches DSP (R), Swirls scribbles sizzlet, Timeless Type alphabet sizzlet, Itty Bitty shapes punch pack, Woodgrain and Linen/Canvas Impression plates (PaperTrey Ink), Double ended banner dies (PTI), Mat Stack 1 and Mat Stack layerz dies (PTI), Corner rounder punch, Dotted Scallop ribbon border punch, Jewels – rhinestones, coloured rhinestones (Kaiser), Pretty in Pink brads, Butter embossing powder (Zing), Fine supernova glitter, Big Shot adhesive sheets, Double sided tape (X Press), SNAIL adhesive, Glue dots