Showing posts with label Linen and Canvas Impression plate. Show all posts

Friday, January 29, 2016

JAI #296 Just add nature


Hi there,
we have a challenge this week at Just Add Ink that I think will suit a lot of people. This week Di has asked us to Just Add Nature. So pull out your flora and fauna stamps and have fun creating something that takes you back to nature! For me it was a great excuse to play with some new Stampin Up! goodies ;)


My original idea was to have the bird as the main, and only, coloured element, but I have serious white space issues ;) and instead changed the top mat to Island Indigo. I loved the resulting contrast to the white flowers and foliage. I also added in lots of little pops of vibrant pinks to tie everything together. Cutting all the flowers and arranging them was a little fiddly but fun too and well worth the time!

Hope you can join us for the challenge. Do check out the rest of the JAI DT for lots of wonderful nature inspiration.

Thanks for visiting,
Kim

Recipe: All SU! unless otherwise noted
Stamps: Picture Perfect, Watercolor Wings
Cardstock: Pool Party, Island Indigo, Whisper White, Shimmer White, Vellum
Ink: Island Indigo, Lost Lagoon, Pool Party, Rose Red
Accessories: Botanical Builder framelits, Circle framelits, Linen/Canvas Impression plate (PaperTrey Ink), Sweetheart Sequin mix 4 & 6mm (Pretty Pink Posh), Hot Pink twine (stash), White embossing powder, Fine Tip glue pen, Dimensionals, Double sided tape (X Press)

Friday, May 22, 2015

JAI #263 Just add wedding

Hello there,
we have gorgeous Autumn colours here right now with lovely crunchy piles of leaves lying on the ground. It's perfectly picturesque for wedding photos and I can imagine that the late Spring weather in the other hemisphere is likewise making people feel the love! Which is why we have a great Just Add Ink challenge this week (can you guess?) yes of course it's to Just add Wedding from Jan

Here's what I came up with.


I wanted to keep it light and fresh and clean and simple (well for me anyway). With some new dies to play with it came together super fast.

Hope you can join us and show us what you would Just Add for a Wedding. Don't forget to check out the rest of the DT for some beautiful wedding inspiration.

Thanks for visiting,
Kim

Recipe: All SU! unless noted
Stamps: Petite Places: Church (PaperTrey Ink)
Cardstock: Whisper White, Pear Pizzazz, Pistachio Pudding, Pool Party, Soft Sky
Ink: Lost Lagoon, Pool Party
Accessories: Petite Places: Church die, Scene it: Basic Backer die, Scene it: Everyday die, Scene it: Skyscapes collection, Linen and Canvas Impression plate (PaperTrey Ink), 2013-15 In Color DSP Stack, Painted Blooms Cotton twine, Soft Sky Seam binding, Dimensionals, Double sided tape (X Press), Tombow

Friday, September 19, 2014

Just Add Ink 232 Just add inspiration


Hello there,
my garden is slowly filling up with more colour every day as spring bulbs bloom and trees blossom. So the inspiration picture we have for the new challenge at Just Add Ink this week is very fitting. This week we want you to Just Add Inspiration.


The orange and pink was such a striking colour combo I knew I had to pull that out some how, and I tempered it with lots of white space.


So I started with a big bold flower set and rock and rolled some flowers to get the colour variation I was after. To add some subtle detail to the white background I embossed a texture into it. Then it was layer some flowers and foliage up into bunches and that's about it!

Hope you can join us for this inspiration challenge. For inspiration to get you started make sure to check out the rest of the JAI DT.

Thanks for visiting,
Kim

Recipe: All SU! unless otherwise noted
Stamps: Perfect Pennants (SU!), Cutting Garden (PaperTrey Ink)
Cardstock: Melon Mambo, Basic Black, Whisper White
Ink: Melon Mambo, Strawberry Slush, Pumpkin Pie, Pistachio Pudding, Garden Green, versamark
Accessories: Linen/ Canvas impression plate (PTI), Cutting Garden dies (PTI), Black embossing powder, 1/4" Melon Mambo cotton ribbon, Piercing mat and tool, Jewel- rhinestones, Dimensionals, Double sided tape (X press)

Friday, April 11, 2014

JAI 210 Just add an Easter bag, box or basket


Hello there,
well just in case you have, with great will power, resisted buying the increasing multitudes of shiny brightly coloured Easter eggs that are spilling off supermarket shelves we are giving you a legitimate excuse to buy some before Easter in the name of your art. Your excuse - well this weeks Just Add Ink challenge is to make an Easter bag, box or basket.  If some eggs essential for the photo shoot don't make it into the bag, box or basket - well that's between you and the Easter bunny - lol. 

I decided it was time to make some new Easter boxes for my munchkins, they used the Bunny boxes I made for them back in 2012 again last year. So here is the 2014 version.


 Close ups

 Basic Instructions
 Step 1: Cut a 12 x 12 sheet of Crumb Cake in half at 6" (15.3 cm). Then score at 5" (12.7 cm) and 7" (17.8 cm)
Step 2: Cut two 2 1/2" (6.4 cm) by 4 7/8" (12.4 cm) pieces of Crumb Cake for the sides of the box. Score 1/4" (0.6 cm) in from edge on both long sides and one short side. Mark a mid point 1" (2.5 cm) in from the bottom and diagonally score to the bottom corners from the midline. Score a central fold from the top of the side to meet the diagonal fold (as pictured above).
Step 3: Decoratively die cut the box top front and back and add embossed pattern
Step 4: Diecut a window in the front side
Step 5: Cut window sheet and using sticky strip secure on back side of the window. 
Tip: I rounded the window sheet corners so the sharp corners wouldn't hurt little fingers fishing around for eggs inside the box.
A view of the box showing how the sides fit in and all the scores work.

I quite enjoy the process of working out how to make a new box. The fact that you can make 3D items effectively from paper never ceases to amaze and delight me! I also enjoyed creating the little scenes on the front for the kids. My DD new straight away the one with the bunny was her's (Ok the flowers might have clued her in) and my DS seems to be quite happy with his duck. One point worth noting is that I made the Easter eggs peeping out of the grass using a small oval punch to punch the patterns from the little banners in the SAB Banner Blast stamp set. 

I did think of adding some ribbon handles but so far have left them off for aesthetic reasons but may in the end need to add them for practical ones like the kids dropping eggs everywhere!!

Hope you can join us to eat some chocolate make a Easter bag, box or basket. Do check out the rest of the JAI DT for some inspiration 3D ideas.

Thanks for visiting,
Kim

Recipe: All SU! unless otherwise noted
Stamps: Storybook Friends, Banner Blast
Cardstock: Crumb Cake, Whisper White, Daffodil Delight, Soft Skye, Pear Pizzazz, Wild Wasabi, Blushing Bride, Winter Wisteria
Ink: Soft Skye, Daffodil Delight, Real Red, Crumb Cake, Chocolate Chip, Blushing Bride, Stazon Black
Accessories: Adorning Accents Edgelits, Adorning Accents embossing folders, Deco Label framelits, Ovals Collection framelits, Punches (Cupcake builder, Itty Bitty Shapes, Boho Blossoms, 2 1/2" circle, 1" circle, small oval (R)), Linen/Canvas Impression plate (PaperTrey Ink), Fringe scissors, Aquapainter, Jewels - rhinestones, Window sheet, Dimensionals, Gold marker, Double side tape (X Press) 

Friday, February 7, 2014

JAI 201 Just add a colour combo

Hello there,
has February crept up and caught you by surprise? Well just in case it has we have a challenge lined up that will help you get that Valentines Day card made on time! This week at Just Add Ink our challenge is to Just Add a Colour Combo. Here's the colours.


And this is the card I made for my hubby - for our anniversary rather than Valentine's Day.


It was sooo hard to restrain myself from adding more to this - but I always have to remind myself when I'm making guy cards to go easy on the fussy details. So I kept the detail in this one limited to the soft layered hearts, a tiny wee sparkly heart and a small twine bow.

Thanks for visiting and do check out the rest of the DT for fab colour combo inspiration.
Kim

Recipe: All SU! unless otherwise noted
Stamps: Hearts a Flutter, Pure Innocence Flower Girl (My Favorite Things), Love Lives Here Holiday (PaperTrey Ink), Confetti Garland Borders (PTI)
Cardstock: Island Indigo, Pool Party, Whisper White
Ink: Pool Party, Sahara Sand, Real Red
Accessories: Banner punch, Hearts collection framelits, Owl builder punch, Linen/Canvas impression plate, Red Glimmer paper, Piercing mat and tool, Cherry Cobler bakers twine, Dimensionals, Double sided tape (X Press)

Friday, November 1, 2013

JAI 189 Just add a colour combo


Hello there,
going back a bit I took a colour combo for a test drive - today's card was the result  - and I liked it very much - so much so I recommended we use the colours for a Just Add Ink challenge. So here we are today with Just Add a Colour combo. 

I discovered retrospectively that the colour combo is drawn from the SU! Color Coach - a super tool, one which I must admit I use a lot!

Did you spy how I used washi tape here? I created my own DSP and also made washi covered leaves. Note to self -  must remember to play with my washi tapes more! I also watercoloured over my dahlias, embossing them first to prevent colour bleed an effect I really like - and its fun to do :)

For lots of gorgeous inspiration with this colour combo do check out the rest of the DT. Hope you can join us this week!

Thanks for visiting,
Kim

Recipe: All SU! unless otherwise noted
Stamps: Chalk Talk, Regarding Dahlias
Cardstock: Naturals White, Perfect Plum, Raspberry Ripple
Ink: Raspberry Ripple, Perfect Plum, Versamark
Accessories: Chalk Talk Framelits, Autumn Accents BigZ die, Large Scallop Edgelit, Linen/ Canvas Impression Plate (Papertrey Ink), Epic Day This and That designer washi tape, White and Clear embossing powder, Stitched Raspberry Ripple ribbon, Linen thread, Jewels - rhinestones

Friday, August 2, 2013

JAI 176 Just add blokes

Hello there,
well another plague of germs has hit our house this week so it's just as well I had this one prepared early for this weeks challenge at Just Add Ink. This is a great challenge to get yourself prepared ahead for any guy related occasions - birthdays, Father's Day for example, because this week we want you to Just Add Blokes (Blokes = men, here is AUS).  And that's just what I did! Here's my Father's Day card for my Dad.

I don't often pull out DSP  (although I have plenty of it!) but I knew I wanted to use bites of colour and pattern to support the main image. The chair is kind of simple but also kind of quirky which I think is how the whole card turned out. I also couldn't resist adding the arrow clip because this card really seems to be speaking directly to you, and the arrow kind of says start here!

Don't forget to check out the rest of the DT for some fabulous bloke (guy) inspiration! Thanks for visiting.
Kim

Recipe: All SU! unless otherwise noted
Stamps: Teeny Tiny Wishes, Polka Dot Parade #3 (PaperTrey Ink)
Cardstock: Pumpkin Pie, Blue Bayou (R), Going Gray (R), Very Vanilla
Ink: Pumpkin Pie, Blue Bayou, Basic Grey, Crumb Cake
Accessories: Polka Dot Parade #3 die (PTI), Howlstooth and Scaringbone DSP (R), Spring Break DSP (R), 0.3 mm  black Copic multiliner, Linen and Canvas impression plate (PTI), 3/4" circle punch, 7/8" scallop circle punch, Word Window punch, Hung Up Cute clip, Island Indigo bakers twine, Dimensionals, Double sided tape (X Press), SNAIL adhesive

Friday, June 14, 2013

JAI 169 Just add inspiration

Hello there,
well we have a fun challenge for you this week at Just Add Ink -  a gorgeous Just Add Inspiration photo. Funnily enough what it reminds me of is the sunrises I'm seeing out the kitchen window (well some days anyway), as I get the kids lunch boxes and breakfasts prepared in the early hours of the morning. My reward after all that's done is a big cup of fragrant Earl Grey tea - yummmm and a daily pinterest catch up :) Here's the inspiration photo.
And here's what I came up with. A birthday card for a friend who lives far across the ocean. May'be even the one in the photo!


It was the graduation of colour and the black that really struck me about the image. Having decided I would use a white base that meant black foliage. To bring the colour in I die cut layered delicate flowers that followed the colour transition in the inspiration image.  Then blinged them up with some shimmer spray and rhinestone brads. Embossing the sentiment in black on the Pure Poppy cardstock brings in a bit of that black against colour effect from the picture and a scattering of coloured rhinestones finished it all off. 

Where will the picture take you? Hope you can join us this week at Just Add Ink and find out :)

Thanks for visiting,
Kim

Recipe: All SU! unless otherwise noted
Stamps: Turning a New Leaf, Fillable Frames #1 and #11 (PaperTrey Ink)
Cardstock: Poppy Parade, Calypso Coral, Tempting Turquoise, Elegant Eggplant, Basic Black
Ink: Basic Black, Poppy Parade, Versamark
Accessories: Bloom Builder # 3 die, Fillable Frame # 11 die, Linen and Canvas impression plate (PTI), Black embossing powder, Frost White shimmer paint, Clear rhinestone brads (R), coloured rhinestones (Kaiser), Dimensionals, Double sided tape (X press)

Saturday, March 30, 2013

Merry Monday #55 My favourite angel

Hello there,
have you ever on first sight knew you just had to have a certain stamp? Well I felt that way the first time I saw this angel (luckily enough I love the rest of the stamp set too!). This is her first outing this year but I'm sure it won't be the last.  The reason she came out was this weeks Merry Monday challenge is a tic tac toe challenge and one of the squares was angel. I decided to go straight through the middle - die cuts + paper piercing + angel.


Somehow blue seemed to be the way to go so I dug through my DSP stash till I found something that said christmas/angel to me. Add a touch of paper piercing and faux stitching, some shine with embossing and crystal effects and finished it all off with some ribbon and twine. That pretty much sums it up. The next few weeks are going to be busy so not sure I'll get the chance to make any christmas cards. If not once things level out I'll try and add to my stash.

Thanks for visiting,
Kim

Recipe: All SU! unless otherwise noted
Stamps: Love Lives Here: Holiday (PaperTrey Ink)
Cardstock: Not Quite Navy, Very Vanilla, Crumb Cake, Cherry Cobler
Ink: Not Quite Navy, Early Expresso, Crumb Cake, Cherry Cobler, Versamark
Accessories: Love Lives Here: holiday dies, Mega Mat Stack 3 die, Linen/Canvas impression plate (PaperTrey Ink), Bella Blue DSP (R), Owl builder punch, 1/2" circle punch, Cherry Cobler embossing powder, Cherry Cobler seam binding, Cherry Cobler bakers twine, white gel pen, Mat and piercing tool, Crystal effects, Dimensionals, Double sided tape (X press)

Friday, March 1, 2013

JAI 155 Just add a sketch


Hello there,
welcome back for a new Just Add Ink challenge. This week we have a sketch for you.

I had one of those eureka moments when I was thinking about this sketch. I wanted to make an anniversary card for my DH (we clocked up a significant anniversary this year). I also wanted to play with letters and negatives and I suddenly realised I could make the tabs in the sketch work with the whole idea of an arrow (love=heart=arrow!!!). This is how it all turned out.


It was just shear luck that the placement of the U on the BigZ die was in just the right place that I could cut it out as a negative at the bottom of my DSP panel - sometimes you do get lucky :). I let the letters do the talking on this one just adding lots of subtle detail (impressing/embossing texture onto much of the layers).

Do go check out the rest of the DT for some fabulous inspiration for this great sketch!!
Thanks for visiting,
Kim

Recipe: All SU! unless otherwise noted
Stamps: none
Cardstock: Real Red, Whisper White, Basic Black
Ink: None
Accessories: Typeset Alphabet BigZ, Timeless Type Alphabet Sizzlet (R), Heart Collection Framelits, Fashionable Hearts Embosslits, Linen and Canvas Impression plate (PaperTrey Ink), Get to the Point die (PTI), Summer Smooches DSP, Pure Poppy vintage button (PTI), Charcoal bakers twine (The Twinery), Double sided tape (X Press), Dimensionals


Friday, December 7, 2012

JAI 147 Just add balloons


Hello there,
how are you all going with your pre Christmas preparations?I still have a loonnngggg way to go. Not to mention ALOT of Christmas cards to make and then write (yikes!!) I am feeling Christmassy though (despite our recent toasty temperatures). Seeing the kids so excited about getting a Christmas tree up probably has something to do with that ;) OK on to this weeks Just Add Ink challenge which is to Just add balloons - sounds like fun :) Here's what I came up with.

My nephew had a birthday recently and I wanted something fun for him.  I think balloons are always entrancing to watch but how much more fun when they are shaped ones! It was thinking of bright yellow diggers that inspired the colours of my balloons for this card.  To provide a sky background for my balloons I started with a Bashful Blue mat then added an embossed white layer that you get to see peeping through die cut clouds spaces cut in the top Marina Mist layer. I added a subtle embossed pattern to the Marina layer and an embossed sentiment on a cloud to finish the front off. The inside was finished off to match. I'm delighted to say that my nephew loved it :)

Do check out the rest of the DT for some fun balloon ideas. Thanks for visiting,
Kim

Recipe: All SU! unless otherwise noted
Stamps: Little Hot Rod, Everyday Button Bits (PaperTrey Ink), Up Up and Away (SU!)
Cardstock: Bashful Blue, Marina Mist, Whisper White
Ink: Daffodil Delight, Chocolate Chip, Versamark
Accessories: Little Hot Rod dies, Cloud dies, Linen and Canvas Impression plate (Papertrey Ink), Rellie Rave embossing folder (Cuttlebug), Scallop border punch, Mini brad silver, Dimensionals, SNAIL adhesive, Double sided tape (X Press)

Friday, October 12, 2012

JAI 139 Just add something brand new

Hello there,
well I've been enjoying a lovely week spent with family in Sydney this week, which has included a visit to the zoo, beach, and lots of playgrounds - of course :) However before I left I did manage to squeeze in some crafting with some of my new SU! products, and its the new bit that's key for this weeks Just Add Ink challenge which is Just Add something brand new! Now I'm sure you can manage that :) This is what I came up with.


So what did you think of the inside? - a bit of fun isn't. I've been saving up this die to use just for this card. A friend of mine said recently she's discovered that boys (big and small) want their cards to be interactive - so true!! and this card is my DH's birthday card so it had to have/ do something special. (I think he liked it). As for the new, well there's a bunch of stuff - the paper and ribbons banners are all brand new and I think I can count the HAPPY die as well. I also finally got to indulge in the banner trend - I had fun making those :) Aside from the banners the rest of the front was pretty simple - a little bit of embossed texture and then some doodling around the edge with a white gel pen. The inside was really a lot simpler than it looks - the fussiest bit was working out how to add the balloons.
 
So do you think you can have some fun with some new crafting goodies this week - please join us if you can :)
 
Thanks for visiting,
Kim
 
Recipe: All SU! unless otherwise noted
Stamps: Tiny Tags, Think Big Favorites 12 (PaperTrey Inc)
Cardstock: Island Indigo, Real Red, Crumb Cake, Baja Breeze, Whisper White
Ink: Real Red, Daffodil Delight, Island Indigo
Accessories: Summer Smooches DSP, Linen/Canvas Impression plate (PTI), Movers and Shakers: Poppers die collection (PTI), Tiny Tag die (PTI), Fishtail Flag STAX (My Favorite Things),White gel pen, Linen Thread, Daffodil Delight and Real Red 1/4" stitched grosgrain ribbon, Cherry Cobler twine, Silver brads, SNAIL adhesive, Double sided tape, Sticky strip

Friday, August 24, 2012

JAI 132 Just add a sketch


Hello there!
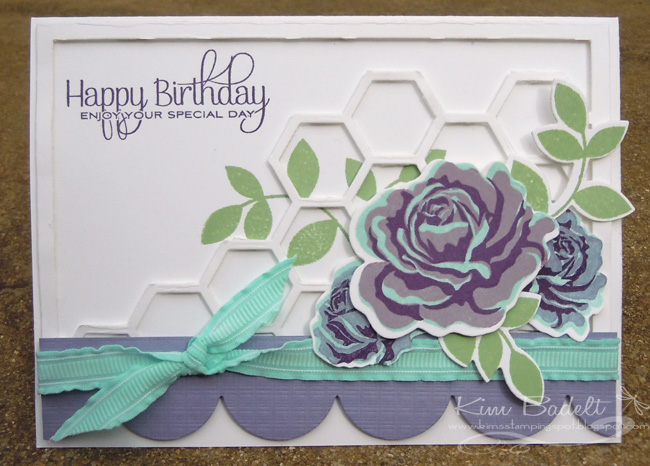
well this week at Just Add Ink we have a sketch for you. It turned out to be perfect for the idea I had for a birthday card for a friend. Here's the sketch.
And here is the end result of sketch plus playing with some new stamping goodies ;)


The colour selection was decided based on colours that I thought my friend would like, they make for some unusual roses but definitely striking ones! It was (and will be) interesting to play with other colour combos using this set and see how the roses turn out. I played around with two mid purple shades - Wisteria Wonder and Perfect Plum. In the end the large rose on the front was stamped with Wisteria and the two smaller ones tucked underneath with Perfect Plum. I also played with a bit of under over foliage. I saw someones work on Pinterest that played with this idea and had been itching to try it out for myself. The colours and all the white give it a really fresh feel - almost summery - or is that wishful thinking on my part as it almost snowed here a week ago ;) All the early spring tree blooming however does give me some hope we are nearing the end of our winter! Anyway hope you get the chance to give the sketch a try this week!

Thanks for visiting :)
Kim

Recipe: All SU! unless otherwise noted
Stamps: This Sweet Life, Beautiful Butterflies, Turning a New Leaf (all Papertrey Inc)
Cardstock: Whisper White, Wisteria Wonder
Ink: Pool Party, Wisteria Wonder, Perfect Plum, Elegant Eggplant, Wild Wasabi
Accessories: Hexagon die: Coverplate, This Sweet Life dies, Turning a New Leaf die, Large Scalloped border, Linen/Canvas Impression plate (all PTI),  Pool Party ruffled ribbon, Dimensionals, Double sided tape, SNAIL adhesive