
Showing posts with label Label Me Bold. Show all posts

Friday, January 14, 2022

Just Add Ink #586 Blog Hop - Summer


Hello there and welcome to 2022 on the blog!
The Just Add Ink team are kicking off the new year with our annual blog hop.

You may have come from Rachael's blog, be starting the blog hop here on my blog, or you can go to Just Add Ink, and then follow the links at the end of each team members blog post on to the next. This year the theme is Summer.
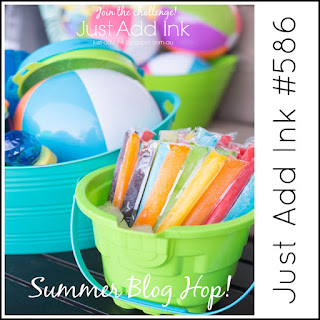


In Summer my garden is filled with colourful flowers, in fact many of the colours you can see in the challenge photo. So I wanted to reflect that in my project. Here's how it turned out.
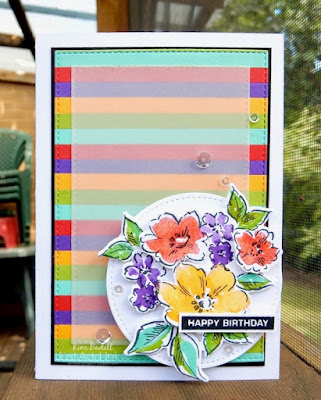
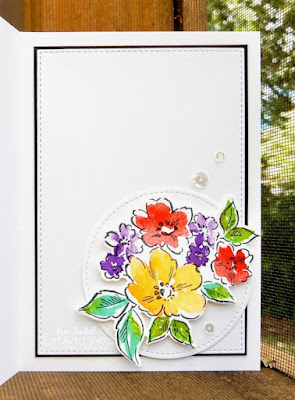


I decided to incorporate the linear icy pole element from the challenge photo in a colourful striped background, then mute it slightly with a vellum mat. The floral focal element then pulls all the colours from the background together. To add dimension I coloured three additional larger flowers from the floral image and mounted them over the base floral image. A swish of Wink of Stella and a scatter of sequins add sparkle.

Jan McQueen is next on the blog hop, so please go on and check out her lovely vibrant project, and then the rest of the team. Then come back and join in the challenge we'd love to see your 'Summer' project. 


Thanks for visiting,
Kim

Recipe: All SU! unless otherwise noted
Stamps: Hand-Penned Petals, Label Me Bold (R)
Dies: Penned Flowers, Stitched Rectangles, Stitched Shapes (R)
Cardstock: Mango Melody, Poppy Parade, Gorgeous Grape, Granny Apple Green, Coastal Cabana, Thick Basic White, Basic White, Basic Black
Ink: Mango Melody, Poppy Parade, Gorgeous Grape, Granny Apple Green, Coastal Cabana, Tuxedo Black (Memento)
Accessories: Wink of Stella, Fine tip glue, Dimensionals, Sequins (Pretty Pink Posh), Tear and tape, Big Shot die cutting machine (R)


Friday, October 16, 2020

Just Add Ink #527 Sketch


Hello there,
I am almost coming to the end of the family birthday season. It's kind of funny how families often have birthdays in clumps and mine is no exception. I used the new Just Add Ink challenge, this week it's time to Just Add a Sketch (my design), to make a birthday card for my niece. Pink and girly are still very much the order of the day. To make it extra special I made it a spinner card. Here's the sketch.


And this is how it turned out.


The stamp only showed the front view of the the girl, so I had to improvise to create a back view for my spinner to work. To do so I jury-rigged a light box, and place the stamped image face down with another piece of card stock taped into place on top. Then using an alcohol friendly fine marker, traced the image, and filled in the details necessary (e.g. hair instead of a face) to get a backview. Probably the trickiest bit was trimming the front and back images out simultaneously.


The spinner element was inserted in an oval cut into the front of the card. To obscure the message that would be inside I added a vellum insert that would fold over. The spinning princess was surrounded by garlands of pink glittery (alcohol ink) coloured flowers and a little sprinkle of sequins. Was it a bit fiddly - yes but I aways try and go that extra bit for the kids in the family. Birthday are such a big deal for them :)

The Just Add Ink DT have lots of fabulous projects to show you so please go check them out and then come back and join in the challenge.

Thanks for visiting,
Kim

Stamps: Bloom and Grow, Label Me Bold (R), Stamping Bella (R)
Tools: Layering Ovals, Pinewood Planks 3D folder, Budding Blooms dies
Cardstock: Flirty Flamingo, Coastal Cabana, Whisper White, Vellum
Ink: Memento Tuxedo Black, Blends (Flirty Flamingo, Petal Pink, Melon Mambo, Magenta Madness, Granny Apple Green, Garden Green, Bermuda Bay, Daffodil Delight, Bronze, Ivory), Copic Multiliner
Accessories: Wink of Stella, Woven Thread sequins, Shimmery Crystal Effects, Dimensionals, Fine Tip glue pen, Tear and Tape, Big Shot die cut machine (R)


Friday, April 24, 2020

Just Add Ink #502 Sketch


Hi there, 
this week at Just Add Ink we have a sketch challenge for you from Tina. Here's the sketch.


And here's what I came up with.


I wanted to make an old friend a birthday card, and her favourite colour is teal, as you can see there is plenty of that here! I haven't done a brayered background for a while so I started with that, then added lots of texture with water drops and white gouache splatters. Then I pulled out my SU! blends and no line coloured a large hibiscus bloom and some leaves. A sprinkle of softly stamped little flowers, the addition of lots of silver elements including sequins and wink of Stella finished it all off.

The Just Add Ink DT have lots of fabulous projects to show you so please go check them out and then come back and join in the challenge.

Thanks for visiting,
Kim 

Project Recipe:
To see and order any items used in today's project, just click on the items below to see them in my Online Store. You can order from me if you live anywhere in Australia. I would love to be your Demonstrator if you don't already have one. Please allow "Demonstrator contact" in your preferences so I can thank you properly when you place your order.


Product List
Blender Pens
$21.00


Retired SU! product: Birthday dies, Metallic sequins, Big Shot die cut machine

Friday, January 17, 2020

Just Add Ink #488 Celebrate blog hop


Hello there and welcome to 2020 on the blog!
The Just Add Ink team are kicking off the new year with our annual blog hop. It is extra  special this year as we are celebrating 10 years and 1000 followers for the Just Add Ink challenges!

You may have come from Denita's blog, be starting the blog hop here on my blog, or you can go to Just Add Ink, and then follow the links at the end of each team members blog post on to the next. This year the theme is very appropriately 'Celebrate!'.     


So many joyful occasions can fall under that theme. For me the first big family event of the year is my daughters birthday, so birthday card it is. 


I had a blogging break at the end of the last year, and was a bit worried I might be rusty, but the sheer enjoyment of playing with new stuff (TimelessTropical in particular, which ironically was not my first pick from the new SU! mini catalogue) and colouring made putting this card together easier than expected. It really is all about the colouring! I stamped my images in a very light ink and then used SU! Blends (alcohol markers) to no line colour the flowers. I should really have taken step-by-step photos as for most of the process honestly they look pretty ordinary and then at the end the multiple layers of ink, blend and end up looking finished. So my best tip for alcohol marker colouring is to persist and keep adding layers of colour and contrast.

Jan McQueen is next on the blog hop, so please go on and check out her fantastic project, and then to the rest of the team. Then come back and join in the challenge we'd love to see your 'Celebrate' project. 


Thanks for visiting,
Kim


Project Recipe:
To see and order any items used in today's project, just click on the items below to see them in my Online Store. You can order from me if you live anywhere in Australia. I would love to be your Demonstrator if you don't already have one. Please allow "Demonstrator contact" in your preferences so I can thank you properly when you place your order.
Product List


Retired/ Non SU!: Big Shot die cutting machine, Metallic sequin assortment, White jelly roll pen (Sakura)