well an extra post in a week has been a rarity for me in the last six months or more, just to busy balancing family, work etc. But when I saw Makeesha Byl's post that the Inkspiration challenges were shutting up shop and were going out with one last challenge - well I just had to join in. The Inkspiration challenges were the first challenges that I participated in and I had the great delight of being a guest designer a couple of times. The design team have never failed to produce innovative and just plain gorgeous work! The challenge was to show your Christmas projects - what ever you've been making for the Christmas season - decorations or gifts. I decided use the card and gifts I made for my Miss 6 teacher. Here they are.
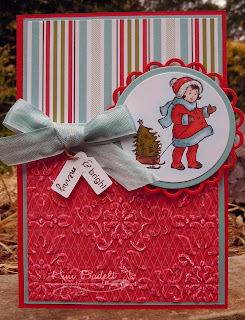
I started with the card - and went just a little vintage using the super cute little Christmas girl from Greeting Card kids, colouring her in with copics. I added some gold highlights to the Christmas tree and dazzling diamonds to her hat. I especially liked the slightly distressed feel I got by embossing the DSP panel on the bottom! I had been planning to using the same DSP on the pencil box which my Miss 6 described as "awesome". I loved it too!! This is one of the inspired by elements - I purchased the template from Ilina Crouse's blog (one of the Inkspirations DT) . I pretty much followed Ilina's instructions as is, just changed up some of the colours and retro fitted some extra tabs to hold the bottom on. So anyway back to the DSP - I was going to use the same but Miss 6 said she wanted numbers and so I dug out some other DSP, colours all still matched so it all still works. As you can see the top of the "pencil" flips open. I stuffed it full of chocolates and then perched the brooch I made on the little shelf at the top. The brooch is my other inspired by element - I was lucky enough to get a gorgeous brooch by Michelle Martin at the SU! convention this year. So I decided to make one of my own. In a nutshell I just stamped some swirls on some DSP, punched out a flower shape, then 4 more flowers of cardstock. Use Tombow to adhere all these layers together, leave to dry. Then give the top a coating of crystal effects, pressing the ribbon threaded button into this and leave it all the dry and set. The next day turn over and coat back with crystal effect pressing the broach pin into it and leave to dry.
Miss 6's teacher was delighted, and I'm slowly nibbling my way through the chocolates that couldn't fit into the box - bonus ;)
Thanks for visiting - and a big thanks to the Inkspiration team - I will miss the challenges and the wonderful inspiration you all provided!
Kim
Card
Recipe: All SU! unless otherwise noted
Stamps: Greeting Card Kids, Holiday Button Bits (PaperTrey Inc)
Cardstock: Real Red, Baja Breeze, Whisper White, X Press copic blending card
Ink: Chocolate Chip
Accessories: Vintage Wallpaper embossing folder, Medium Jewelery Tag punch, Lacey and classic circles nestability (Spellbinder), Baja Breeze seam binding, Copic markers, Gold leaf pen, Dazzling Diamonds, Ski Slope DSP (R), Linen Thread, Dimensionals, Two way glue pen, Double sided tape, SNAIL adhesive.
Pencil Box
Recipe: All SU! unless other wise noted
Stamps: Tart and Tangy (R)
Cardstock: Real Red, Basic Black, Sahara Sand, Whisper White
Ink: Real Red, Chocolate Chip, Old Olive
Accessories: Celebrations DSP (R), Sticky strip, Double sided tape, Tombow multi
Brooch
Recipe: All SU! unless otherwise noted
Stamps: Barque Motifs
Cardstock: Riding Hood Red
Ink: Black Stazon
Accessories: Love Letter DSP (R), Black button, 1/8" Real Red taffeta, Boho Blossom punch, Tombow multi, Crystal effects, sponge, brooch pin (craft store)


That giant pencil is fabulous! Great gift package :) Thanks for joining us in our last Inkspirations challenge :)
ReplyDeleteAwesome Kim! I'm sure her teacher was thrilled. I so have to buy that box tute too. Hugs. Di
ReplyDelete