Showing posts with label Tiny Tags. Show all posts

Friday, July 26, 2013

JAI 175 Just add a sketch

Hello there,
well its back to our normal routines this week which is a relief. Although the kids and I really enjoyed the week we had up in Sydney. We even went to the beach - yes in mid winter! - ostensibly to build a sandcastle but of course getting wet turned out to be part of the experience.

Now onto this weeks Just Add Ink challenge - this week we have a great sketch for you. I loved this one and found it really easy to work with!
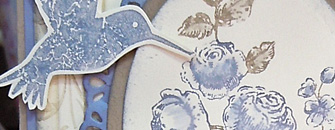
And here is what I came up with.

Ooh look another tag/banner ;) - but this time the sketch made me do it - lol! I went into this knowing I wanted something soft, pastelly and sort of shabby chic - well my version of it anyway. I decided that a jar full of flowers is just what I need for a birthday card. I didn't want to take the focus from that so to represent the ribbon element of the sketch I used an embossed border.To ground the flowers and also to also create a soft background for them I stamped some text and added a few stamped off Pool Party splotches as well. I did scratch my head a bit about what to use for the little banner up in the top corner but then decided to link it back to the jar by cutting a banner from the same stamped polka dot pattern and then added a bit of faux stitching. 

Hope you can join us and try your hand at this great sketch. Do go check out the rest of the DT for some awesome ideas!

Thanks for visiting,
Kim

Recipe: All SU! unless otherwise noted
Stamps: Fabulous Florets, Gorgeous Grunge, Tiny Tags (R), Friendship Jar (PaperTrey Ink), Background Basics: Text Style (PTI)
Cardstock: Pool Party, Pear Pizzazz, Whisper White, Blushing Bride
Ink: Pear Pizzazz, Pool Party, Crumb Cake, Calypso Coral, Blushing Bride, Basic Black
Accessories: Large scallop edgelit, Bitty banner framelits, Needlepoint border embossing folder, Jewelery Tag punch (R), Friendship Jar die (PTI), Calypso Coral Baker's twine, Piercing tool and mat, Dimensionals, Double sided tape (X Press)

Friday, April 19, 2013

JAI 162 Just add a technique you have never tried before

Hello there,
well we have a fun challenge for you at Just Add Ink this week. It's Just add a technique you have never tried before. Now I've been paper crafting for a good 7 years and there are always lots of things I still have on my try one day list. So this is a good time to check your list and then go play!!
 

As you can see I just couldn't resist taking the "chalkboard" technique for a spin. I had stamps sets all over the table mixing and matching and playing with the arrangement till I was happy. It was lots of fun though and very effective. The mix of white embossing, white ink and white (and coloured pencil) adds so much detail and depth. I might have got a bit carried away with some of my doodling though! As my starting point I checked out a great tutorial by Betsy Veldman, you can find it here.

So why don't you join in the challenge this week and have some fun trying out something new! Don't forget to check out the rest of the DT for some awesome inspiration too :) Thanks for visiting,
Kim

Recipe: All SU! unless otherwise noted
Stamps: Vintage Labels, Mini Blooms, Fillable Frames #11, Half and Half, Tiny Tags, Big Birthday Wishes, Just the Ticket
Cardstock: Melon Mambo, Pretty in Pink, Whisper White, Basic Black
Ink: Melon Mambo, Pretty in Pink, Basic Black, Versamark, Whisper White
Accessories: (Half and Half dies, Fabulous Frames die, Raseberry Fizz patterned paper - all Papertrey Ink) Itty Bitty shape punches, White embossing powder, Rhinestones SU! and Kaiser, white and pink pencils, sewing machine, Dimensionals, Double sided tape (X Press)


Friday, March 29, 2013

JAI 159 Just Add a Bunny

Hello and a very Happy Easter to you all,
as you could probably guess we have an Easter themed challenge for you this week at Just Add Ink. This week we would like you to Just Add a Bunny. I've been wanting to ink up the very sweet Storybook Friends images for a while and I decided this was the time to ink up the bunny and make a baby card. I was originally aiming for a gender neutral card but I think in the end it definitely ended up a bit more on the girly side. See what you think.

I pulled my colour combo from the Tea for Two DSP - I thought the soft pastels would be really lovely for a baby card and went with a patchwork panel at the top and some embossing below. A lot of different elements went into this card but I think they all work together. I certainly loved how it turned out :)

I wish you all a happy and relaxing Easter. I'm planning on doing some out of season "spring" cleaning, some stamping ;) and eating some chocolate - of course - I think Lindt bunny is on the menu - yum yum! Don't forget to check out the rest of the DT's bunny offerings too for some great ideas.

Thanks for visiting,
Kim

Recipe: All SU! unless noted otherwise
Stamps: Storybook Friends, Tiny Tags, Itty Bitty Banners
Cardstock: Crumb Cake, Calypso Coral, So Saffron, Whisper White
Ink: Calypso Coral, Whisper White, Versamark, Tuxedo Black (Memento)
Accessories: Tea for two DSP, Embossing folders (Stripes, Designer Frames, Needlepoint Border), 1 1/4" square punch, Extra large oval punch, Jewelery Tag punch, Itty Bitty Shapes punch, Labels Collection Framelits, Bitty Banner Framelits, Copic markers, Victoria crochet trim, Calypso Coral ruffled ribbon and bakers twine, Vintage trinket, Jewels - pearl, White embossing powder, Gold leaf pen, sewing machine, Dimensionals, Double sided tape (X Press)

Friday, December 14, 2012

JAI 148 Just add Christmas

Hello there,
welcome everyone for the last Just Add Ink challenge of the year. We are wrapping up a fabulous year with a very Christmassy challenge - we want you to Just Add Christmas. So pull out your Christmas projects, I'm sure you are working on some ;) I have bits and pieces scattered all over/under/around my crafting space. However the one I'm going to show you today I made to take to the Sydney SU! Heartfelt event back in November. A mini ornament Merry banner (double sided so you can pick your colour to match your Christmas decor). First the blue side.
 The red side
 Used the tag die to create a place to tuck the project recipe into.
A close up
A couple of construction shots. That little bit of tape was used to reinforce the most fragile fold.
 The same blanks now stamped up with the matching ornament.
The idea for this came to me when I was out walking one morning. So I just had to try and fold the cardstock and see if I could cut an ornament chain - and it worked! It was possible to cut 5 layers - just. I had to do just a little fine snipping in some spots where it had heavily embossed rather than cut all the way through. I was pretty pleased with how it came out and even more so once I had added the stamping step. Once that was done - it was time to embellish and for Christmas I couldn't go past adding some bling. Silver glimmer mats for the blue side and champagne for the red side. Of course I had to add my letters, fussy cut using the Broadsheet alphabet.

Some quick construction notes: The doubled sidedness served two purposes - one so you can select the side to suit your Christmas colours ;) but also a more practical one of making it quite sturdy. I adhered the two sides using dimensionals, securing the twine in there at the same time. The twine was used to tie each ornament to the ribbon (red and blue stuck together with doubled sided tape). The twine from each differently coloured pair of ornaments was tied together in a bow over the grosgrain ribbon, and the ribbons tied at either end of the banner. I added my project recipe using the two tag die cut and tied that on with more twine.

Thanks for visiting and if you can join us for our 2012 finale. However don't forget to join us again in 2013, well rested I hope, for our first challenge on Friday January 18th!
Kim

Recipe: All SU! unless otherwise noted
Stamps: Broadsheet alphabet, Ornament Keepsakes, Perfect Punches, Tiny Tags
Cardstock: Very Vanilla, Night of Navy, Silver glimmer, Champagne glimmer
Ink: Real Red, Cherry Cobler, Bashful Blue, Night of Navy
Accessories: Holiday Ornament framelits, 1 1/4" scallop circle punch, 1" circle punch, Scallop Trim border punch, Jewelery Tag punch, Two Tags BigZ die, Candlelight Christmas specialty DSP, Real Red and Night of Navy stitched grosgrain ribbon, Cherry Cobler and Island Indigo twine,  Doubled sided tape (XPress), Dimensionals

Friday, November 2, 2012

JAI 142 Just add a sketch

 Hello there :)
anyone notice the weather getting warmer (or colder - depending on where you are of course)? Our garden was looking a bit like a lush jungle before DH spent the weekend doing some taming. I must admit I didn't help I was too busy doing some scrapbooking - yippee! But I did admire the result! Now did you have fun with that lovely colour combo last week? Well this week at Just Add Ink we have a sketch for you. Here it is.
 I needed to make a rather overdue baby card and as it happened I also hadn't inked up a new stamp which was just perfect for the job.


Hmm do you think it might be for a girl ;) 
I decided to go the classic soft pink and brown path and of course you can't go wrong with polka dots! As the background was busy I went simple with my ark image and embossed it. I added little embellishing bits and pieces - like the glossed and glittered heart and baby tag and that was it. This one is winging its way to the UK.

You'll be sure to find some awesome sketch inspiration checking out the rest of the Just Add Ink DT so don't forget to drop past their blogs! Thanks for visiting.
Kim

Recipe: All SU! unless otherwise noted
Stamps: Two by Two, Tiny Tags (Papertrey Ink)
Cardstock: Pink Pirouette, Chocolate Chip, Whisper White
Ink: Pink Pirouette, Chocolate Chip, Versamark
Accessories: Chocolate embossing powder (Zing), Happy Spots patterned paper (PTI), Pink Pirouette 1 1/4" grosgrain ribbon (R), Early Expresso twine, Cupcake builder, Owl builder, Small Heart, Scalloped border (punches), Double ended banner die (PTI), Pinking shears, SNAIL adhesive, Dimensionals, Double sided tape

Friday, October 26, 2012

JAI 141 Just add a colour combo

 Hello there,
well this week at Just Add Ink we have a colour challenge for you and it has a lovely soft feel just perfect for vintage girly stuff! Since I needed a birthday card for a friend it was well timed for me :) Here are the colours.
 And here is what I came up with - a mix of old and new!

Lots of layering of embossing and ink , it was fun to just play around and see how it turned out. Luckily for me it looked good ;) To soften the flowers, once I stamped them I just grabbed my aquapainter and lightly spread the ink from the stamped image. The rest is pretty straightforward, some sponging and lots of embellishing details to give that vintagey feel. It's fun to create a full on girly card sometimes :) Now that's not to say these colours have to vintage! Why don't you join us at Just Add Ink this week and see what you come up with.

Thanks for visiting,
Kim

Recipe: All SU! unless otherwise indicated
Stamps: Elements of Style, Tiny Tags
Cardstock: Very Vanilla, Crumb Cake, Winter Wisteria
Ink: Winter Wisteria, Crumb Cake
Accessories: Vintage Wallpaper embossing folder, Stripes embossing folder, Classic Oval nestabilities (Spellbinder), Finishing touch edgelets, Medium Jewelery Tag punch, Crumb Cake seam binding, Winter Wisteria twine, Dimensionals, Double sided tape (X Press)

Friday, October 12, 2012

JAI 139 Just add something brand new

Hello there,
well I've been enjoying a lovely week spent with family in Sydney this week, which has included a visit to the zoo, beach, and lots of playgrounds - of course :) However before I left I did manage to squeeze in some crafting with some of my new SU! products, and its the new bit that's key for this weeks Just Add Ink challenge which is Just Add something brand new! Now I'm sure you can manage that :) This is what I came up with.


So what did you think of the inside? - a bit of fun isn't. I've been saving up this die to use just for this card. A friend of mine said recently she's discovered that boys (big and small) want their cards to be interactive - so true!! and this card is my DH's birthday card so it had to have/ do something special. (I think he liked it). As for the new, well there's a bunch of stuff - the paper and ribbons banners are all brand new and I think I can count the HAPPY die as well. I also finally got to indulge in the banner trend - I had fun making those :) Aside from the banners the rest of the front was pretty simple - a little bit of embossed texture and then some doodling around the edge with a white gel pen. The inside was really a lot simpler than it looks - the fussiest bit was working out how to add the balloons.
 
So do you think you can have some fun with some new crafting goodies this week - please join us if you can :)
 
Thanks for visiting,
Kim
 
Recipe: All SU! unless otherwise noted
Stamps: Tiny Tags, Think Big Favorites 12 (PaperTrey Inc)
Cardstock: Island Indigo, Real Red, Crumb Cake, Baja Breeze, Whisper White
Ink: Real Red, Daffodil Delight, Island Indigo
Accessories: Summer Smooches DSP, Linen/Canvas Impression plate (PTI), Movers and Shakers: Poppers die collection (PTI), Tiny Tag die (PTI), Fishtail Flag STAX (My Favorite Things),White gel pen, Linen Thread, Daffodil Delight and Real Red 1/4" stitched grosgrain ribbon, Cherry Cobler twine, Silver brads, SNAIL adhesive, Double sided tape, Sticky strip

Friday, August 3, 2012

JAI 129 Just add a sketch


Hello there :)
welcome back for a new Just Add Ink challenge. This week we have a great sketch for you - lots of fun :) Here it is.

The idea for this card popped into my head while I was putting my little boyo to bed one night. I always stay with him for a cuddle, and I find the dark quiet environment works wonders for creative thinking. So having had the idea I had to put it to paper and I did from scratch that night. It was so nice to go to bed feeling happy with the outcome! 

My starting plan was to go with a browns plus blue colour scheme and then add a few eyecatching accents of pink.  So I used the balloon, the owls belly and the tags as the three accent features and kept the rest in the brown/blue palette. I almost went with DSP for the background layer but then pulled out a text stamp and used that instead. Fading the text as it travels down and also transitioning from blue=sky to brown=ground. To add a little extra interest I dottoed on a few clouds before I stamped the text and then pulled them off when I was done stamping. The rest is pretty straightforward - an owl, a branch for her to sit on, and sentiment tags :)

I had fun making this one! Hope you can join us for the challenge.
Thanks for visiting,
Kim
Recipe: All SU! unless otherwise noted
Stamps: Party this Way, Tiny Tags, Happiest Birthday Wishes, Background Basics: Text Style (PaperTrey Inc)
Cardstock: Crumb Cake, Chocolate Chip, Very Vanilla, Regal Rose
Ink: Chocolate Chip, Regal Rose, Baja Breeze
Accessories: Punches (Owl, Scalloped Dotted Ribbon border, Jewelery Tag, Cupcake, Scalloped Oval, Modern Label, Decorative Label), Parisian Breeze DSP (R), Sweet Always DSP (R), Early Expresso twine, Tombow multi, Double sided tape, Dimensionals

Friday, June 22, 2012

JAI 123 Just add a sketch

Hello there,
well hopefully the week for you all has been less germ filled than mine. I'm hoping that by the time this post goes lives I won't be stuffed up and snuffly anymore and even more so hope that my Mr 4 has stopped coughing!! This week at Just Add Ink we have a sketch for you, it might take some thinking but it has alot of possibilities!

I started by flipping the sketch 90 degrees, viewed that way it made me think of a frame, with tags in the bottom right corner. Now why a frame? well that might have something to do with the recent acquistion of the SU! Notably Ornate set. I ummed and ahhed about this for months but in the end the appeal of the frame won out. Anyway here is the end result.

I started by stamping about 2/3 of the frame on the base, two flowers overlapping the frame and some scattered extra background detail. That done I impressed the base layer to add texture. Then I stamped the frame again, trimmed it out, sponged the edges and mounted that over the base. I also trimmed out several layers of flowers and white embossed an additional flower and layers.  Added all the flowers and layers in using dimensionals, and finished off the front with a couple of little tags. The inside was finished off to match. I must admit I really liked how this one turned out :) but I didn't have long to admire it as it went in the post straight away to a lovely stamping friend over in New Zealand (Hi Paula :).

Thanks for visiting and do give the sketch a try!
Kim

Recipe: All SU! unless otherwise noted
Stamps: Creative Elements, Notably Ornate, French Foliage, Tiny Tags
Cardstock: Cherry Cobler, Basic Black, Whisper White
Ink: Cherry Cobler, Basic Black, Crumb Cake, Whisper White, Versamark
Accessories: Jewelery Tag punch, Wrought Iron impression plate (PaperTrey Inc), White embossing powder, Cherry Cobler twine, Jewels - rhinestones, Sponge, Dimensionals, Double sided tape

Friday, March 9, 2012

JAI 108 - Just add a colour combo

Hello there,

well this week at Just Add Ink we have a colour challenge for you. Its a lovely combo - but I must admit I struggled with it. But that probably has something to do with lack of sleep caused by my beloved children taking turns to throw up (in the middle of the night of course) off and on over the course of the last couple of weeks. Urghhh! I'll leave the level of detail there shall I! Ok here are the colours.

Nice huh!!


This all started with a flower - a flower that I liked but was just...too....darn...big...to work....on...a card!! (insert groan of frustration). After beating my forehead on my craft table (metaphorically) I gave up the idea of a card and decided to embrace the idea of topping a box with the flower. So whipped out some textured Early Expresso and my Petal Cone die and in the time it takes to say 1,2,3 had a nifty little take away lunch box sticky striped together, wrapped with ribbon and embellished with that BIG flower ;) But I was nagged by the thought that a gift box needs to have a little gift card to go with it. So came about the matching little card. In the end I was just glad I found a good use for the flower that started it all off ;) There are some fabulous ideas by the rest of the DT so do go check them out. I'm off to bed to catch up on some of that sleep I've been missing out on!!

Thanks for visiting,
Kim

Recipe: All SU! unless otherwise noted
Stamps: Pick a petal (R), Tiny Tags, Background Basics Polka Dot I (PaperTrey Inc), Grid (Kaiser)
Cardstock: Early Expresso (textured), Pool Party, Island Indigo, Confetti White
Ink: Pool Party, Island Indigo, Early Expresso
Accessories: Swirls and scribbles sizzlet, Petal Cone BigZL die, Beautiful Blooms die #3 (PaperTrey Inc), Ocean Tides vintage buttons (PTI), Early Expresso twine, Scalloped Ribbon border punch, Tombow multi, dimensionals, Sticky Strip, SNAIL adhesive, Double sided tape (X Press)

Friday, January 13, 2012

JAI 100 Just add crowns blog hop


Well hello there and happy 2012!
After a short intermission for Christmas and New Year I’m back with a bang ;) The Just Add Ink team have decided to start the year off by celebrating our 100th challenge with a Blog Hop. The theme of the blog hop is to Just Add Crowns (think royalty related theme). You may have just come from Kathy Tanner’s blog, if not make sure you go and check out her very cute princess! You can start the blog hop here, with any of the DT members or at the JAI blog. Because this is a special occasion we are also offering prizes!! – one for commenting on all the DT blogs and one for the winner of the challenge.

When the theme was set for this blog hop one idea immediately popped into my mind, something special I had been saving up to try for my gorgeous girl and seeing as her birthday is coming up it was the perfect time. Now kings and queens (who of course wear crowns, have to keep their crowns somewhere safe don't they ;) - and of course that would be a castle!! I first saw a castle card on Liam Pulcher's blog here and followed her link back to Deneen's tutorial here. I printed Deneen's templates two to a page, so approximately half size. I wanted my finished card to be as close to a standard A5 size, so once I cut out the template pieces I just widen them to 4” for each panel that way I could cut all three panels from one 12x12 piece, and just score the folds.
The glittery 7 surprise
The front and back unfolded

Close ups


Since this is my special little girls birthday card I went with a colour combo that would appeal to her tastes – well the pink (Regal Rose) and yellow (Daffodil Delight) do - although she is bit iffy on the Expresso! So starting with a Regal Rose base, I covered the front and back inside panel with DSP (Sweet Stitches), I also prepared a layer of impressed Expresso for the back panel that the front door opens on to. I sandwiched a bit of decorative scalloped trim in between some of these layers. Finally I added one more panel of Expresso for the turret roof. This probably sounds confusing so please do look at the photos. Then I added lots and lots of bling, and garlands of little flowers, with more bling!! Some vines and more flowers finish off the front, and yes those woodgrain doors do open to a little extra glittery surprise! The final touch for the top is a flag to fly from the turret – with a crown (of course ;) and more bling. I kept the layers on the inside pretty flat, a panel to write our birthday message and a large decorative embossed Happy Birthday (yes I’m still loving my coloured embossing powders J). The card opens with a kind of zig zag motion. I can tell you my kids were both entranced and my Mr almost 4 is lobbying hard to get a castle card for his birthday too!

Now don’t forget to keep going through the blog hop and join in the challenge. Next stop is Mae Collins, just click on the blog hop button below to get to Mae’s blog. All the DT blog links are on the JAI blog if there are any hiccups too.

Thanks for visiting and enjoy this right royal occaision J
Kim


Recipe: All SU! unless other wise noted
Stamps: Perfectly Penned, Create a Cupcake,Tiny Tags
Cardstock: Regal Rose, Daffodil Delight, Early Expresso, Whisper White
Ink: Regal Rose, Daffodil Delight, Versamark
Accessories: Sweet Stitches DSP (R), Swirls scribbles sizzlet, Timeless Type alphabet sizzlet, Itty Bitty shapes punch pack, Woodgrain and Linen/Canvas Impression plates (PaperTrey Ink), Double ended banner dies (PTI), Mat Stack 1 and Mat Stack layerz dies (PTI), Corner rounder punch, Dotted Scallop ribbon border punch, Jewels – rhinestones, coloured rhinestones (Kaiser), Pretty in Pink brads, Butter embossing powder (Zing), Fine supernova glitter, Big Shot adhesive sheets, Double sided tape (X Press), SNAIL adhesive, Glue dots

Friday, July 29, 2011

JAI 78 - Just add a colour combo

Hello there,
despite being in the depths of winter, with a -5oC night expected I felt like we had a touch of spring around today - firstly the sun was shining (mostly) and even more springy was that I noticed the first daffodil bud in the garden - its probably still a couple of weeks off blooming but its a nice sign of times to come! (also coming with Spring is our new SU! catalogue - also something to look forward to eh!!). My card today has a touch of autumn/winter to it inspired by the lovely colour combo challenge we have for you at Just Add Ink this week. Here it is.


I thought these colours would be perfect for a card for my Dad, and with Father's Day coming up down here in AUS in September I decided to try and get organised early. I also had a brand new set that I was very keen on inking up (French Foliage) so here is the result.
The inside

I started by stamping a panel of Very Vanilla all over with leaves inked first in Certainly Celery then rock and rolled in Not Quite Navy, I also added the text image in Sahara Sand, and spoltches in stamped off Chocolate Chip. That was mounted on a Chocolate Chip base.  Next I stamped a large branchy tree in Chocolate Chip on Vanilla and trimmed it out. I mounted that to the side of another Vanilla panel that I stamped with an assortment of sentiments to make up the message to my Dad. That Vanilla panel was mounted on top of a Choc Chip mat that had been embossed with the Square Lattice embossing folder. To finish off the front of the card I wrapped linen thread across the front, and added two little Not Quite Navy birds. The inside was stamped and matted to match the front.

Thanks for visiting, this is a really lovely colour combo so if you get the chance why don't you give it a go this week.

Kim

Recipe: All SU! unless otherwise noted
Stamps: French Foliage, Vintage Labels(R), Teeny Tiny Sentiments (SU!), Through the Trees, Tiny Tags, Botanical Silhouettes (Papertrey Inc)
Cardstock: Very Vanilla, Chocolate Chip
Ink: Certainly Celery, Not Quite Navy, Sahara Sand, Chocolate Chip
Accessories: Square Lattice embossing folder, Large Labels (Spellbinder), Linen Thread, Silver brad, Dimensionals, Double sided tape (X press)