Friday, June 26, 2009

Inkspirations Colour Challenge 9


Hi there,

Well this is my last week as guest designer for
Makeesha Byl’s Inkspiration challenges, so I want to start today by saying a big thanks to Keesh for asking me. It has been lots of fun and I’ve loved the challenge. I would also like to say a special thanks to the design team members (Karen, Cindy, Amy, Renee and Kirsty) and anyone else who has dropped by and left me a comment. (As an aside if anyone has had trouble with that please scroll down and read the brief post and comments before this one).

So on to today – here are the colours Keesh picked for this week.


Yep I’m definitely sure I find colour challenges the hardest, and perhaps my cards this week reflect that. Yes two cards again – well I couldn’t only do one after the last three weeks.

As I started to say, while I am happy with the way they turned out, better than I expected actually, they don’t quite have what I would call “that certain something – a zingy – I got it right” quality. Anyway enough babbling here are the cards.


And a side view so you can see the butterfly that has been cut out and mounted over the first one, as well as a glimpse of the inside.


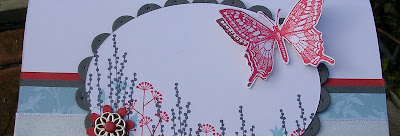
Well this first one is the girly one. I’ve seen some lovely meadow/butterfly cards and so I decided to try my hand at that. First using Pocket Silhouettes I stamped the “meadow”, then cut out a large oval from the stamped image and a framing scalloped oval using oval nestabilities. To balance the butterfly in the upper right I added a punched flower/filigree brad topped with a Ruby Red brad. Then finally to balance that and to carry the Ruby Red through I added the sentiment in the lower right corner. A little bit of piercing and some DSP basically finish it off.

Here's a side view to give you glimpse of the inside.


My second card is my go at a masculine card – one for Father’s Day coming up in September here in AUS. I broke out my new Jumbo Outline alphabet to stamp dad on some Basic Gray DSP from the hostess set in our new catalogue. At the very end I decided I needed more impact from the letters and then layered each one onto either Whisper White or Ruby Red cardstock. The letters are laid over some crimped Baja cardstock (which at the very end I ended up piercing the borders of). To bring in the Ruby Red I rolled my (retired) Builders Bits wheel in Ruby Red over some white cardstock. The base Baja layer was also stamped with the Canvas (retired) background stamp. The finishing touches are two large pewter brads and hemp twine which I pulled over my Basic Gray ink pad and some distressing of edges.

Well that wraps it up from me, please go and check out the other examples from Keesh and the design team members.
Karen
Cindy
Amy
Renee
Kirsty
Keesh

Recipe: All SU unless otherwise noted

Best Wishes
Stamps: Pocket Silhouettes, Short and Sweet, Touch of Nature (R)
Card Stock: Whisper White, Basic Gray, Ruby Red
Ink: Basic Gray, Ruby Red, Baja Breeze
Accessories: Oval nestabilities, Urban Garden DSP, Spring Bouquet punch(R), Word Window punch, ¾” circle punch, Scallop edge punch, Silver filigree brad, Silver and Ruby Red brad, Mat pack and piercing tool, White taffeta ribbon, Dimensionals, SNAIL adhesive, Double sided tape.

Dad
Stamps: Jumbo Outline alphabet, Builders Bits (R), Canvas (R)
Card Stock: Whisper White, Basic Gray, Ruby Red, Baja Breeze
Ink: Basic Gray, Ruby Red, Baja Breeze
Accessories: Crimper, jumbo Pewter brads, Hemp twine, Cropodile, Piercing tool, Cutter Kit, Dimensional, SNAIL adhesive, Double sided tape

Tuesday, June 23, 2009

Need some technical help

Hi there,

I'm hoping that some one out in here in blog/web land will be able to help me with a technical problem. A lovely blogging buddy of mine Makeesha Byl is having tremendous trouble opening my blog. It begins to open but then an error message comes up and it (my site and/or Internet Explorer?) automatically shuts down. She says after repeated efforts sometimes she does get it to open but then the same problem happens when she tries to open a individual post to leave a comment. Keesh's site runs off Wordpress and mine is Blogger. We didn't have this problem originally but it started about 6 ish weeks ago. In fact I can remember one week when Mr Linky was down and to enter Keesh's challenge I had to put my post in the comments, when I tried to open it to check I got an error message and automatic shutdown. The problem can't be universal as others have been able to leave me comments.

We have no idea why this has started or how to fix it. Has anyone out there had a similar problem and does know how to fix it? I would certainly appreciate any advice/suggestions.

Thanks Kim

Friday, June 19, 2009

The Starry Sea and Message in a Bottle


Hi there,
well when I first saw the sketch for this weeks challenge from Makeesha - I broke out in a sweat - I kid you not. What was I going to do with this! Here's the sketch so you can see what I mean.


It was seriously challenging, yes I know that is the point! Tag, luggage tags, windows all flashed before my eyes and then for some strange reason I thought "hey the central element could be a bottle". Next step from there was what goes in bottle - ships and messages of course!! Now I really did not mean to do two cards this week, but I just had to follow the two ideas up, and well this month I am really just concentrating on Keesh's challenges. So my "official" card is the one below but keep going if you want to see my second idea for the sketch.


Well the family friend who was expecting a baby had a boy, so I needed another baby card so I decided to use my ship in a bottle idea for this one. The Baja base is double layered, so the two silver brads don't show through to the inside, the top Baja layer was clear embossed with the Classic Stars wheel, and I also embossed stamping first with white craft ink and then using white embossing powder, the star, ship and sentiment from Nursery Necessities. The star and ship are raised up on dimensionals and so is the DSP sail. I created the waves by using the small oval punch on an angle, once that was SNAILed on to the Baja layer I paper pierced the wave pattern. The create the thread at the top of the bottle, I used my bone folder and the track on my cutter, then used a gel pen to highlight the thread, wiping most of it back with a slightly damp cloth. Some ribbon finishes it off. Now, here is card two.


Ok, well card two is my version of a message in a bottle. Once again the base layer (Sahara) is double layered so that the brass brads won't show through to the inside). I stamped that with Sanded in Sahara, the message is En Francais stamped in Not Quite Navy onto Confetti White, then scrunched up a bit and the top corner rolled over and stuck down with glue dots. Behind the bottle I white embossed (most of) the Something Fishy wheel onto Not Quite Navy, used the small oval punch again to create waves, paper pierced just below the waves and then layered that onto a Confetti layer. A white embossed sentiment (I figured if you're stuck on an island and putting a message in a bottle you are certainly thinking of someone!), a Sahara "cork" and some hemp twine finish it off. Hope you liked them :)

To finish once again big thanks go to Sam, who I borrowed more stuff from. Ta!!
I also want to say a special hello to Keesh who has sent me over an award - thanks lovely lady:)

To check out the other design team creations click on the links below.
Karen
Cindy
Renee
Kirsty
Amy

Recipe: (All SU unless otherwise noted)
"Starry Seas"
Stamps:Nursery Necessities, Classic Stars
Card Stock: Baja Breeze,Basic Grey, Whisper White
Ink: White Craft, Versamark, Baja Breeze
Accessories: Urban Garden DSP, Silver hodgepodge, Kiwi Kiss satin ribbon, white and clear embossing powder, white gel pen, Corner Rounder punch, Small Oval punch and small Star punch, Piercing tool and mat pack, Dimensionals, SNAIL adhesive, double sided tape.

"Message in a Bottle"
Stamps: En Francais, Sanded, Something Fishy
Card Stock: Sahara Sand, Confetti White, Not Quite Navy
Ink: White Craft, Not Quite Navy
Accessories: White embossing powder, Brass Bo Bunny brads, Corner Rounder punch, Small Oval punch, Piercing tool and mat pack, hemp twine, Glue Dots, Dimensionals, SNAIL adhesive, double sided tape.

Friday, June 12, 2009

Relax


Hi there,

Well the title does not describe my week so far but I hope it describes the two cards I made for Makeesha’s inspiration challenge. That’s how her image struck me, very natural light earthly colours, soft and calming. Here’s her pic.


Who wouldn’t want to cuddle up to those pillows on a couch for a snooze!

My first idea was to make a square card, and I did, but I struggled with it, and somehow I still feel not quite 100% happy with it. So my “official” card is this one.


My first thoughts were to use a combination of Kraft, White and Sahara, with white embossing and the eyelet border punch to give some decorative detail. That basically sums up the recipe for both my cards. The basic points to note are that I first stamped the grass side of Inspired with Nature in Sahara onto the top Sahara layer, then using white craft ink stamped the daisy side over the top and then embossed using white embossing powder. To accent, I used the eyelet border punch down both sides but on different layers. The final details are to add some white taffeta ribbon and some pewter hodgepodge. My cunning plan here was to connect up two of the eyelet punch holes to make a slot to feed the ribbon through. A big pewter brad with ribbon fed through underneath finishes off the bottom. I didn’t want the sentiment to detract too much from the image which is why I have just left it on a Sahara layer, but raised it and added a brad to give it some impact.

OK now here is the second card, I’m slowly getting the hang of making two at one time, not that hard when you have all your stuff put really.


The main thing to note here is that I first stamped Upsy Daisy in Sahara and then, offset it and stamped again with white craft ink. Once again I embossed using white embossing powder. The shadow effect is kind of neat! The final details on this card include some piercing, Kraft and White Taffeta ribbon, pewter hodgepodge. I also stamped off the Linen background stamp in Sahara before stamping most of the white layer. The white just seemed a bit too strong when I was putting the card together and I wanted to tone it down a bit.

Enjoy

Finally to finish, thanks again to Sam, for lending me Inspired with Nature and her eyelet border punch. You can't half tell that my next order from the catalogue is going to be big!

You can find the links to the cards from the other design team members here. Sorry I don't have time to link separately this week, in fact this post will be scheduled to post itself while I'm away - I hope.

“You’re on my mind”
Recipe:
Stamps:
Inspired with Nature, Upsy Daisy
Cardstock: Kraft, Whisper White, Sahara
Ink: Sahara, White craft , Eyelet border punch, white embossing powder, pewter hodgepodge, white taffeta ribbon, dimensionals, SNAIL adhesive, Stamp-ma-jig, cropodile.
Accessories: Eyelet border punch, white embossing powder, pewter hodgepodge, white taffeta ribbon, dimensionals, SNAIL adhesive, Stamp-ma-jig, cropodile.


“Thank You”
Recipe:
Stamps:
Upsy Daisy, Linen
Cardstock: Kraft, Whisper White, Sahara
Ink: Sahara, White craft
Accessories: Eyelet border punch, white embossing powder, pewter hodgepodge, Kraft and white taffeta ribbon, piercing tool and mat pack, dimensionals, SNAIL adhesive, Stamp-ma-jig.

Thursday, June 4, 2009

My First DT card - Its a Girl


Hi there everyone,

yep the title says it all. I was delighted (translation excited jumping up and down accompanied by squeals of joy) to recieve an email from the lovely Makeesha to ask me to be the first guest design team member for her weekly challenges. I will be on the DT for the month of June so I will look forward to saying hello each week and hopefully hearing from you all as well!

Now I have discovered that I find colour challenges the hardest to work with - imagine how daunting it was to start off my tenure with a colour challenge. This is the colour combo that Makeesha picked this week.


I did do a fair bit of fiddling and in the end made two cards. But the one I have decided to select as my DT card is right below.


A family friend is expecting a baby in the next few weeks - so my start point was a baby card, given the involvement of Pink Passion - one for a girl. Overall its actually a fairly simple card. My main colour decision to was when possible to space the Celery between the Pink Passion and Pumpkin. I found it gave better contrast for both of them. So starting with a Pink Passion layer, I added a Celery one on top then a Whisper White that was stamped with Polka Dots to match the dotty Pumpkin DSP at the bottom. The main element is the Pink Passion elephant, dressed up with a Celery brad for its eye, glittery Pumpkin ear and a Pumpkin felt Fusion flower. To dress up the Celery ribbon below I also added a row of Pumpkin felt fusion flowers with alternating pink and Celery brads. In the process I discovered that Tombow and Crystal effects just did not want to stick the flowers down but some glue dots and sticky strip later I got that problem solved. Lots of scallops, some piercing and "Its a girl' for the flower stalk and it was all done. The inside was also just finished off simply.

Ok having seen my official card here is the second one I made for the colour challenge.


My starting point for this one was to use the most recent (at the time) Mojo Monday sketch and also to use the same layering as I did for the first. The points to note here are that I used the stripy Background sampler stamp to make the Pink Passion strips on the bottom, then using markers added in Pumpkin and Celery stripes. I got the colour effect on the largest flower, by colouring the centre with a Pumkpin marker and the edge with a Pink Passion one, then used a blender pen to pull the Pumkpin out into the Pink, I did go over after with an aquapainter and a little ink from the ink pads lids to deepen the colour. The top flower was simply rock and rolled and Dazzling Diamonds was added to the Celery flower. The opened up pink brads was accidental really, I opened one up flat just so I could see if the Pink brads were right for the card - size wise and looked and went - hmmm Ok I might keep it this way.

I want to finish today by saying a big thank you to very good friend (and now upline) Sam who kindly lent me Polka Dot, Background Sampler and Petals Pizzazz.

You can check out the brilliant creations from the other DT members here.


Kirsty

"Its a Girl"
Recipe:
All SU unless otherwise noted
Stamps: Wild About You, So Many Sayings, Polka Dot
CardStock: Pink Passion, Certainly Celery, Pumpkin Pie and Whisper White
Ink: Pink Passion, Certainly Celery, Pumpkin Pie
Accessories: Scallop Edge punch, Wide and narrow Certainly Celery grosgrain ribbon, Pumpkin Pie felt Fusion flowers, 2-way Glue pen, Dazzling Diamonds, Certainly Cerlery brads, Pink Bo Bunny brads, Mat pack and piercing tool, Glue Dots, Sticky Strip, Double sided tape, SNAIL adhesive, Dimensionals

"Thank You"
Recipe:
All SU unless otherwise noted
Stamps: Petals Pizzazz, Background Sampler, Simple Wishes (retired hostess set)
CardStock: Pink Passion, Certainly Celery, and Whisper White
Ink: Pink Passion, Certainly Celery, Pumpkin Pie
Accessories: Certainly Celery DSP, Cuttlebug Distressed Stripes folder, Ice Rhinestone brad, large pink Bo Bunny brads, wide Certainly Celery grosgrain ribbon, 2-way Glue pen, Dazzling Diamonds, Dimensionals, Double sided tape, SNAIL adhesive, blender pen

Wednesday, June 3, 2009

Exciting news number 1

Hi there everyone,

well I was super excited to finally make the decision to join Stampin Up as a demonstrator. I have enjoyed blogging so much and corresponding with all the creative and talented people out here that I couldn't resist anymore. I hope to meet many of you at Convention next year - hey a girl has to plan ahead!

There are a couple of other things I wanted to mention too - firstly that the lovely and very talented Kate Lewis, has given me an award which I hope to post real soon. Thanks Kate.

Lastly one more thing, stay tuned in, because I will be posting some super exciting news, yes there is more, at around dinner time AEST on Friday. So drop by around then or on the weekend and come check it out.

I have dug a card out of my archives, pre blogging to show you to finish off this post, I don't have time to write up the recipe now. But basically it was Soft Sky, Not Quite Navy and Old Olive. Enjoy...


A Trendy Flower


Hi there,

for
Makeesha sketch challenge this week I finally managed to break out my Trendy trees stamp and some of the new in colours and I really enjoyed using both. This was one of those idea you come up with in your head and when you convert it to paper it actually worked - yippee. First here is the sketch, and the card will follow.


A side view to give you a glimpse of the inside.


I went with greens and blues for this one as I wanted to use my Urban Garden DSP and the black and white gingham check ribbon inspired me to use black to accent all the features. Really this card is about embossing, punching and piercing. I had read how you can use craft ink and just pour embossing powder onto it, so that's what I tried. First I stamped the tree top with white craft ink, then just to make doubly sure I poured over white embossing powder - it worked a treat! Once I had embossed all the petals I just punched them out. I clear embossed as well on the Baja panel with the same tree top stamp. The flower stem was an idea I had seen some where and some time in blog land, sorry I can't remember, and was made by using the scallop edge punch on both side of the same strip of cardstock, you just need to remember to offset it on the second side, to get the ric rac effect. The sentiment was punched out with the word window punch, and I made a little frame for it by cutting a strip of card stock just a bit wider and then used the corner rounder punch to get the pointed ends. Piercing, ribbon, and some black brads finish it off.


Recipe: (All SU unless otherwise noted)
Stamps: Trendy Trees
Card Stock: Kiwi Kiss, Baja Breeze, Basic Black and Whisper White
Ink: Basic Black, White Craft, Versamark
Accessories: Urban Garden DSP, Clear and White Embossing powder, Heat Gun, Mat pack and piercing tool, Black Gingham ribbon, 1" circle punch, word window punch, scallop edge punch, corner rounder punch, Black brads