Friday, December 23, 2011

JAI 99 - just add wrapping/ pretty packaging

Hello,
well it's almost Christmas - yippee! The run up has been pretty crazy, but every...thing...is...done...now! even the presents wrapped - hurray. So it's time to sit back and relax (well as much as that is possible with four kids under 6 around - no not all mine!!), catch up on some blog browsing, read a book and perhaps have the odd glass of champagne too :) The challenge this week at Just Add Ink is perfectly suited to the Christmas season - it's just add wrapping/pretty packaging.


I wanted to make my SIL some lavender filled felt strawberries ( I made some of these earlier this year - see this post for the details of the making). The only thing I've improved was to add a little button to hide where the ribbon hanger is stitched on. I figured these juicy berries required some special packaging to showcase them. So I dug out my Petal Cone die and cut two acetate die cuts. I converted the cone die cuts to a box shape by trimming the bottom inch off each then scoring and folding the next inch under to form the bottom of the box. I used sticky strip to hold it all together and then added DSP (on the outside) and cardstock (on the inside) on two sides of the box to hide where the box was adhered together. I decorated all the flaps with scalloped cardstock and DSP, but reversed the orientation on the opposite flaps (hope that makes sense - just look at the pics to see what I mean).  I shredded some white tissue paper to act as a bed for the strawberries, tucked them and  then in the flaps folded up I punched holes and threaded through some taffeta ribbon, tying it in a bow to secure it all. Lastly I added a Christmas tag with some linen thread.

Hope you are all on the home stretch with the Christmas preparations - and then enjoy a Christmas filled with peace, love and joy!!

Thanks for visiting,
Kim

Box
Recipe: All SU! unless otherwise noted
Stamps: Holiday Lights (PaperTrey Inc)
Cardstock: Old Olive, Real Red
Ink: Real Red
Accessories: Petal Cone BigZL die, Bella Rose DSP (R), Beautiful Blooms DSP (PaperTrey Inc), 1/8" Old Olive taffeta ribbon, Linen Thread, 2" scalloped circle punch, 1 3/4" circle punch, Jewels - rhinestones, Sticky Strip, Scor Tape

Strawberries
Red and green wool felt, White embroidery thread, 1/8" Old Olive taffeta ribbon, shell button

Tuesday, December 20, 2011

Inkspirations 100 - Inspired By

Hello there,
well an extra post in a week has been a rarity for me in the last six months or more, just to busy balancing family, work etc. But when I saw Makeesha Byl's post that the Inkspiration challenges were shutting up shop and were going out with one last challenge - well I just had to join in. The Inkspiration challenges were the first challenges that I participated in and I had the great delight of being a guest designer a couple of times. The design team have never failed to produce innovative and just plain gorgeous work! The challenge was to show your Christmas projects - what ever you've been making for the Christmas season - decorations or gifts. I decided use the card and gifts I made for my Miss 6 teacher. Here they are.


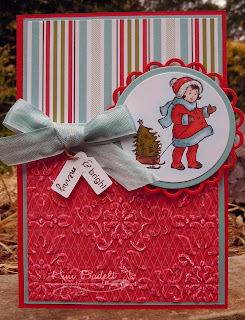
I started with the card - and went just a little vintage using the super cute little Christmas girl from Greeting Card kids, colouring her in with copics. I added some gold highlights to the Christmas tree and dazzling diamonds to her hat. I especially liked the slightly distressed feel I got by embossing the DSP panel on the bottom! I had been planning to using the same DSP on the pencil box which my Miss 6 described as "awesome". I loved it too!! This is one of the inspired by elements - I purchased the template from Ilina Crouse's blog (one of the Inkspirations DT) . I pretty much followed Ilina's instructions as is, just changed up some of the colours and retro fitted some extra tabs to hold the bottom on. So anyway back to the DSP - I was going to use the same but Miss 6 said she wanted numbers and so I dug out some other DSP, colours all still matched so it all still works. As you can see the top of the "pencil" flips open. I stuffed it full of chocolates and then perched the brooch I made on the little shelf at the top. The brooch is my other inspired by element - I was lucky enough to get a gorgeous brooch by Michelle Martin at the SU! convention this year. So I decided to make one of my own. In a nutshell I just stamped some swirls on some DSP, punched out a flower shape, then 4 more flowers of cardstock. Use Tombow to adhere all these layers together, leave to dry. Then give the top a coating of crystal effects, pressing the ribbon threaded button into this and leave it all the dry and set. The next day turn over and coat back with crystal effect pressing the broach pin into it and leave to dry.

Miss 6's teacher was delighted, and I'm slowly nibbling my way through the chocolates that couldn't fit into the box - bonus ;)

Thanks for visiting - and a big thanks to the Inkspiration team - I will miss the challenges and the wonderful inspiration you all provided!

Kim

Card
Recipe: All SU! unless otherwise noted
Stamps: Greeting Card Kids, Holiday Button Bits (PaperTrey Inc)
Cardstock: Real Red, Baja Breeze, Whisper White, X Press copic blending card
Ink: Chocolate Chip
Accessories: Vintage Wallpaper embossing folder, Medium Jewelery Tag punch, Lacey and classic circles nestability (Spellbinder), Baja Breeze seam binding, Copic markers, Gold leaf pen, Dazzling Diamonds, Ski Slope DSP (R), Linen Thread, Dimensionals, Two way glue pen, Double sided tape, SNAIL adhesive.

Pencil Box
Recipe: All SU! unless other wise noted
Stamps: Tart and Tangy (R)
Cardstock: Real Red, Basic Black, Sahara Sand, Whisper White
Ink: Real Red, Chocolate Chip, Old Olive
Accessories: Celebrations DSP (R), Sticky strip, Double sided tape, Tombow multi

Brooch
Recipe: All SU! unless otherwise noted
Stamps: Barque Motifs
Cardstock: Riding Hood Red
Ink: Black Stazon
Accessories: Love Letter DSP (R), Black button, 1/8" Real Red taffeta, Boho Blossom punch, Tombow multi, Crystal effects, sponge, brooch pin (craft store)

Friday, December 16, 2011

JAI 98 - Just add sparkle


Well hello there :)
How is everyone tracking with their Christmas preparations? I'm finally making headway with mine but still have a stack of cards to write and post out.  This week at Just Add Ink we have a very appropriate challenge for the Christmas season - its Just Add Sparkle. I had a special Christmas card in mind for this challenge...here it is.

This one came together pretty quickly once I had the colour combo, I wanted something a little vintage and soft to go with the gorgeous angel die that I planned to use. So first up a Pear Pizzazz base, then a Perfect Plum mat, then the vanilla top mat. I stamped a frame of greenery around the panel, adding Plum and Blushing Bride berries. Then I die cut and stamped my angel, and added a hanger for her. Finishing touches include the sparkle (of course ;) rhinestones "berries" and glass glitter on the wings, and a sentiment - a very appropriate one in my case as the card has already made its way to my parents :)

As usual at the momment I dead knackered so that is from me!! Have a good week and check out the rest of the amazing DT offerings  - they are stunning!

Thanks for visiting,
Kim

Recipe: All SU! unless otherwise noted
Stamps: Tree Trimmings, Love Lives Here: Holiday (PaperTrey Inc)
Cardstock: Pear Pizzazz, Perfect Plum, Very Vanilla
Ink: Pear Pizzazz, Perfect Plum, Blushing Bride, Early Expresso
Accessories: Love Lives Here" Holiday dies (PaperTrey Inc), Corner Rounder punch, Silver glass glitter, Jewels - rhinestones, Tombow multi, Dimensionals, Double sided tape

Friday, December 9, 2011

JAI 97 - Just add inspiration


Hello there!

well this week at Just Add Ink we have a very bright inspirational photo for you brought to you by the lovely Jo Eades. Jo's suggested colours to go with the photo are Poppy Parade, Lucky Limeade, Pool Party and Melon Mambo...want to see ;)

And this is what I made of it.

I have got to admit I did struggle with this one, in fact this card was sooo close to being binned! But a bit of last minute readjusting and I came out with something I half like. The colours suggested tropical flowers to me, with a dash of aqua to cool it all down. So starting point - lots of flowers in Melon Mambo, the layers were made by stamping and then stamping again to get the lighter shade. The red flowers were one layer of Real Red and one of Poppy Parade. The layered flowers were arranged on an oval base, and dressed up with some Limeade greenery. I kept the background neutral, but added some texture using embossing. I really like the distressed effect you get by running DSP through an embossing folder - nice :) Finishing touches - lots of rhinestones and some Pool Party ribbon.

Hopefully that gives you the general idea - I promised myself I would get to bed early earlier today so I need to get my weary body to bed otherwise my brain will be mush tomorrow!

Thanks for visiting,

Kim

Recipe: All SU! unless otherwise noted
Stamps: Array of Sunshine, Teeny Tiny Sentiments
Cardstock: Melon Mambo, Pool Party, Whisper White
Ink: Melon Mambo, Lucky Limeade, Real Red, Poppy Parade
Accessories: Rasberry Fizz DSP (R), Linen and Canvas Impression Plate (PaperTrey Inc), Vintage Wallpaper embossing folder, Ticket corner punch, Modern Label punch, Word window punch, Classic oval and scalloped oval nestabilities (Spellbinder), Pool Party ruffled ribbon, Dimensionals, Double sided tape, Jewels - rhinestones.

Friday, December 2, 2011

JAI 96 - Just add Tania Gould

Hello there,
how is everyone going at this busy time of year? I still have a heap of half completed projects I want need to get done by Christmas, although I am making progress. But our December calender is filling up with work Christmas lunches (yes lunches ;), Christmas shopping - yikes!!, school end of year concerts and fetes etc etc. It's all fun and crazy at the same time - I am seriously hanging out for some time to chill at Christmas!

OK enough blather!! We have a great challenge for you this week at Just Add Ink - we want you to just add one of the team - Tania Gould. The idea is to go and have a look at some of Tania's work and pick something to CASE or be inspired by. It won't be hard trust me! I was stopped  in my tracks by a gorgeous mini book Tania made recently, check out her post here. And here is a pic so you can see where I started from.

Now this is where I went with it.
One of the pages open

The back.
My version is going to be a mini photo album of some highlights of 2011, and will be going to one of the family grandmother's as a Christmas present. I started by cutting two thick chipboard Top note die cuts, then another two inserts in a thinner chipboard. Then I cut eight Top note die cuts from First Edition DSP. Then it was time to get sticky - I used Tombow to glue all the DSP Top notes to the chipboard Top notes then left them to dry for a day or two. Then I went around all the edges with some distress type ink. Now I wanted to use a silhouette image like Tania did in the bottom LHS corner - so I pulled out Upsy Daisy and then got to try something I have been wanting to do for ages, ever since seeing this post by Amanda Reddicliffe , way back in May. Yes I played with different coloured embossing powders (so pleased that SU! has introduced some coloured ones!). It was a bit hit and miss as I could hardly see the versamark image on the DSP but I took my best guess and sprinkled the coloured powder about. I LOVE how it turned out. And then I got to do it again, so I could have another embossed Upsy Daisy image on the back :) and of course every single one is unqiue. Anyway I just added some die cut numbers to the front and punched the holes for the album rings.  Now I just need to add the photos, some journalling and a few extra embellishments - I'm thinking some stamped brightly coloured flowers - to finish up this Christmas present!

Thanks for visiting and do go and check Tania out!
Kim

Recipe: All SU! unless otherwise noted
Stamps: Upsy Daisy
Cardstock: Textured Early Expresso
Ink: Versamark
Accessories: Timeless Type alphabet sizzlet, Top note die, First Edition DSP, Melon Mambo and Tempting Turquoise embossing powder, Leaf, Butter and Apricot embossing powder (Zing), Chai ink (PaperTrey Inc), Cropodile, album ringlets (Kaiser), Tombow multi, adhesive sheet