Tuesday, November 30, 2010

Inkspirations 50 - A Little More Christmas


Hi all,

this week Makeesha set a colour challenge I just couldn't resist - even though I was up to my eyeballs busy - we are well and truly in that mad crazy run up to Christmas! So want to see the tantilising colour selection? - here it is!


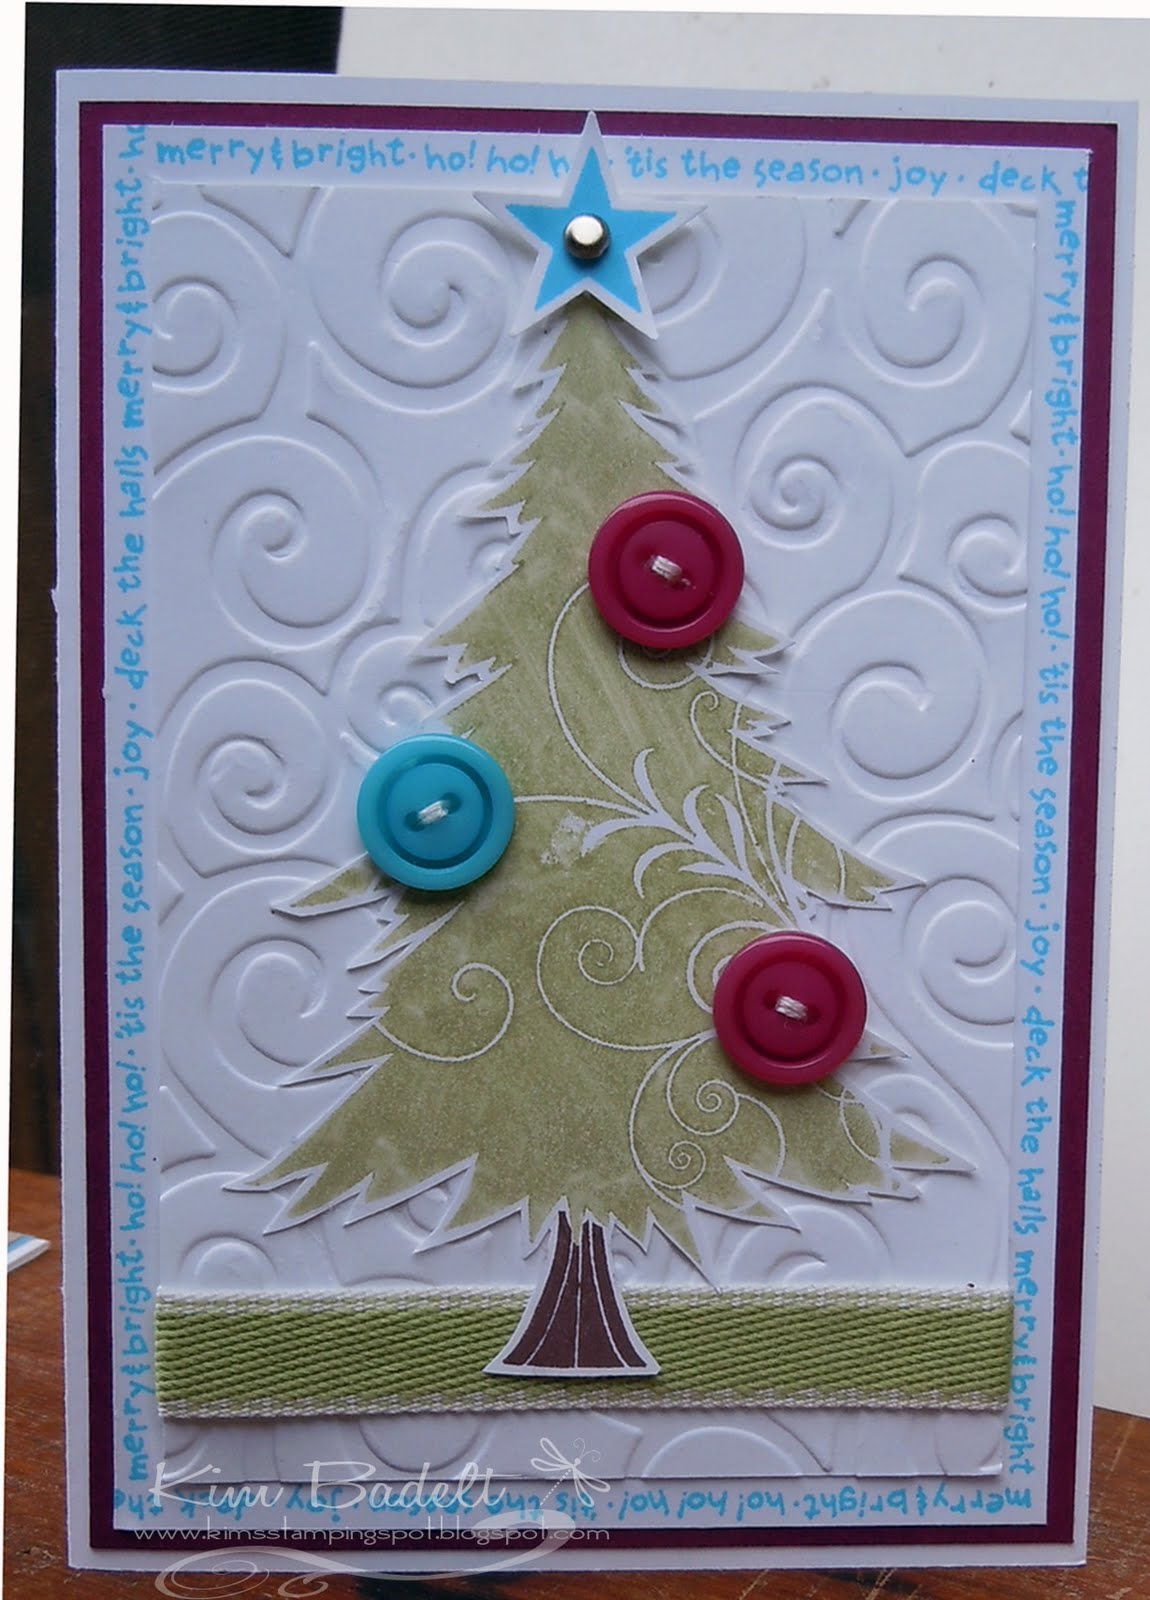
I was still in a Tree Trimming mood but wanted use the biggest Christmas tree in the set (PTI has a die for this tree but sadly mine is currently lost in mid Pacific limbo - ah well may'be it will arrive next week). My idea for the card kind of evolved as I went along but this is how it ended up.


Starting with a white base, I layered that with a Razzleberry mat, then added a white mat. I used a long Christmas sentiment stamp to add a Tempting Turquoise border all around the edges of this layer. Then I added another white mat - this one embossed with a swirl pattern to tie in with the tree image. For the tree itself I inked up the stamp with Pear Pizzazz and stamped on Whisper White, then masked the bottom so I could add a Choc Chip base. Then I trimmed the whole tree out and SNAILed it down over the embossed layer. I also added a strip of Pear Pizzazz ribbon to ground the tree. To finish the tree off I added a Turquoise star, and button and two Razzleberry buttons. The inside was finished off very simply with a decorated sentiment.

Thanks for visiting,
Kim

Recipe: All SU! unless otherwise noted
Stamps: Crazy for Christmas (R), Tree Trimming Trio (PaperTrey Inc), Vintage Labels (PTI)
Ink: Pear Pizzazz, Tempting Turquoise, Rich Razzleberry, Chocolate Chip
Accessories: Swirl cuttlebug embossing folder, Tempting Turquoise and Rich Razzleberry buttons, small Star punch (R), Silver brad, Pear Pizzazz 1/2" poly ribbon, white embroidery thread, SNAIL, Double sided tape

Friday, November 26, 2010

JAI 45 - just add a sketch again


Hi there,

well I'm back again with that second card for this weeks Just Add Ink challenge. Its such a versatile sketch and very user friendly so I hope you'll have a go this week too :) OK here is the sketch again.


Now I came up with the idea for this one as we were driving back from Melbourne (a 10 hour trip - especially when you need to make playground stops). I should mention my DH was doing the driving which is why I had the leisure to ponder card designs ;) I wanted to try two things a pink and red combo and a glittered Christmas tree. Here's what came out of that.


I started with a Cherry Cobler base, layered that with a Blushing Bride embossed with Vintage Wallpaper, I also rubbed my versamark ink pad over all the raised embossing. Like the first card I added a strip of 1 1/4" striped Riding Hood Red grosgrain across the middle. The focal image was layered over the ribbon, and I created that by stamping the pine tree from Lovely as a Tree in versamark, then adding heat and stick powder, heating that then pouring over fine red glitter. It looks lovely - so sparkly and you actually get remarkably good detail. But even with the heat and stick powder you get continual glitter shed - so this card goes more in the one off category rather than mass produce if you know what I mean. Oh and I used Pink Pirouette for the tree panel. I stamped the sentiment twice on the tree panel, and layered it onto a scalloped rectangle Cherry Cobler mat (got to love nestabilities!). I did love how this one turned out so I'm glad I got the chance to make.

Well I hope you've enjoyed my little mini Christmas card bonanza week ;) Don't forget if you have the chance - why don't you join us at Just Add Ink this week too!

Thanks for visiting,
Kim

Recipe: All SU! unless otherwise specified
Stamps: Lovely as a Tree, Tree Trimming Trio
Cardstock: Cherry Cobler, Blushing Bride, Pink Pirouette
Ink: Versamark, Cherry Cobler
Accessories: Vintage Wallpaper embossing folder, Classic and Scalloped Rectangle nestabilites (Spellbinder), Fine red glitter (Martha Stewart), Heat and Stick powder, 1 1/4" striped Riding Hood Red grosgrain ribbon, SNAIL adhesive, Dimensionals, Double sided tape

JAI 45 -just add a sketch


Hi all :)

ooh ooh we have a great sketch for you at Just Add Ink this week. So good in fact that I made two cards for it, even though its my week off from the DT;) You can check out my following post for the second card I made. Having waved my arms around telling you how fab this sketch is, I had better show you the sketch - ehh! Here it is.


Well at this time of year you can probably guess what is coming your way - yep its a Christmas card - and oh my did I have fun playing with some new stuff!!

I'm quite fond of a blue/red colour combo for Christmas cards so that is what I started with - Riding Hood Red and Bashful Blue. So I cut a RHR A frame base and round the top left and bottom right corners. Next I cut a Bashful Blue mat, and then embossed it with the Vintage Wallpaper folder. Next step was sponging around the edges with Bashful Blue ink, then with Champagne Mist shimmer paint. Before I attached the blue embossed layer I SNAILed some gorgeous striped RHR grosgrain ribbon across. The focal point for the card is a stamped RHR bauble from Delightful Decorations, punched out with the matching punch (love this). To decorate the bauble I tied a silver cord bow around the top and added a star brad (non SU). The bauble was mounted on dimensionals over a mat of embossed Bashful Blue, sprayed with Champagne Mist shimmer spray, which was matted onto a RHR base with a scallop trim border. I had a lot of fun playing with my shimmer paint and bauble punch making this one - there is a gorgeous shimmer IRL just sparkling off the card - but its darn hard to photograph :(

Thanks for dropping by, and if you have time check out card two in the next post and I hope you have time to have a play with the sketch and link up your fabulous creation to the Just Add Ink challenge :)

Kim

Recipe: All SU! unless otherwise noted
Stamps: Delightful Decorations
Cardstock: Riding Hood Red, Bashful Blue
Ink: Riding Hood Red, Bashful Blue
Accessories: Vintage Wallpaper embossing folder, Bauble punch, Scallop Trim border punch, Corner rounder punch, Champagne Mist shimmer paint, 1 1/4" striped grosgrain Riding Hood Red ribbon, Silver cord (R), Dimensionals, Double sided tape

Tuesday, November 23, 2010

Inkspirations 49 - Trimming the tree


Hi all,

weeelllll its been a long time since I've been able to do an Inkspiration challenge. But then of the last 7 weeks I've only spent 2.5 at home!!! So finally reunited with all my stamping stuff the urge to get creative hit last night and I kept going till I was done as I knew I wouldn't get the time today. So what challenge did Makeesha set - well a sketch, here it is.


So what did I do with it - what else but a Christmas card - of course ;) I had two starting points - I wanted to use SU! Dashing DSP (retired) and a PaperTrey Inc Christmas set I had bought last year and not inked up yet (opps - last night was the night to remedy that!). Here's what I came up with.


The colours from the DSP dictated the scheme - so I went with a Very Vanilla base, then layered that with an Old Olive mat, then added some dotty patterned DSP. For the long vertical element of the sketch I used an old jumbo wheel (All About Christmas) - giving me panel and sentiment all in one! Because I wanted my Christmas tree to be the star I kept both the panel elements of the sketch Old Olive on Vanilla. For my Christmas tree I stamped it in Real Red on Very Vanilla, then used my largest oval nestability to cut it out, and also cut a scalloped Olive mat for it. Then I added a Choc Chip base for the tree and decorated it with buttons and a star. The final element of the card was to add three red buttons at the end of the long vertical panel, over some scalloped Olive edging. Oh and unusual for me - I finished off the inside of this Christmas card - stamping the same tree, but in Olive (stamped off first), and adding a Red sentiment over the top - and of course a star!

So to finish up I wanted to say thanks for visiting :)

Kim

Recipe: All SU! unless otherwise specified
Stamps: All About Christmas (R), Tree Trimmimg Trio (PaperTrey Inc)
Cardstock: Very Vanilla, Old Olive
Ink: Old Olive, Real Red, Chocolate Chip
Accessories: Dashing DSP (R), small star punch (R), Scallop border punch, Classic and Scalloped Oval Nestabilities, Old Olive button, Spring Moss, Ripe Avocado, Pure Poppy buttons (PaperTrey Inc), DMC embroidery thread, Tombow, Dimensionals, Double sided tape

Friday, November 19, 2010

JAI 44 - Just add a colour combo


Hi all,

did you have a go at last weeks Just Add Ink Christmas challenge? we had some awesome and inspiring entries! This week of course we have a new challenge for you - it's add a colour combo. Here are the colours.

Now I have to admit these are not colours I would naturally gravitate to, although having said that they do go well together. To me they said "earthy, something natural" and with that thought my mind turned to a lovely Aussie wildflower set we have in the SU! catalogue (Edited to add: oops retired now). Here's the result.


One of my starting points for this card was wanting to make the checkboard weave backing panel to the image. But can you believe it took me three goes. In fact I nearly had a whole panel of strips woven together before I realised that it wasn't checkerboard - a BIG doh momment!! Before I wove the Wasabi and River Rock stips together I ran them through the crimper and also gave them a good scrunching up as I really wanted to get some texture in there as well as softness. The focal image was done very simply by stamping the Waratah image in versamark and embossing with white embossing powder. I worked out where I wanted the sentiment strip to run and then added some piercing detail to the image panel as well. That was then matted onto some Whisper White and then mounted onto the woven panel of Wild Wasabi and River Rock. Which was then mounted onto a Choc Chip mat. Originally I had planned to have this just added to a Whisper White base but once I'd put it there is just seem to float on the white - it didn't feel anchored. So changed the card base to Choc Chip, then added a white mat and then...finally added the woven mat and image. The last thing to do was add the sentiment - and for this I got to use a one of my new sets with a lovely simple but ornate and flowing font. I stamped that in Choc Chip, mounted it up on dimensionals and added large Choc Chip brads to either end. The inside I finished off simply with three more Waratahs.

So - what do you think? I like the clean but textured style in all honesty its not one of my favourite pieces of work. But then again may'be I'll change my mind with some more contemplating ;)

Thanks for visiting and why don't you give this colour combo a crack this week and link up your creation to Just Add Ink.

Kim

Recipe: All SU!
Stamps: Bloom Away (R), Curly Cute
Cardstock: Wild Wasabi, River Rock, Chocolate Chip, Whisper White
Ink: Chocolate Chip, Versamark
Accessories: White embossing powder, Mat pack and piercing tool,Jumbo brad 5/16 Chocolate Chip, Crimper, Dimensionals, Double sided tape.

Friday, November 12, 2010

JAI 43 - Its beginning to feel a bit like Christmas


Hi all :)

well welcome back - today as you can guess this post has a Christmas theme - and that's cause Just Add Ink has a fun challenge this week - just add Christmas! Now I love Christmas - getting the tree out and decorating it, baking Chrissie bikkies - last year Miss 5 helped :) she did a great job adding smarties (MMs) to the icing!, I even enjoy making my Christmas cards - OK well may'be I enjoy looking at them all when their all made ;) So what did I make for you this week - not a card...


I came up with this idea months ago, but never had the chance to finish it so the challenge was well timed indeed! I started by stamping the Medallion stamp on cardstock vellum with Real Red ink and versamark - three of each. The versamark medallions I embossed with white embossing powder straight away. The Real Red ones I left well...months actually. But a couple of hours would probably do ;)Then I overstamped with versamark and clear embossed. It was sooo tricky to try and line up the clear over the red and I didn't always get it exactly right but luckily its hard to see. The next step was to trim out the six medallions and then fold them all in half and really smooth the crease down. Then I started adhering them together, alternating the colours. Before I stuck the last two sides together I added a long strand of silver cord through the middle. At the bottom I tied it into a tassle, then threaded on a crystal and pearl, then the medallion ornament was added, I added on another crystal and pearl above the ornament, then tied the silver cord in a big loop.

So there you are my first use of the Medallion stamp.

Thanks for visiting and if you are making some Christmas goodness this week why don't you join in the challenge at Just Add Ink too.

Recipe: All SU!
Stamps: Medallion
Cardstock: Cardstock Vellum
Ink: Real Red, Versamark
Accessories: White embossing powder, Pretties Kit (R), Silver cord (R), Sticky Strip

Friday, November 5, 2010

JAI 42 - just add a sketch

Hi all,

welcome back for another Just Add Ink challenge. This week we have a great sketch for you. Have a look and may'be you'll be inspired to join us this week.


I decided to interpret the sketch a little liberally this week and actually make a picture for my Mr 2's room. Since he's rather fond of owls - honestly nothing is cuter than hearing him go " hoo hoo" I had to use my nifty new owl punch. (I literally ripped it out of its packaging to do this project ;) )

And a close up my rather dopey looking owl - I didn't quite get his eyelids matched up but I figure he's still pretty cute.

As my starting point I was inspired by an awesome swap I got at the SU! convention earlier this year from the lovely and talented Bronwyn Easterly a teammate of mine on the JAI DT. I wanted to create a night time scene like Bronwyn did but in blue tones, so I got out some Not Quite Navy cardstock and wheeled the Neighbourhood wheel over using Night of Navy ink. Then I trimmed around the upper skyline, and added a little Daffodil Delight window - someone's up late or perhaps its early! For the background I started with a piece of Whisper White cardstock the right size for my box frame. I punched out a 1 3/4" circle and used some dotto to temporarily adhere it where I wanted my moon to be. Then I bravely got out my brayer and inked it up with Not Quite Navy and started working my way from the top of the sky down. Unintentionally the brayer seemed to leave a sort of jumped pattern but I decided I rather liked that, and that it gave the feel of light streaming up or down from the night sky. Once the background was done I coudn't resist adding the Southern Cross silver embossed into the top LHS corner. Then I added the houses at the bottom mounted up on dimensionals. Next up was to get Mr Owl punched. I used some Elegant Soiree DSP for his belly, and subdued colours to match the night scene for the rest of him. Then perched him in the crook of some branches and added one more branch to arch out in front of the moon. The last touch was to sponge some Soft Suede onto the upper frame layer.

I was quite pleased with this and more importantly Mr 2 likes it :)

So why don't you join us this week on Just Add Ink!

Thanks for visiting,
Kim

Recipe: All SU! unless otherwise noted.
Stamps: Neighborhood, Spaceships and Robots (My Cute Stamps)
Cardstock: Whisper White, Not Quite Navy, Always Artichoke, Daffodil Delight, Baja Breeze, Very Vanilla
Ink: Night of Navy, Soft Suede, Versamark
Accessories: Box frame, Two step bird punch, Owl punch, 1 3/4" circle punch, Elegant Soiree DSP, Brayer, Silver Embossing powder, Dimensionals, SNAIL adhesive, sponge